49 - Cabinet Maker's Tool Chest, страница 18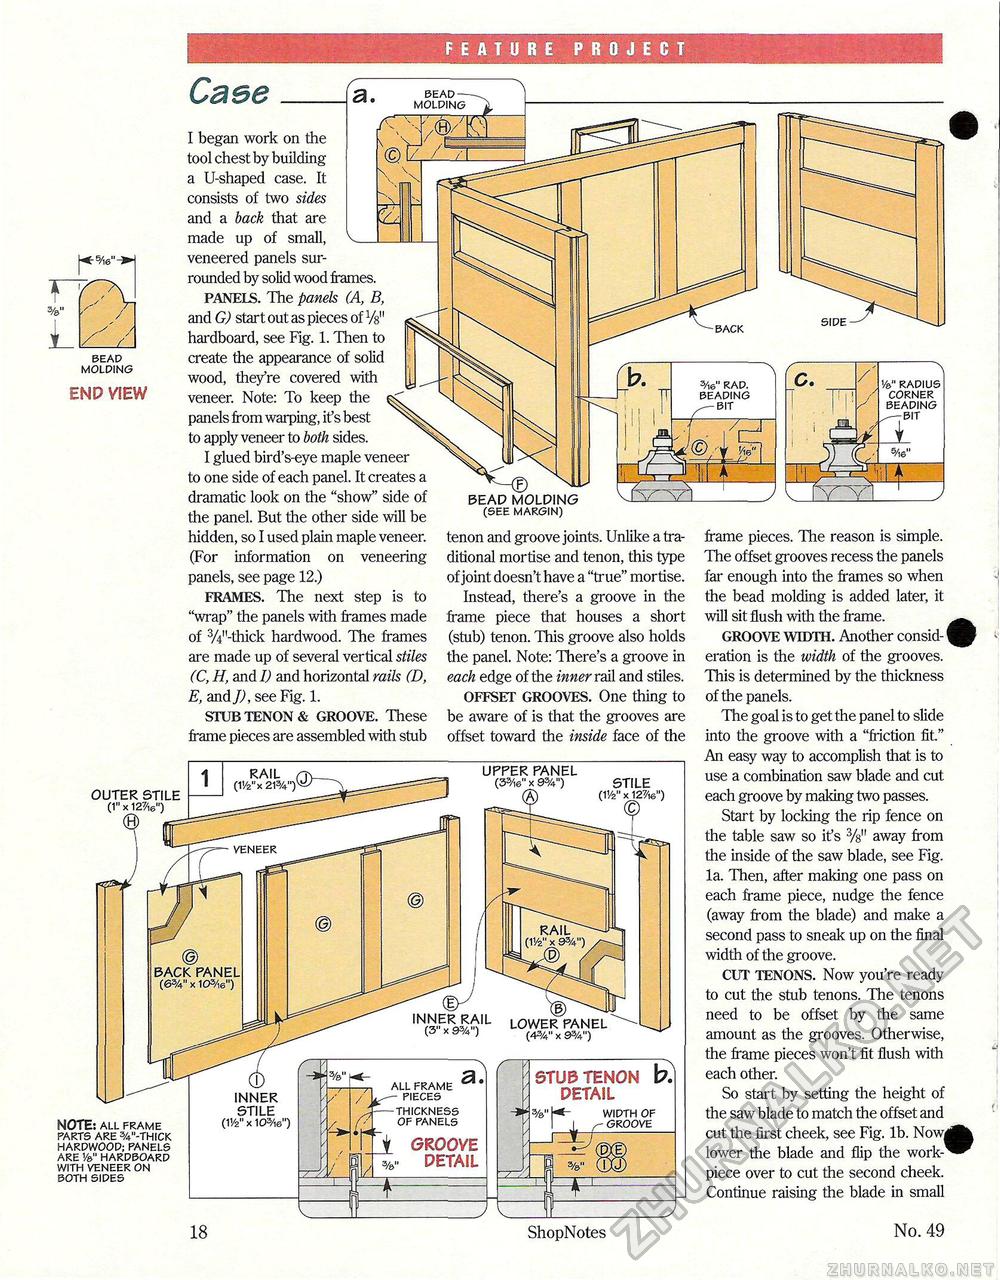
FEATURE PROJECT Case END VIEW I began work on the tool chest by building a U-shaped case. It consists of two sides and a back that are made up of small, veneered panels surrounded by solid wood frames. PANELS. The panels (A, B, and G) start out as pieces of Vs" hardboard, see Fig. 1. Then to create the appearance of solid wood, they're covered with veneer. Note: To keep the panels from warping, it's best to apply veneer to both sides. I glued bird's-eye maple veneer to one side of each panel. It creates; dramatic look on the "show" side of the panel. But the other side will be hidden, so I used plain maple veneer. (For information on veneering panels, see page 12.) frames. The next step is to "wrap" the panels with frames made of 3/4n-thick hardwood. The frames are made up of several vertical stiles (C, H, and I) and horizontal rails (D, E, and J), see Fig. 1. STUB TENON & GROOVE. These frame pieces are assembled with stub BEAD MOLDING (see margin) tenon and groove joints. Unlike a traditional mortise and tenon, this type of joint doesn't have a "true" mortise. Instead, there's a groove in the frame piece that houses a short (stub) tenon. This groove also holds the panel. Note: There's a groove in each edge of the inner rail and stiles. OFFSET GROOVES. One thing to be aware of is that the grooves are offset toward the inside face of the frame pieces. The reason is simple. The offset grooves recess the panels far enough into the frames so when the bead molding is added later, it will sit flush with the frame. GROOVE WIDTH. Another consid-! eration is the width of the grooves. This is determined by the thickness of the panels. The goal is to get the panel to slide into the groove with a "friction fit." An easy way to accomplish that is to use a combination saw blade and cut each groove by making two passes. Start by locking the rip fence on the table saw so it's away from the inside of the saw blade, see Fig. la. Then, after making one pass on each frame piece, nudge the fence (away from the blade) and make a second pass to sneak up on the final width of the groove. CUT TENONS. Now you're ready to cut the stub tenons. The tenons need to be offset by the same amount as the grooves. Otherwise, the frame pieces won't fit flush with each other. So start by setting the height of the saw blade to match the offset and cut the first cheek, see Fig. lb. Now^k lower the blade and flip the work-^^ piece over to cut the second cheek. Continue raising the blade in small 18 ShopNotes No. 49 UPPER PANEL (35/ie" x 9%") RAIL , (1'/2"x 213/4") STILE (1'/2" X 127/is") OUTER STILE (1" x 127/,6") VENEER BACK PANEL (6%" X 103/16") INNER RAIL (3" x 9%") LOWER PANEL (434" x 93/4") STUB TENON b, DETAIL %" H<- WIPTH OF I GROOVE ALL FRAME - PIECES -THICKNESS OF PANELS INNER STILE (11/2" X 105/16") NOTE: ALL FRAME PARTS ARE 3/4"-THICK HARPWOOP; PANELS ARE Vs." HARPBOARP WITH VENEER ON BOTH SIPES GROOVE DETAIL |


