49 - Cabinet Maker's Tool Chest, страница 21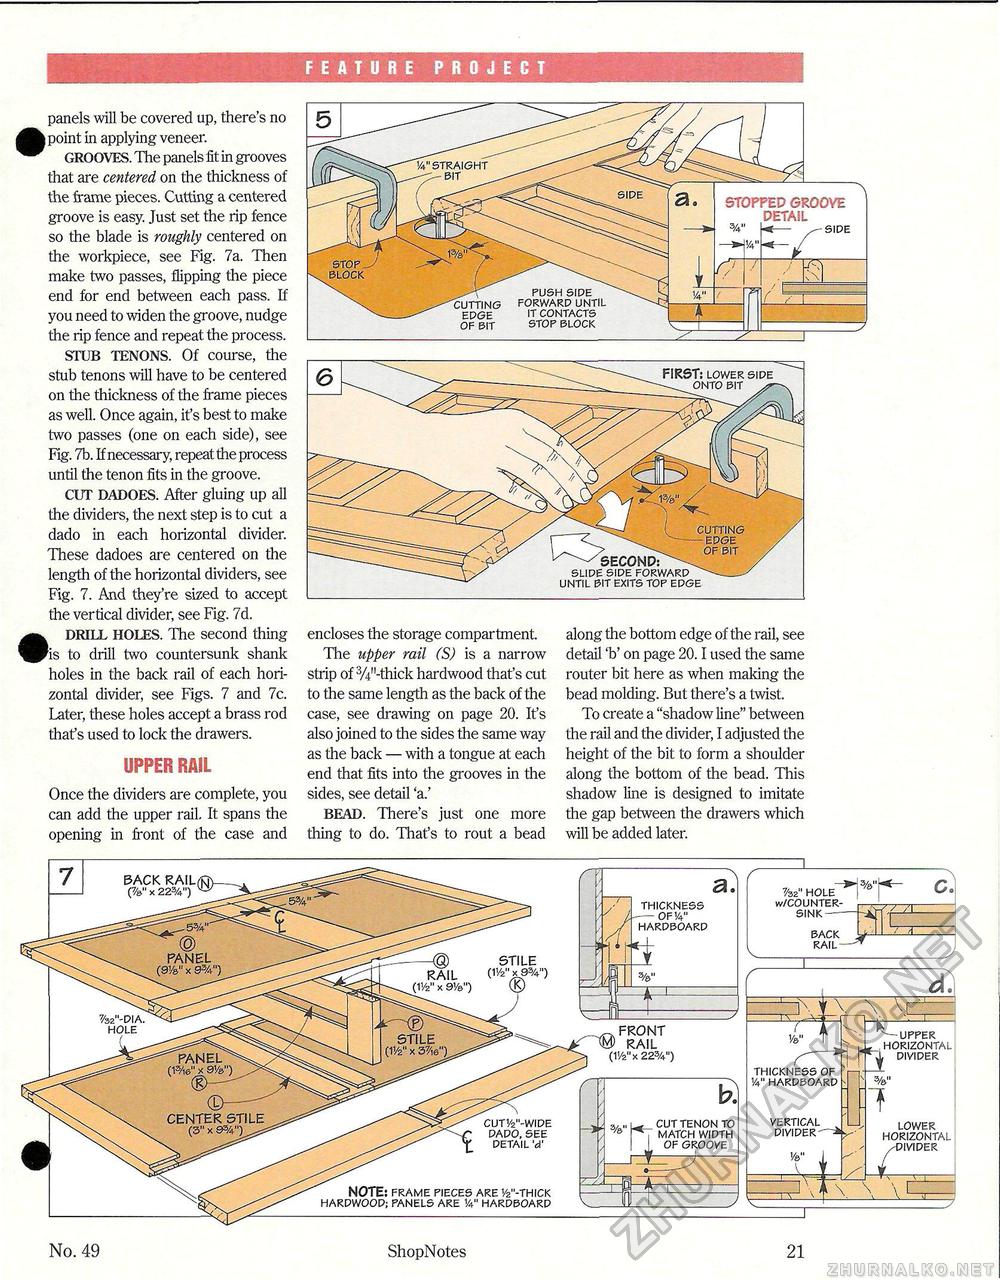
FEATURE PROJECT panels will be covered up, there's no (point in applying veneer. GROOVES. The panels fit in grooves that are centered on the thickness of the frame pieces. Cutting a centered groove is easy. Just set the rip fence so the blade is roughly centered on the workpiece, see Fig. 7a. Then make two passes, flipping the piece end for end between each pass. If you need to widen the groove, nudge the rip fence and repeat the process. STUB TENONS. Of course, the stub tenons will have to be centered on the thickness of the frame pieces as well. Once again, it's best to make two passes (one on each side), see Fig. 7b. If necessary, repeat the process until the tenon fits in the groove. CUT DADOES. After gluing up all the dividers, the next step is to cut a dado in each horizontal divider. These dadoes are centered on the length of the horizontal dividers, see Fig. 7. And they're sized to accept the vertical divider, see Fig. 7d. DRILL HOLES. The second thing fis to drill two countersunk shank holes in the back rail of each horizontal divider, see Figs. 7 and 7c. Later, these holes accept a brass rod that's used to lock the drawers. UPPER RAIL Once the dividers are complete, you can add the upper rail. It spans the opening in front of the case and encloses the storage compartment. The upper rail (S) is a narrow strip of 3/4n-thick hardwood that's cut to the same length as the back of the case, see drawing on page 20. It's also joined to the sides the same way as the back — with a tongue at each end that fits into the grooves in the sides, see detail 'a.' BEAD. There's just one more thing to do. That's to rout a bead along the bottom edge of the rail, see detail 'b' on page 20.1 used the same router bit here as when making the bead molding. But there's a twist. To create a "shadow line" between the rail and the divider, I adjusted the height of the bit to form a shoulder along the bottom of the bead. This shadow line is designed to imitate the gap between the drawers which will be added later. !4" straight bit stop block _ cutting edge of bit STOPPED GROOVE DETAIL 3/4" V/4"|" T push side forward until it contacts stop block b. „ cut tenon to 3 fl match width of groove FRONT RAIL (11/2"x 223/4") %2"-dia. hole thickness 0F1/4" hardboard BACK X cut'/2m-wide dado, see detail 'a' NOTE: frame pieces are '/2"-thick hardwood; panels are v4" hardboard No. 49 ShopNotes 21 |


