49 - Cabinet Maker's Tool Chest, страница 15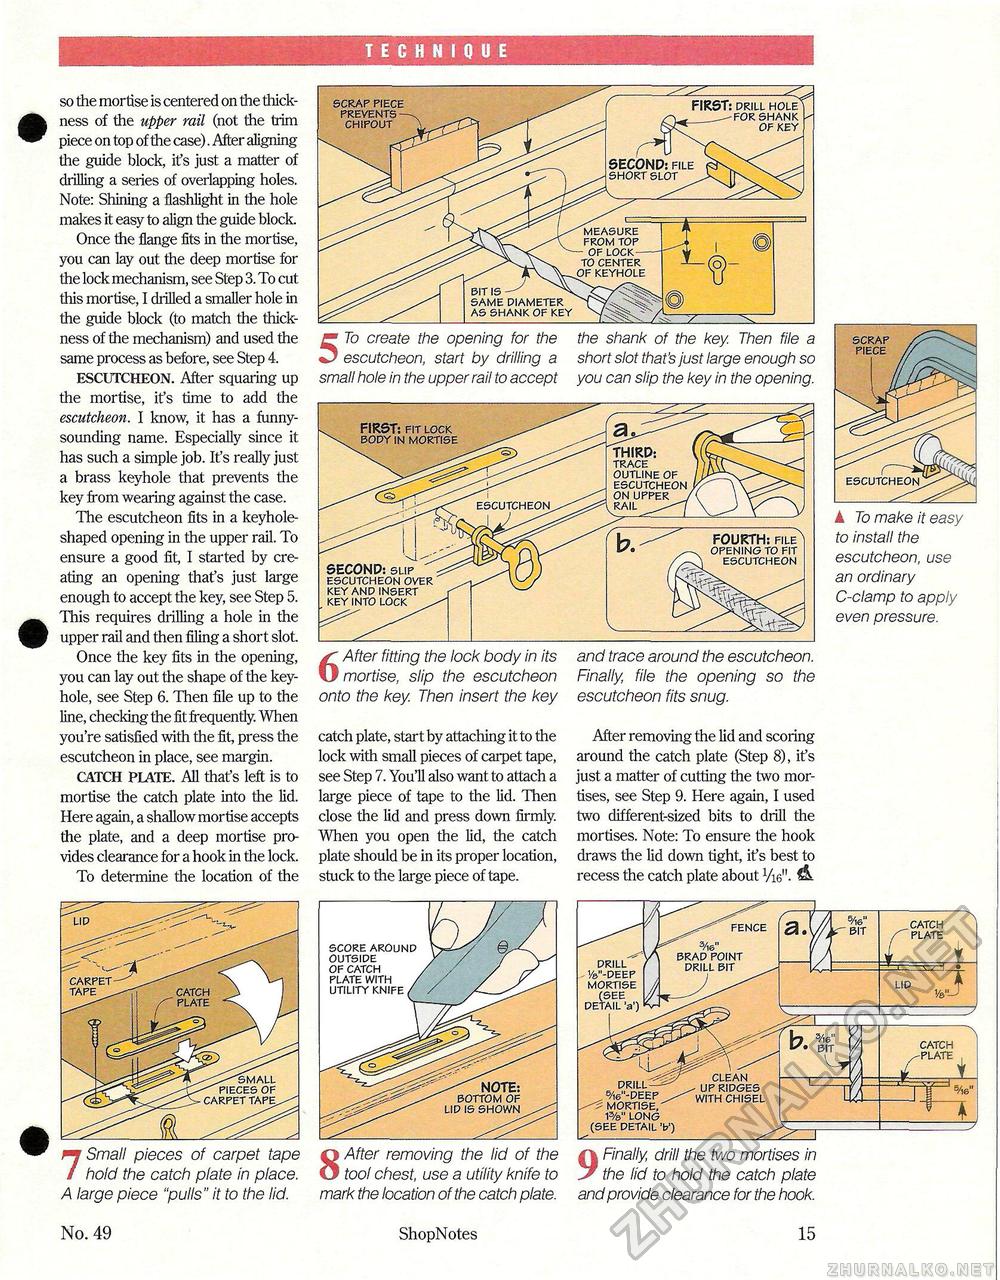
TECHNIQUE 5 To create the opening for the the shank of the key. Then file a escutcheon, start by drilling a short slot that's just large enough so small hole in the upper rail to accept you can slip the key in the opening. so the mortise is centered on the thickness of the upper rail (not the trim piece on top of the case). After aligning the guide block, its just a matter of drilling a series of overlapping holes. Note: Shining a flashlight in the hole makes it easy to align the guide block. Once the flange fits in the mortise, you can lay out the deep mortise for the lock mechanism, see Step 3. To cut this mortise, I drilled a smaller hole in the guide block (to match the thickness of the mechanism) and used the same process as before, see Step 4. ESCUTCHEON. After squaring up the mortise, it's time to add the escutcheon. I know, it has a funny-sounding name. Especially since it has such a simple job. It's really just a brass keyhole that prevents the key from wearing against the case. The escutcheon fits in a keyhole-shaped opening in the upper rail. To ensure a good fit, I started by creating an opening that's just large enough to accept the key, see Step 5. This requires drilling a hole in the upper rail and then filing a short slot Once the key fits in the opening, you can lay out the shape of the keyhole, see Step 6. Then file up to the line, checking the fit frequently. When you're satisfied with the fit, press the escutcheon in place, see margin. catch plate. All thafs left is to mortise the catch plate into the lid. Here again, a shallow mortise accepts the plate, and a deep mortise provides clearance for a hook in the lock. To determine the location of the 6 After fitting the lock body in its mortise, slip the escutcheon onto the key Then insert the key catch plate, start by attaching it to the lock with small pieces of carpet tape, see Step 7. You'll also want to attach a large piece of tape to the lid. Then close the lid and press down firmly. When you open the lid, the catch plate should be in its proper location, stuck to the large piece of tape. and trace around the escutcheon. Finally file the opening so the escutcheon fits snug. After removing the lid and scoring around the catch plate (Step 8), it's just a matter of cutting the two mortises, see Step 9. Here again, I used two clifferent-sized bits to drill the mortises. Note: To ensure the hook draws the lid down tight, it's best to recess the catch plate about Vie". to install the escutcheon, use an ordinary C-clamp to apply even pressure. 7 Small pieces of carpet tape hold the catch plate in place. A large piece "pulls" it to the lid. 8 After removing the lid of the tool chest, use a utility knife to mark the location of the catch plate. SCRAP PIECE PREVENTS -CHIPOUT SECOND: file short slot measure from top - of lock— to center of keyhole bit is same diameter as shank of key FIRST: drill hole -for shank OF key FIRST: fit lock body IN mortise escutcheon THIRD: trace outline of escutcheon on upper rail SECOND: slip escutcheon over key and insert key into lock FOURTH: file^ opening to fit escutcheon score around outside of catch plate with utility knife DRILL 1/b"-DEEP MORTISE (SEE DETAIL 'a') DRILL „ 5/i6"-DEEP MORTISE, 1%" LONG (SEE DETAIL 'b') -- ur WITH CHISEL 9 Finally, drill the two mortises in the lid to hold the catch plate and provide clearance for the hook. ^.v^kr- BIT u= CATCH PLATE No. 49 ShopNotes 15 |


