49 - Cabinet Maker's Tool Chest, страница 14
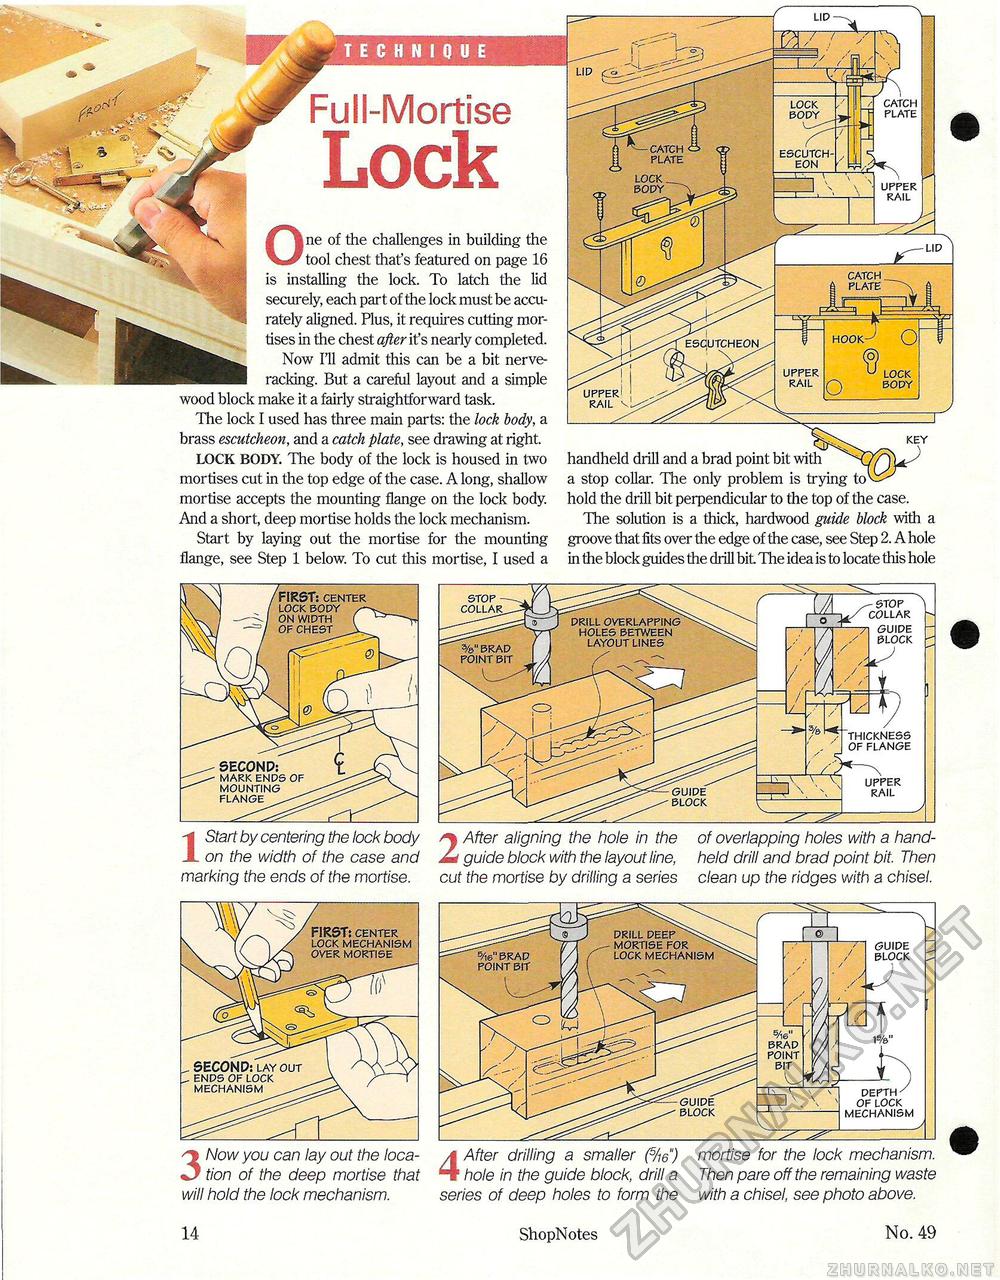
Full-Mortise Lock lock r nnv 0; ne of the challenges in building the tool chest that's featured on page 16 is installing the lock. To latch the lid securely, each part of the lock must be accurately aligned. Plus, it requires cutting mortises in the chest after it's nearly completed. Now I'll admit this can be a bit nerve-racking. But a careful layout and a simple wood block make it a fairly straightforward task. The lock I used has three main parts: the lock body, a brass escutcheon, and a catch plate, see drawing at right. LOCK BODY. The body of the lock is housed in two mortises cut in the top edge of the case. A long, shallow mortise accepts the mounting flange on the lock body. And a short, deep mortise holds the lock mechanism. Start by laying out the mortise for the mounting flange, see Step 1 below. To cut this mortise, I used a handheld drill and a brad point bit with a stop collar. The only problem is trying to hold the drill bit perpendicular to the top of the case. The solution is a thick, hardwood guide block with a groove that fits over the edge of the case, see Step 2. A hole in the block guides the drill bit The idea is to locate this hole RAIL CATCH PLATE UPPER RAIL HOOK UPPER RAIL LOCK BODY SECONP: MARK ENDS OF MOUNTING FLANGE DRILL OVERLAPPING HOLES BETWEEN LAYOUT LINES %" BRAD GUIDE BLOCK -STOP COLLAR -71 GUIDE BLOCK m / THICKNESS OF FLANGE UPPER RAIL STOP COLLAR^ POINT BIT 1 Start by centering the lock body on the width of the case and marking the ends of the mortise. 2 After aligning the hole in the guide block with the layout line, cut the mortise by drilling a series of overlapping holes with a handheld drill and brad point bit. Then clean up the ridges with a chisel. 3 Now you can lay out the location of the deep mortise that will hold the lock mechanism. DRILL DEEP ^^ MORTISE FOR ^ LOCK MECHANISM GUIDE %="BRAD POINT BIT BLOCK BRAD POINT DEPTH" OF LOCK MECHANISM GUIDE BLOCK 4 After drilling a smaller (5/i6") hole in the guide block, drill a series of deep holes to form the mortise for the lock mechanism. Then pare off the remaining waste with a chisel, see photo above. 14 ShopNotes No. 49 |


