58 - Miter Saw Station, страница 18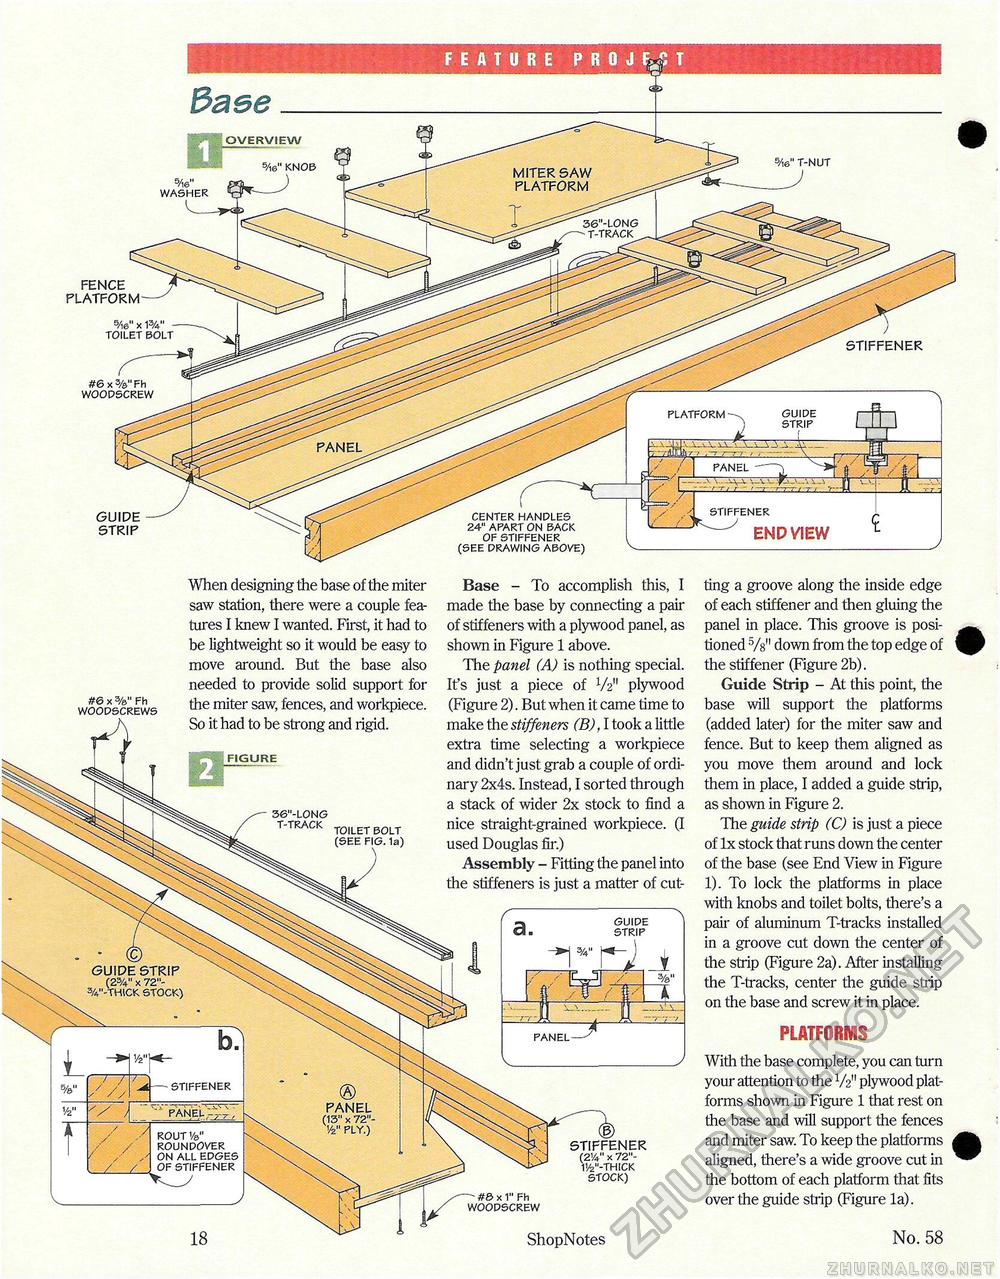
5Ae" T-NUT 5Ae" WASHER 5/ie" KNOB 5Ae" T-NUT FENCE PLATFORM- #6x%"Fh WOODSCREW GUIDE STRIP #6 x %" Fh WOODSCREWS When designing the base of the miter saw station, there were a couple features I knew I wanted. First, it had to be lightweight so it would be easy to move around. But the base also needed to provide solid support for the miter saw, fences, and workpiece. So it had to be strong and rigid. Base - To accomplish this, I made the base by connecting a pair of stiffeners with a plywood panel, as shown in Figure 1 above. The panel (A) is nothing special. It's just a piece of V211 plywood (Figure 2). But when it came time to make the stiffeners (B), I took a little extra time selecting a workpiece and didn't just grab a couple of ordinary 2x4s. Instead, I sorted through a stack of wider 2x stock to find a nice straight-grained workpiece. (I used Douglas fir.) Assembly - Fitting the panel into the stiffeners is just a matter of cut GUIDE STRIP
STIFFENER (2V4" x 72"-1V2"-THICK STOCK) #6 x 1" Fh WOODSCREW 18 ShopNotes ting a groove along the inside edge of each stiffener and then gluing the panel in place. This groove is positioned 5/s" down from the top edge of the stiffener (Figure 2b). Guide Strip - At this point, the base will support the platforms (added later) for the miter saw and fence. But to keep them aligned as you move them around and lock them in place, I added a guide strip, as shown in Figure 2. The guide strip (C) is just a piece of lx stock that runs down the center of the base (see End View in Figure 1). To lock the platforms in place with knobs and toilet bolts, there's a pair of aluminum T-tracks installed in a groove cut down the center of the strip (Figure 2a). After installing the T-tracks, center the guide strip on the base and screw it in place. PLATFORMS With the base complete, you can turn your attention to the V2'1 plywood platforms shown in Figure 1 that rest on the base and will support the fences and miter saw. To keep the platforms aligned, there's a wide groove cut in the bottom of each platform that fits over the guide strip (Figure la). No. 58 |
|||||||||||||||||||||


