58 - Miter Saw Station, страница 21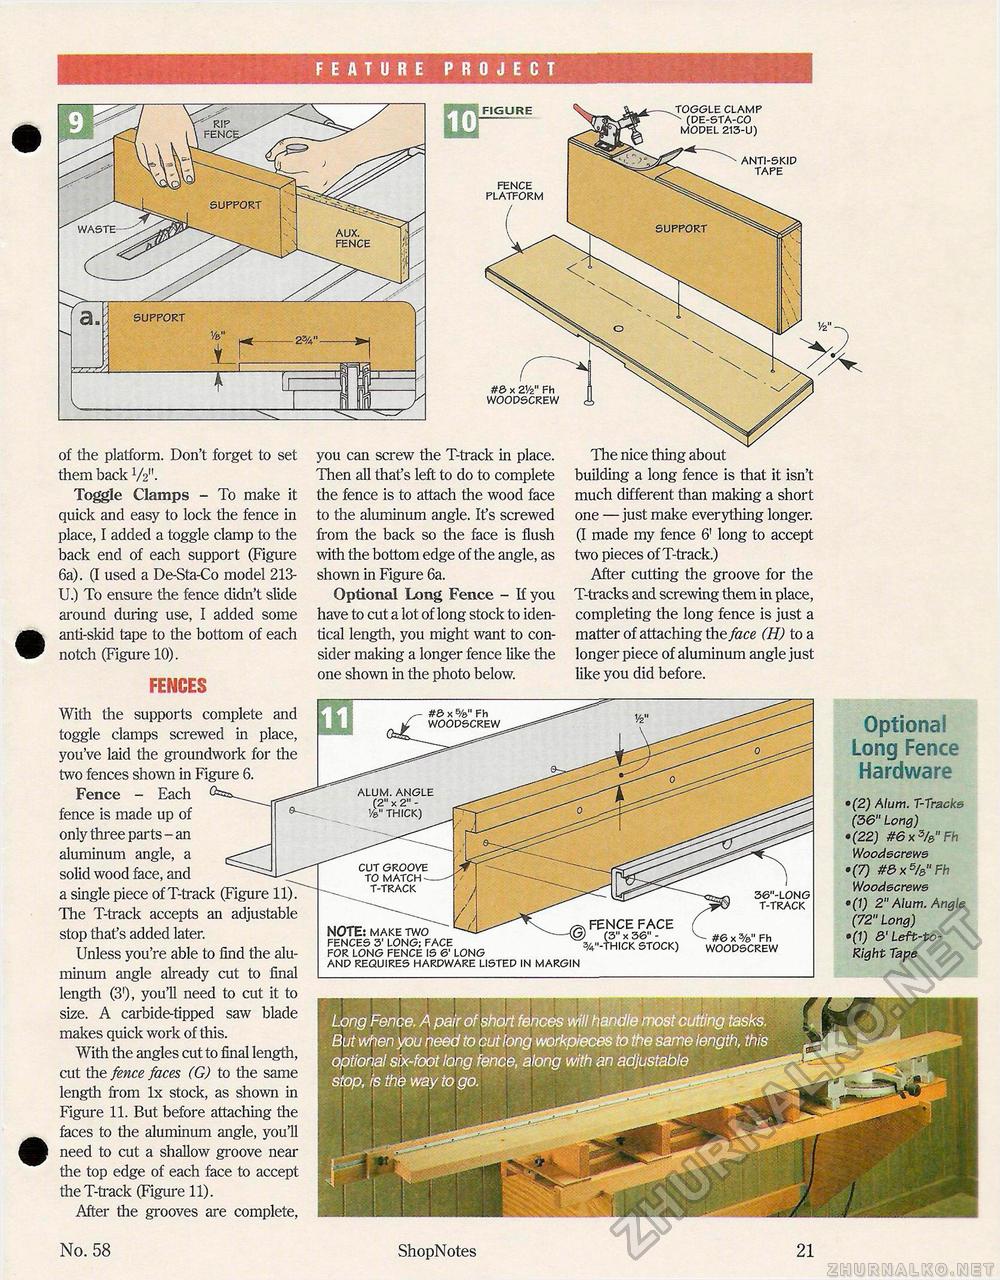
FEATURE PROJECT of the platform. Don't forget to set them back V2". Toggle Clamps - To make it quick and easy to lock the fence in place, I added a toggle clamp to the back end of each support (Figure 6a). (I used a De-Sta-Co model 213-U.) To ensure the fence didn't slide around during use, I added some • anti-skid tape to the bottom of each notch (Figure 10). 5 RIP FENC! SUPPORT WASTE SUPPORT Long Fence, A pair of short fences will handle most cutting tasks. But when you need to cut long workpieces to the same length, this optional six-foot long fence, along with an adjustable stop, is the way to go. #8x %" Fh WOODSCREW FENCES With the supports complete and toggle clamps screwed in place, you've laid the groundwork for the two fences shown in Figure 6. Fence - Each fence is made up of only three parts - an aluminum angle, a solid wood face, and a single piece of T-track (Figure 11). The T-track accepts an adjustable stop that's added later. Unless you're able to find the aluminum angle already cut to final length (31), you'll need to cut it to size. A carbide-tipped saw blade makes quick work of this. With the angles cut to final length, cut the fence faces (G) to the same length from lx stock, as shown in Figure 11. But before attaching the faces to the aluminum angle, you'll need to cut a shallow groove near the top edge of each face to accept the T-track (Figure 11). After the grooves are complete, you can screw the T-track in place. Then all that's left to do to complete the fence is to attach the wood face to the aluminum angle. It's screwed from the back so the face is flush with the bottom edge of the angle, as shown in Figure 6a. Optional Long Fence - If you have to cut a lot of long stock to identical length, you might want to consider making a longer fence like the one shown in the photo below. The nice thing about building a long fence is that it isn't much different than making a short one — just make everything longer. (I made my fence 6' long to accept two pieces of T-track.) After cutting the groove for the T-tracks and screwing them in place, completing the long fence is just a matter of attaching the face (H) to a longer piece of aluminum angle just like you did before. ALUM. ANGLE (2"x 2" -V&" THICK) CUT GROOVE TO MATCH -T-TRACK 36"-L0NG T-TRACK NOTE: MAKE TWO FENCES 3' LONG; FACE FOR LONG FENCE IS & LONG ' (3 x 36 -%"-THICK STOCK) #6 x Fh WOODSCREW AND REQUIRES HARDWARE LISTED IN MARGIN FIGURE TOGGLE CLAMP (DE-STA-CO MODEL 213-U) FENCE PLATFORM ANTI-SKID TAPE Optional Long Fence Hardware •(2) Alum. T-Tracks (36" Long) • (22) #6 x %" Fh Woodscrews •(,7) #&x5/a"Fh Woodscrews • (1) 2" Alum. Angle (72" Long) • (1) 3' Left-to-Right Tape No. 58 ShopNotes 21 |


