58 - Miter Saw Station, страница 22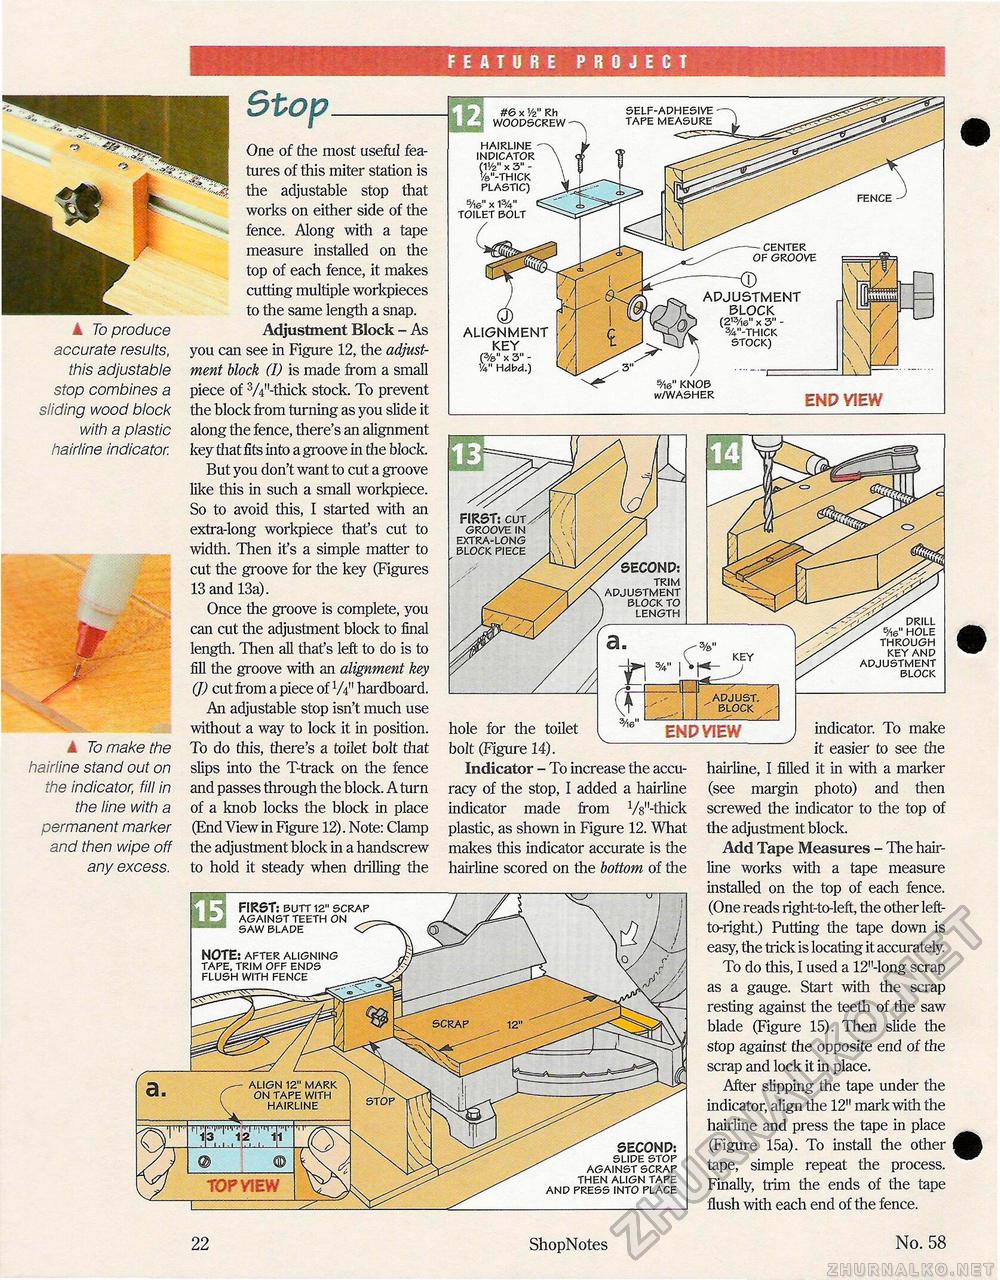
FEATURE PROJECT Stop k To produce accurate results, this adjustable stop combines a sliding wood block with a plastic hairline indicator. k To make the hairline stand out on the indicator, fill in the line with a permanent marker and then wipe off any excess. One of the most useful features of this miter station is the adjustable stop that works on either side of the fence. Along with a tape measure installed on the top of each fence, it makes cutting multiple workpieces to the same length a snap. Adjustment Block - As you can see in Figure 12, the adjustment block (I) is made from a small piece of W'-thick stock. To prevent the block from turning as you slide it along the fence, there's an alignment key that fits into a groove in the block. But you don't want to cut a groove like this in such a small workpiece. So to avoid this, I started with an extra-long workpiece that's cut to width. Then it's a simple matter to cut the groove for the key (Figures 13 and 13a). Once the groove is complete, you can cut the adjustment block to final length. Then all that's left to do is to fill the groove with an alignment key (J) cut from a piece of W hardboard. An adjustable stop isn't much use without a way to lock it in position. To do this, there's a toilet bolt that slips into the T-track on the fence and passes through the block. A turn of a knob locks the block in place (End View in Figure 12). Note: Clamp the adjustment block in a handscrew to hold it steady when drilling the hole for the toilet bolt (Figure 14). Indicator - To increase the accuracy of the stop, I added a hairline indicator made from VV'-thick plastic, as shown in Figure 12. What makes this indicator accurate is the hairline scored on the bottom of the END VIEW indicator. To make it easier to see the hairline, I filled it in with a marker (see margin photo) and then screwed the indicator to the top of the adjustment block. Add Tape Measures - The hairline works with a tape measure installed on the top of each fence. (One reads right-to-left, the other left-to-right) Putting the tape down is easy, the trick is locating it accurately. To do this, I used a 12"-long scrap as a gauge. Start with the scrap resting against the teeth of the saw blade (Figure 15). Then slide the stop against the opposite end of the scrap and lock it in place. After slipping the tape under the indicator, align the 12" mark with the hairline and press the tape in place (Figure 15a). To install the other tape, simple repeat the process. Finally, trim the ends of the tape flush with each end of the fence. 22 ShopNotes No. 58 |


