58 - Miter Saw Station, страница 23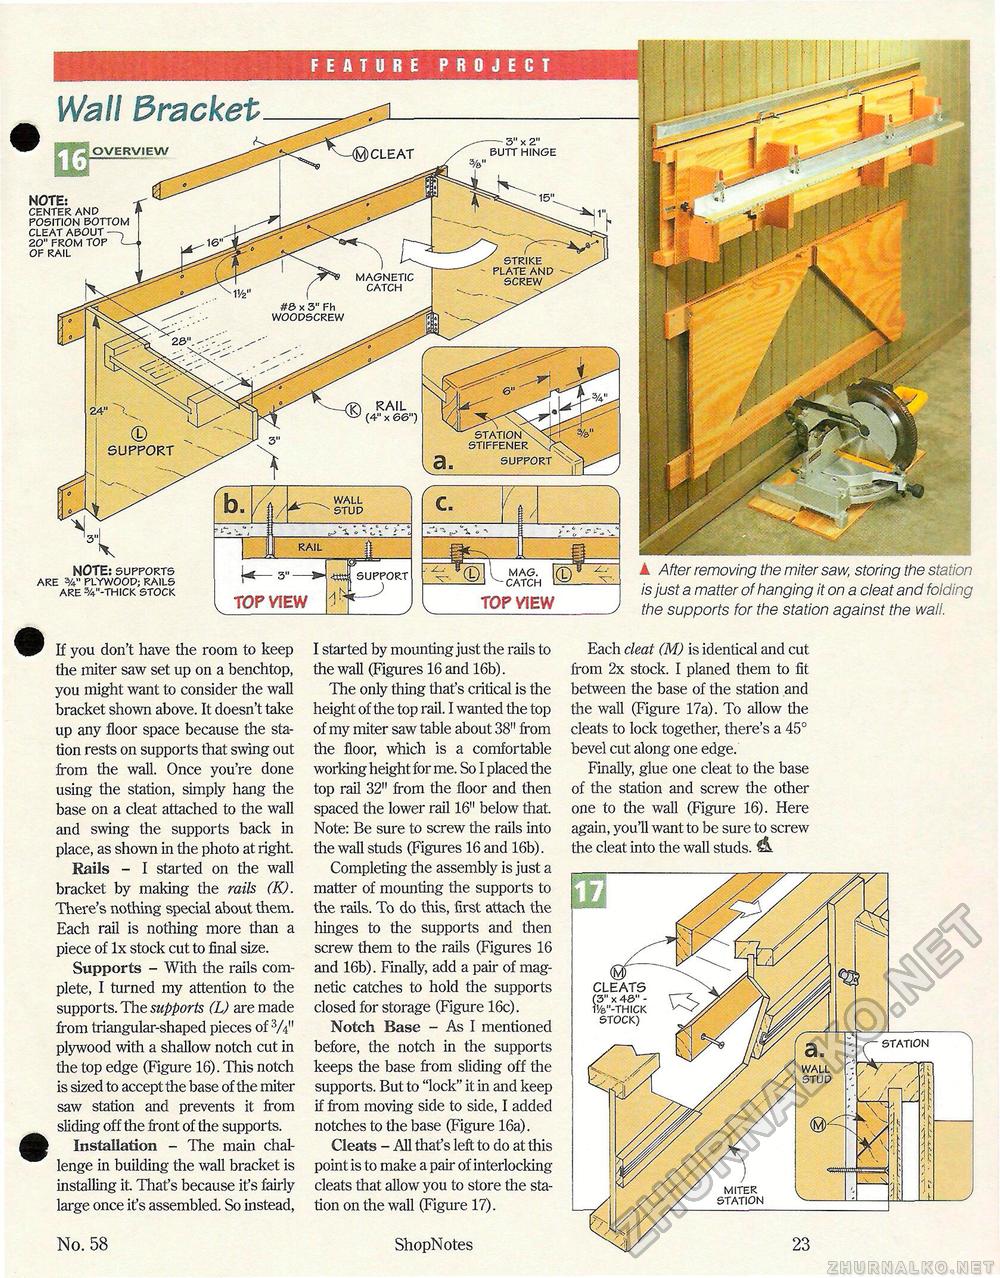
Wall Bracket OVERVIEW RAIL (4" X 66") © SUPPORT stiffener support NOTE: supports are plywood; rails are 3/4"-thick stock
(d v mag. ^ ^-catch © TOP VIEW A After removing the miter saw, storing the station is just a matter of hanging it on a cleat and folding the supports for the station against the wall. If you don't have the room to keep the miter saw set up on a benchtop, you might want to consider the wall bracket shown above. It doesn't take up any floor space because the station rests on supports that swing out from the wall. Once you're done using the station, simply hang the base on a cleat attached to the wall and swing the supports back in place, as shown in the photo at right. Rails - I started on the wall bracket by making the rails (K). There's nothing special about them. Each rail is nothing more than a piece of lx stock cut to final size. Supports - With the rails complete, I turned my attention to the supports. The supports (L) are made from triangular-shaped pieces of V4" plywood with a shallow notch cut in the top edge (Figure 16). This notch is sized to accept the base of the miter saw station and prevents it from sliding off the front of the supports. Installation - The main challenge in building the wall bracket is installing it That's because it's fairly large once it's assembled. So instead, I started by mounting just the rails to the wall (Figures 16 and 16b). The only thing that's critical is the height of the top rail. I wanted the top of my miter saw table about 38" from the floor, which is a comfortable working height for me. So I placed the top rail 32" from the floor and then spaced the lower rail 16" below that. Note: Be sure to screw the rails into the wall studs (Figures 16 and 16b). Completing the assembly is just a matter of mounting the supports to the rails. To do this, first attach the hinges to the supports and then screw them to the rails (Figures 16 and 16b). Finally, add a pair of magnetic catches to hold the supports closed for storage (Figure 16c). Notch Base - As I mentioned before, the notch in the supports keeps the base from sliding off the supports. But to "lock" it in and keep if from moving side to side, I added notches to the base (Figure 16a). Cleats - All that's left to do at this point is to make a pair of interlocking cleats that allow you to store the station on the wall (Figure 17). Each deat (M) is identical and cut from 2x stock. I planed them to fit between the base of the station and the wall (Figure 17a). To allow the cleats to lock together, there's a 45° bevel cut along one edge. Finally, glue one cleat to the base of the station and screw the other one to the wall (Figure 16). Here again, you'll want to be sure to screw the cleat into the wall studs. A CLEATS (3" x 43" -I1/a"-TH ICK STOCK) station 3" x 2" butt hinge NOTE: center and position bottom cleat about 20" from top of rail No. 58 ShopNotes 23 |
||||||||||||||||


