58 - Miter Saw Station, страница 26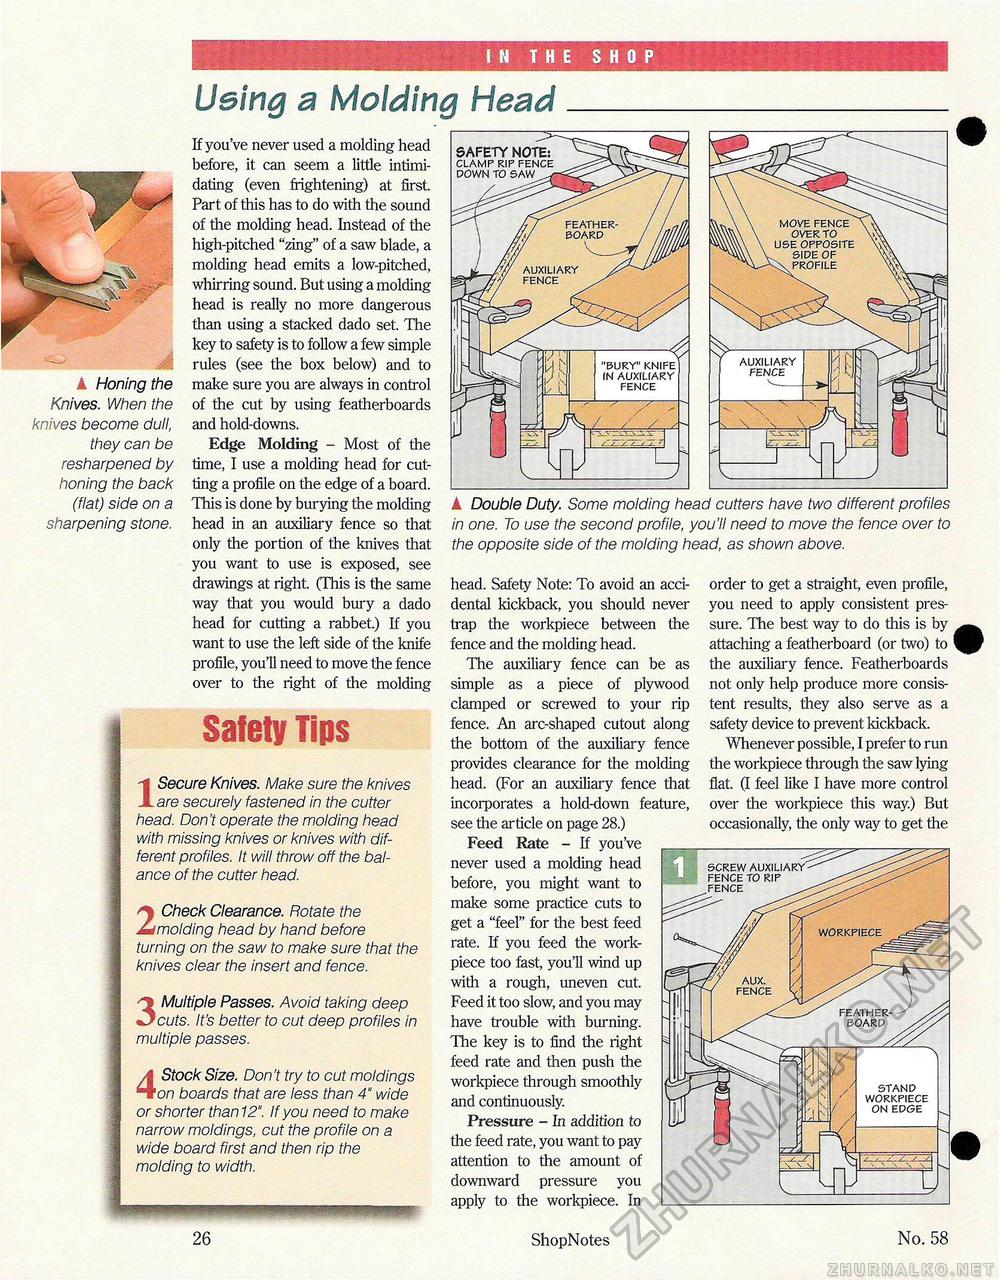
I N THE SHOP k Honing the Knives. When the knives become dull, they can be resharpened by honing the back (flat) side on a sharpening stone. Using a Molding HeadIf you've never used a molding head before, it can seem a little intimidating (even frightening) at first. Part of this has to do with the sound of the molding head. Instead of the high-pitched "zing" of a saw blade, a molding head emits a low-pitched, whirring sound. But using a molding head is really no more dangerous than using a stacked dado set. The key to safety is to follow a few simple rules (see the box below) and to make sure you are always in control of the cut by using featherboards and hold-downs. Edge Molding - Most of the time, I use a molding head for cutting a profile on the edge of a board. This is done by burying the molding head in an auxiliary fence so that only the portion of the knives that you want to use is exposed, see drawings at right. (This is the same way that you would bury a dado head for cutting a rabbet) If you want to use the left side of the knife profile, you'll need to move the fence over to the right of the molding k Double Duty. Some molding head cutters have two different profiles in one. To use the second profile, you'll need to move the fence over to the opposite side of the molding head, as shown above. Safety Tips 1 Secure Knives. Make sure the knives are securely fastened in the cutter head. Don't operate the molding head with missing knives or knives with different profiles. It will throw off the balance of the cutter head. 2 Check Clearance. Rotate the molding head by hand before turning on the saw to make sure that the knives clear the insert and fence. 3 Multiple Passes. Avoid taking deep cuts. It's better to cut deep profiles in multiple passes. 4 Stock Size. Don't try to cut moldings on boards that are less than 4" wide or shorter than 12". If you need to make narrow moldings, cut the profile on a wide board first and then rip the molding to width. head. Safety Note: To avoid an accidental kickback, you should never trap the workpiece between the fence and the molding head. The auxiliary fence can be as simple as a piece of plywood clamped or screwed to your rip fence. An arc-shaped cutout along the bottom of the auxiliary fence provides clearance for the molding head. (For an auxiliary fence that incorporates a hold-down feature, see the article on page 28.) Feed Rate - If you've never used a molding head before, you might want to make some practice cuts to get a "feel" for the best feed rate. If you feed the work-piece too fast, you'll wind up with a rough, uneven cut. Feed it too slow, and you may have trouble with burning. The key is to find the right feed rate and then push the workpiece through smoothly and continuously. Pressure - In addition to the feed rate, you want to pay attention to the amount of downward pressure you apply to the workpiece. In order to get a straight, even profile, you need to apply consistent pressure. The best way to do this is by attaching a featherboard (or two) to the auxiliary fence. Featherboards not only help produce more consistent results, they also serve as a safety device to prevent kickback. Whenever possible, I prefer to run the workpiece through the saw lying flat. (I feel like I have more control over the workpiece this way.) But occasionally, the only way to get the 26 ShopNotes No. 58 SAFETY NOTE: CLAMP RIP FENCE DOWN TO SAW t auxiliary fence |


