58 - Miter Saw Station, страница 29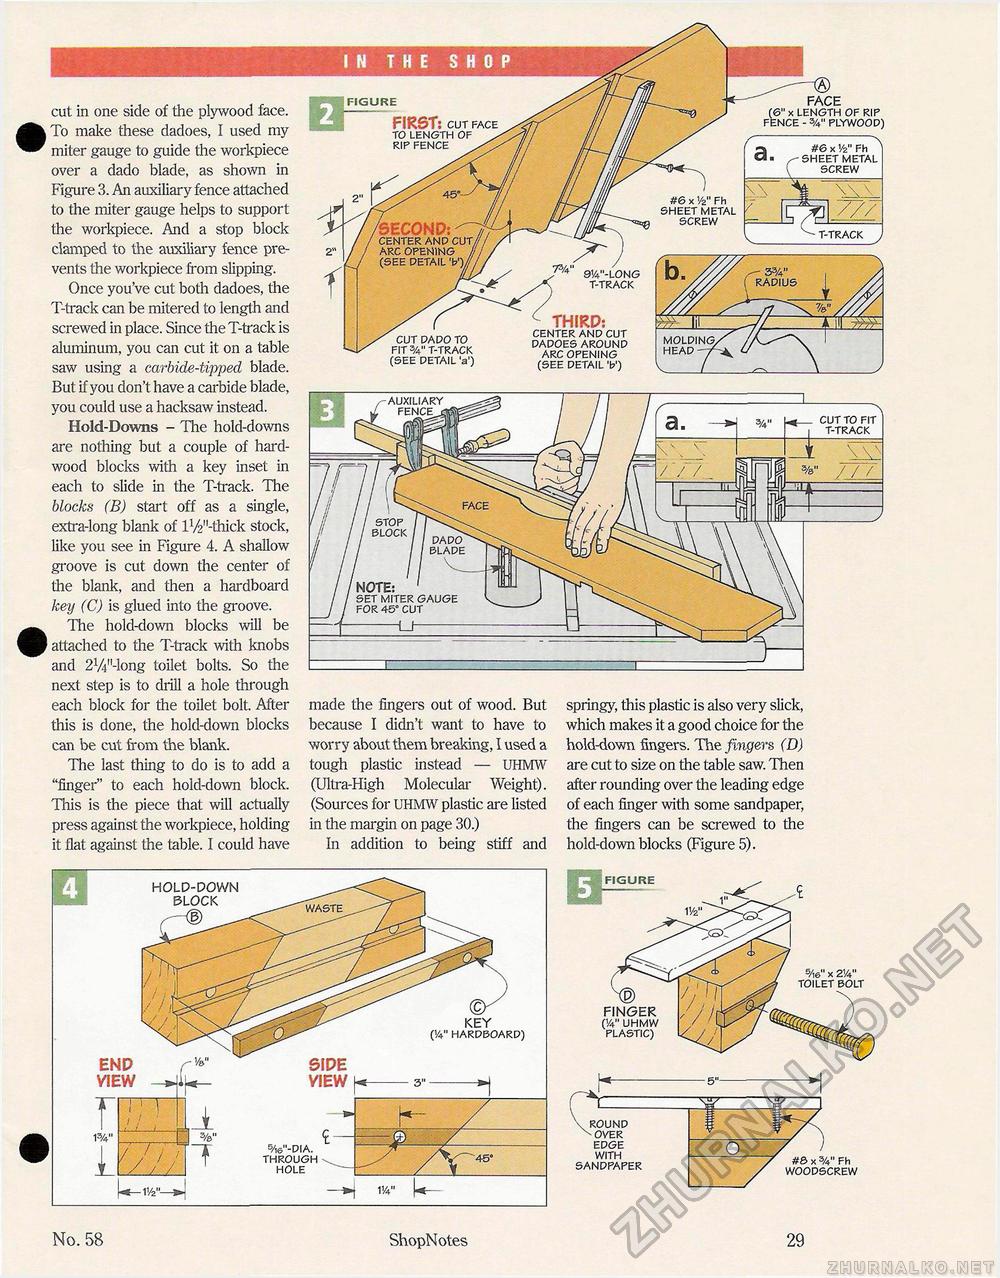
IN THE SHOP cut in one side of the plywood face. • To make these dadoes, I used my miter gauge to guide the workpiece over a dado blade, as shown in Figure 3. An auxiliary fence attached to the miter gauge helps to support the workpiece. And a stop block clamped to the auxiliary fence prevents the workpiece from slipping. Once you've cut both dadoes, the T-track can be mitered to length and screwed in place. Since the T-track is aluminum, you can cut it on a table saw using a carbide-tipped blade. But if you don't have a carbide blade, you could use a hacksaw instead. Hold-Downs - The hold-downs are nothing but a couple of hardwood blocks with a key inset in each to slide in the T-track. The blocks (B) start off as a single, extra-long blank of l1/^'-thick stock, like you see in Figure 4. A shallow groove is cut down the center of the blank, and then a hardboard key (C) is glued into the groove. ^^ The hold-down blocks will be ^P attached to the T-track with knobs and 21A"-long toilet bolts. So the next step is to drill a hole through each block for the toilet bolt. After this is done, the hold-down blocks can be cut from the blank. The last thing to do is to add a "finger" to each hold-down block. This is the piece that will actually press against the workpiece, holding it flat against the table. I could have FIGURE FIRST: CUT FACE TO LENGTH OF RIP FENCE ® FACE (6" x LENGTH OF RIP FENCE - %" PLYWOOD) 'SECONPt CENTER AND CUT ARC OPENING (SEE DETAIL 'b') CUT DADO TO FIT %" T-TRACK (SEE DETAIL 'a') #6 x 1/2" Fh SHEET METAL SCREW CENTER AND CUT DADOES AROUND ARC OPENING (SEE DETAIL V) made the fingers out of wood. But because I didn't want to have to worry about them breaking, I used a tough plastic instead — UHMW (Ultra-High Molecular Weight). (Sources for UHMW plastic are listed in the margin on page 30.) In addition to being stiff and springy, this plastic is also very slick, which makes it a good choice for the hold-down fingers. The fingers (D) are cut to size on the table saw. Then after rounding over the leading edge of each finger with some sandpaper, the fingers can be screwed to the hold-down blocks (Figure 5). HOLD-DOWN BLOCK KEY (V HARDBOARD) SIPE VIEW ENP VIEW 5/i©"-DIA. THROUGH HOLE #&x Fh WOODSCREW FIGURE FINGER (14" UHMW PLASTIC) 5/i6" x 214" TOILET BOLT No. 58 ShopNotes 29 |


