58 - Miter Saw Station, страница 27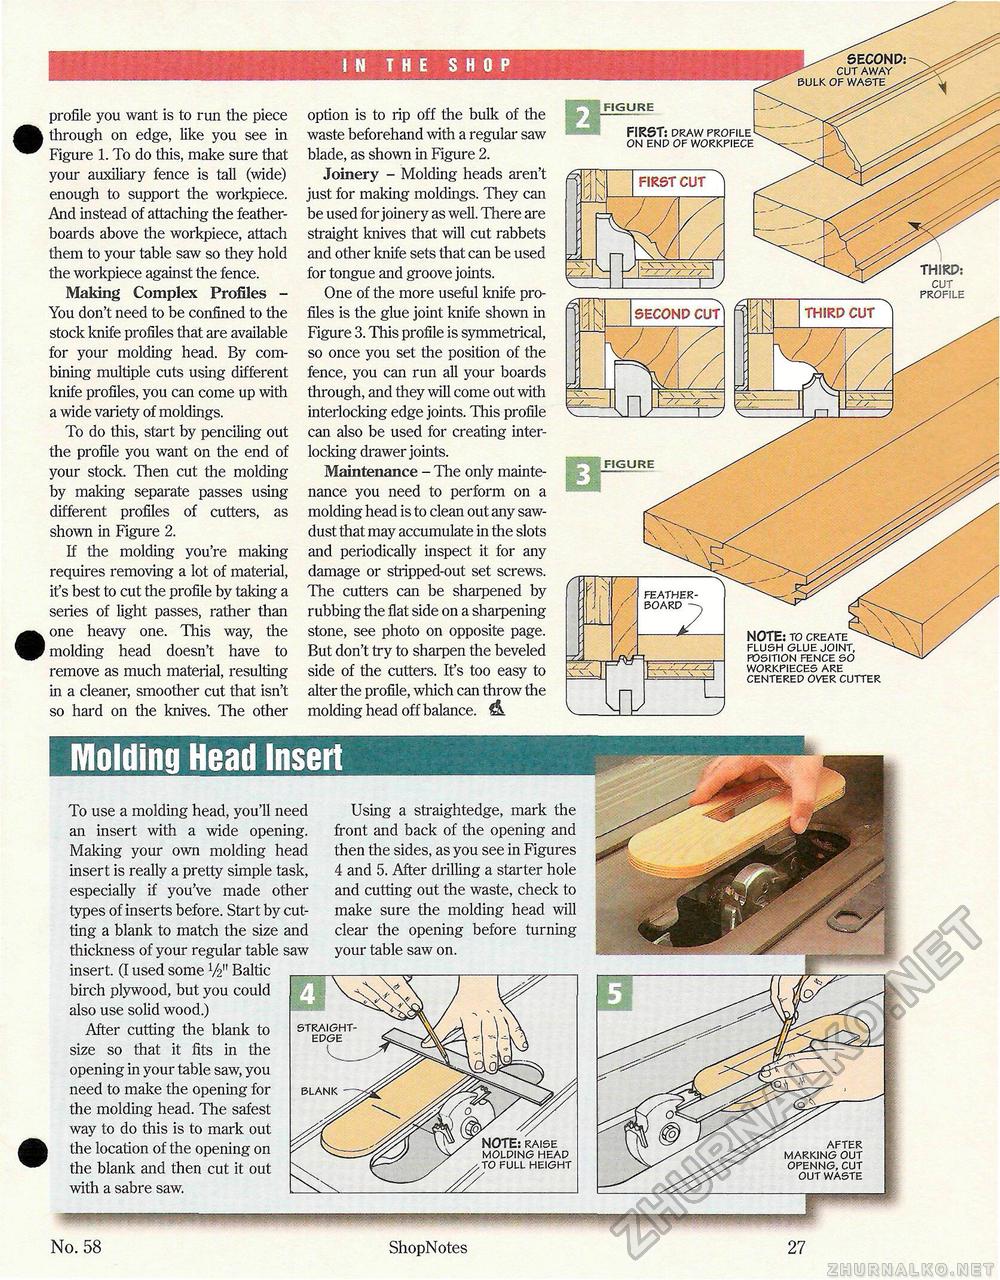
IN THE SHOP profile you want is to run the piece through on edge, like you see in Figure 1. To do this, make sure that your auxiliary fence is tall (wide) enough to support the workpiece. And instead of attaching the feather-boards above the workpiece, attach them to your table saw so they hold the workpiece against the fence. Making Complex Profiles -You don't need to be confined to the stock knife profiles that are available for your molding head. By combining multiple cuts using different knife profiles, you can come up with a wide variety of moldings. To do this, start by penciling out the profile you want on the end of your stock. Then cut the molding by making separate passes using different profiles of cutters, as shown in Figure 2. If the molding you're making requires removing a lot of material, it's best to cut the profile by taking a series of light passes, rather than one heavy one. This way, the molding head doesn't have to remove as much material, resulting in a cleaner, smoother cut that isn't so hard on the knives. The other option is to rip off the bulk of the waste beforehand with a regular saw blade, as shown in Figure 2. Joinery - Molding heads aren't just for making moldings. They can be used for joinery as well. There are straight knives that will cut rabbets and other knife sets that can be used for tongue and groove joints. One of the more useful knife profiles is the glue joint knife shown in Figure 3. This profile is symmetrical, so once you set the position of the fence, you can run all your boards through, and they will come out with interlocking edge joints. This profile can also be used for creating interlocking drawer joints. Maintenance - The only maintenance you need to perform on a molding head is to clean out any sawdust that may accumulate in the slots and periodically inspect it for any damage or stripped-out set screws. The cutters can be sharpened by rubbing the flat side on a sharpening stone, see photo on opposite page. But don't try to sharpen the beveled side of the cutters. It's too easy to alter the profile, which can throw the molding head off balance. ^ SECOND: cut away bulk of waste FIRST: draw profile on end of workpiece FIRST CUT THIRD: cut profile THIRD CUT SECOND CUT FIGURE feather-board ~ NOTE: to create^\ flush glue joint, position fence so workpieces are centered over cutter ........................................1 PWPWWW^ To use a molding head, you'll need an insert with a wide opening. Making your own molding head insert is really a pretty simple task, especially if you've made other types of inserts before. Start by cutting a blank to match the size and thickness of your regular table saw insert. (I used some 1/2M Baltic birch plywood, but you could also use solid wood.) After cutting the blank to size so that it fits in the opening in your table saw, you need to make the opening for the molding head. The safest way to do this is to mark out the location of the opening on the blank and then cut it out with a sabre saw. Using a straightedge, mark the front and back of the opening and then the sides, as you see in Figures 4 and 5. After drilling a starter hole and cutting out the waste, check to make sure the molding head will clear the opening before turning your table saw on. straight edge NOTE: raise molding head to full height No. 58 ShopNotes 27 |


