58 - Miter Saw Station, страница 9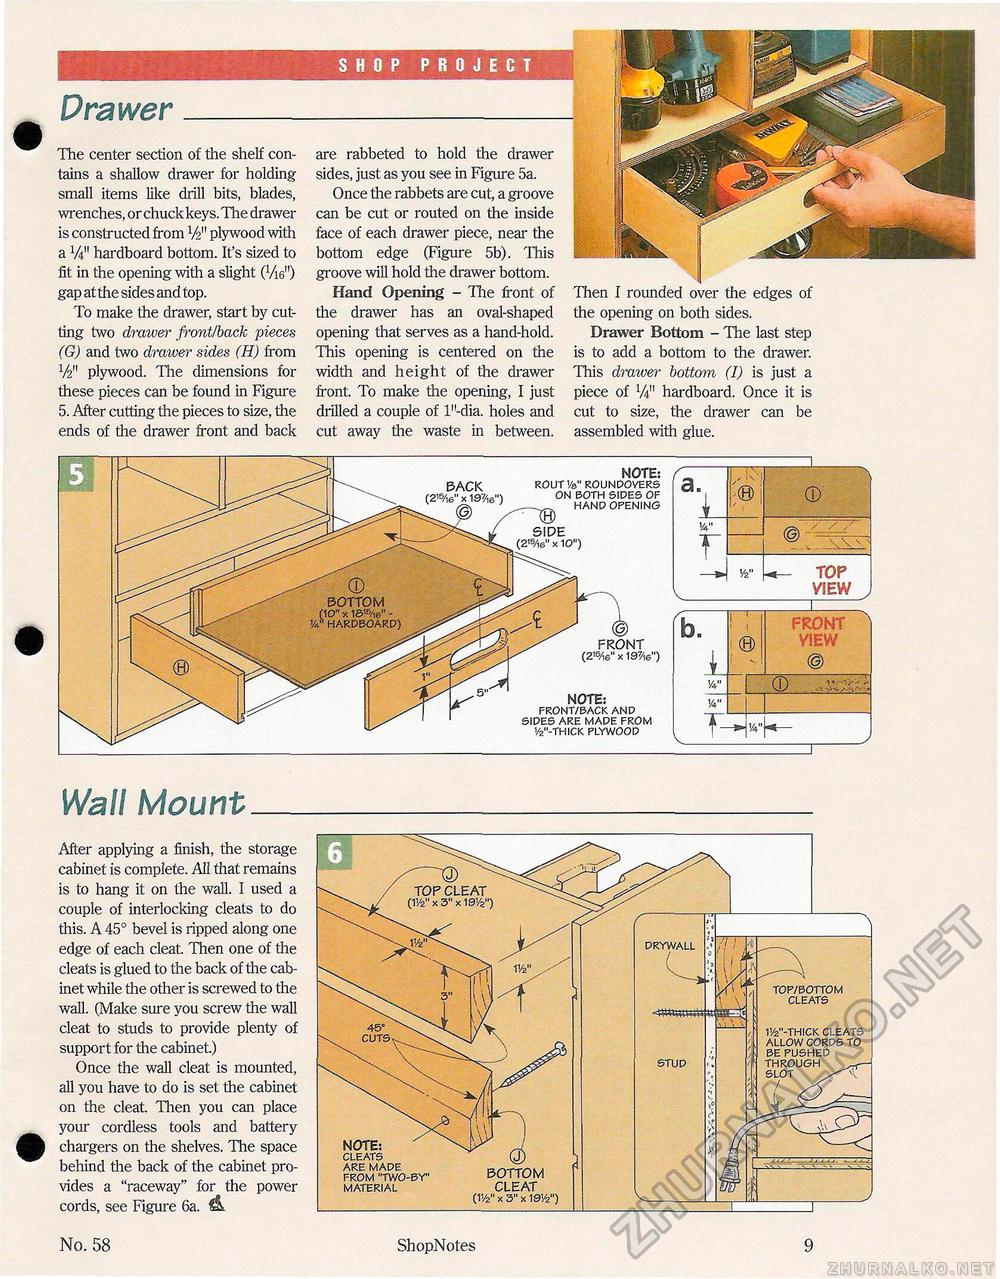
SHOP PROJECT DrawerThe center section of the shelf contains a shallow drawer for holding small items like drill bits, blades, wrenches, or chuck keys. The drawer is constructed from plywood with a V411 hardboard bottom. It's sized to fit in the opening with a slight (Vie") gap atthe sides and top. To make the drawer, start by cutting two drawer front/back pieces (G) and two drawer sides (H) from V2" plywood. The dimensions for these pieces can be found in Figure 5. After cutting the pieces to size, the ends of the drawer front and back are rabbeted to hold the drawer sides, just as you see in Figure 5a. Once the rabbets are cut, a groove can be cut or routed on the inside face of each drawer piece, near the bottom edge (Figure 5b). This groove will hold the drawer bottom. Hand Opening - The front of the drawer has an oval-shaped opening that serves as a hand-hold. This opening is centered on the width and height of the drawer front. To make the opening, I just drilled a couple of l"-dia. holes and cut away the waste in between. Then I rounded over the edges of the opening on both sides. Drawer Bottom - The last step is to add a bottom to the drawer. This drawer bottom (I) is just a piece of V4" hardboard. Once it is cut to size, the drawer can be assembled with glue. BACK " x 197/i6") ROUTVa" ROUNDOVERS ON BOTH SIDES OF HAND OPENING SIDE (215/16" X 10") NOTE: f a* W T O V2" Q AOs TOP VIEW /f & FRONT (215/16" X 197/ie") NOTE: FRONT/BACK AND SIDES ARE MADE FROM 1/2"-THICK PLYWOOD 1 I © FRONT VIEW 1 4*- Wall MountAfter applying a finish, the storage cabinet is complete. All that remains is to hang it on the wall. I used a couple of interlocking cleats to do this. A 45° bevel is ripped along one edge of each cleat. Then one of the cleats is glued to the back of the cabinet while the other is screwed to the wall. (Make sure you screw the wall cleat to studs to provide plenty of support for the cabinet) Once the wall cleat is mounted, all you have to do is set the cabinet on the cleat. Then you can place your cordless tools and battery chargers on the shelves. The space behind the back of the cabinet provides a "raceway" for the power cords, see Figure 6a. & No. 58 ShopNotes |


