58 - Miter Saw Station, страница 7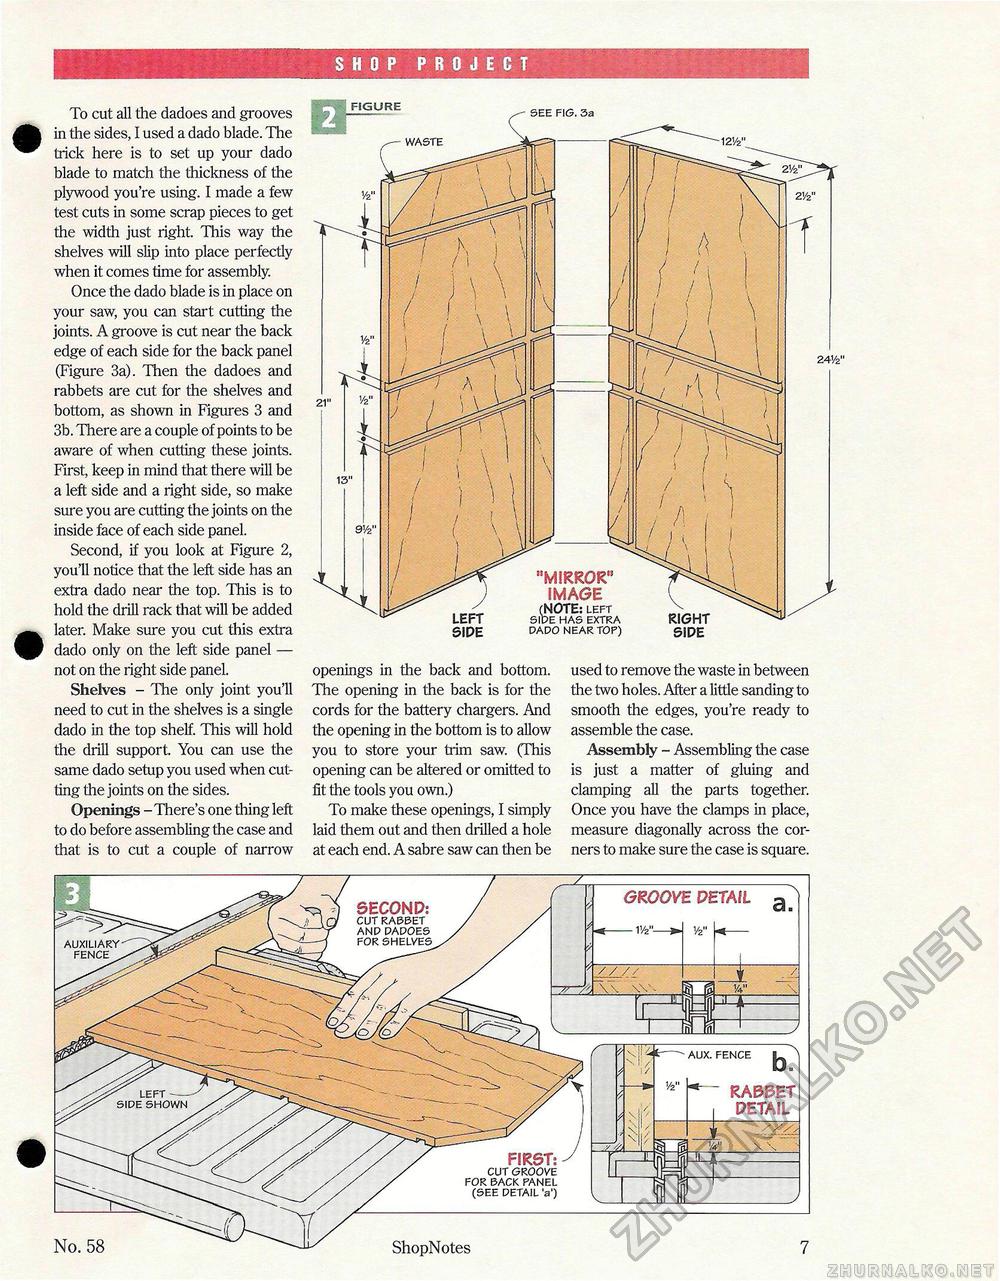
SHOP PROJECT To cut all the dadoes and grooves in the sides, I used a dado blade. The trick here is to set up your dado blade to match the thickness of the plywood you're using. I made a few test cuts in some scrap pieces to get the width just right. This way the shelves will slip into place perfectly when it comes time for assembly. Once the dado blade is in place on your saw, you can start cutting the joints. A groove is cut near the back edge of each side for the back panel (Figure 3a). Then the dadoes and rabbets are cut for the shelves and bottom, as shown in Figures 3 and 3b. There are a couple of points to be aware of when cutting these joints. First, keep in mind that there will be a left side and a right side, so make sure you are cutting the joints on the inside face of each side panel. Second, if you look at Figure 2, you'll notice that the left side has an extra dado near the top. This is to hold the drill rack that will be added later. Make sure you cut this extra dado only on the left side panel — not on the right side panel. Shelves - The only joint you'll need to cut in the shelves is a single dado in the top shelf. This will hold the drill support. You can use the same dado setup you used when cutting the joints on the sides. Openings - There's one thing left to do before assembling the case and that is to cut a couple of narrow SEE FIG. 3a (NOTE: LEFT LEFT SIDE HAS EXTRA SIDE DADO NEAR TOP) RIGHT SIDE openings in the back and bottom. The opening in the back is for the cords for the battery chargers. And the opening in the bottom is to allow you to store your trim saw. (This opening can be altered or omitted to fit the tools you own.) To make these openings, I simply laid them out and then drilled a hole at each end. A sabre saw can then be used to remove the waste in between the two holes. After a little sanding to smooth the edges, you're ready to assemble the case. Assembly - Assembling the case is just a matter of gluing and clamping all the parts together. Once you have the clamps in place, measure diagonally across the corners to make sure the case is square. No. 58 ShopNotes CUT GROOVE FOR BACK PANEL (SEE DETAIL 'a') AUX. FENCE RABBET DETAIL GROOVE DETAIL ^ //// \\ |


