65 - Our Best Bench Yet, страница 11
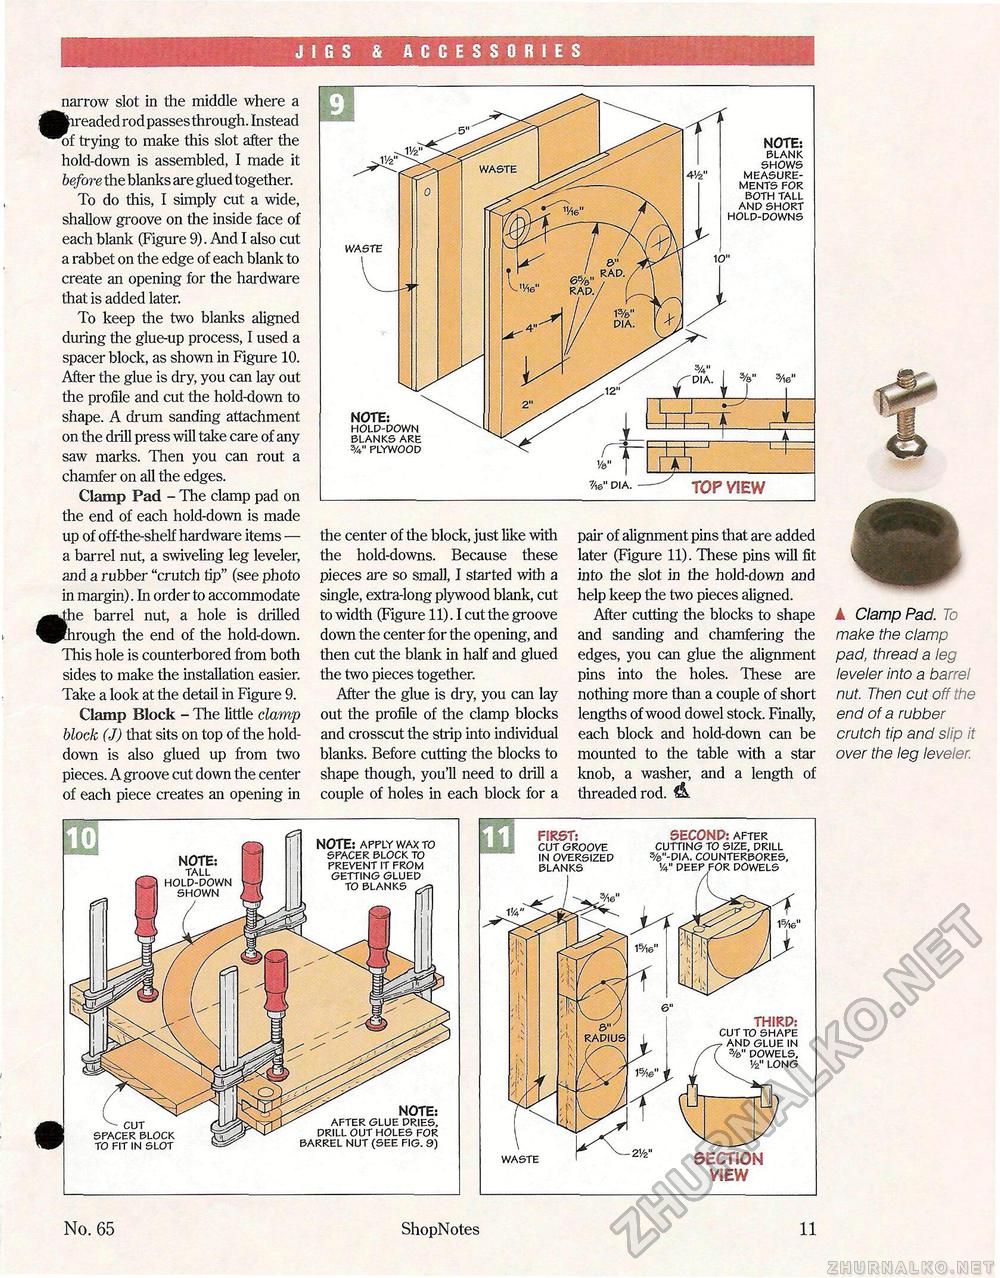
JIGS & ACCESSORIES Pi narrow slot in the middle where a eaded rod passes through. Instead of trying to make this slot after the hold-down is assembled, I made it before the blanks are glued together. To do this, I simply cut a wide, shallow groove on the inside face of each blank (Figure 9). And I also cut a rabbet on the edge of each blank to create an opening for the hardware that is added later. To keep the two blanks aligned during the glue-up process, I used a spacer block, as shown in Figure 10. After the glue is dry, you can lay out the profile and cut the hold-down to shape. A drum sanding attachment on the drill press will take care of any saw marks. Then you can rout a chamfer on all the edges. Clamp Pad - The clamp pad on the end of each hold-down is made up of off-the-shelf hardware items — a barrel nut, a swiveling leg leveler, and a rubber "crutch tip" (see photo in margin). In order to accommodate e barrel nut, a hole is drilled Girough the end of the hold-down. This hole is counterbored from both sides to make the installation easier. Take a look at the detail in Figure 9. Clamp Block - The little clamp block (J) that sits on top of the hold-down is also glued up from two pieces. A groove cut down the center of each piece creates an opening in the center of the block, just like with the hold-downs. Because these pieces are so small, I started with a single, extra-long plywood blank, cut to width (Figure 11). I cut the groove down the center for the opening, and then cut the blank in half and glued the two pieces together. After the glue is dry, you can lay out the profile of the clamp blocks and crosscut the strip into individual blanks. Before cutting the blocks to shape though, you'll need to drill a couple of holes in each block for a pair of alignment pins that are added later (Figure 11). These pins will fit into the slot in the hold-down and help keep the two pieces aligned. After cutting the blocks to shape and sanding and chamfering the edges, you can glue the alignment pins into the holes. These are nothing more than a couple of short lengths of wood dowel stock. Finally, each block and hold-down can be mounted to the table with a star knob, a washer, and a length of threaded rod. ▲ Clamp Pad. To make the clamp pad, thread a leg leveler into a barrel nut. Then cut off the end of a rubber crutch tip and slip it over the leg leveler. NOTE: apply wax to spacer block to prevent it from getting glued to blanks NOTE: after glue dries, drill out holes for barrel nut (see fig. 9) FIRST: cut groove in oversized blanks SECOND: after cutting to size, drill %"-dia. counterbores, 1/4" deep for dowels 15Ae" THiRP: cut to shape and glue in 3/a" dowels, 1/2" long waste SECTION VIEW No. 65 ShopNotes 11 |


