65 - Our Best Bench Yet, страница 14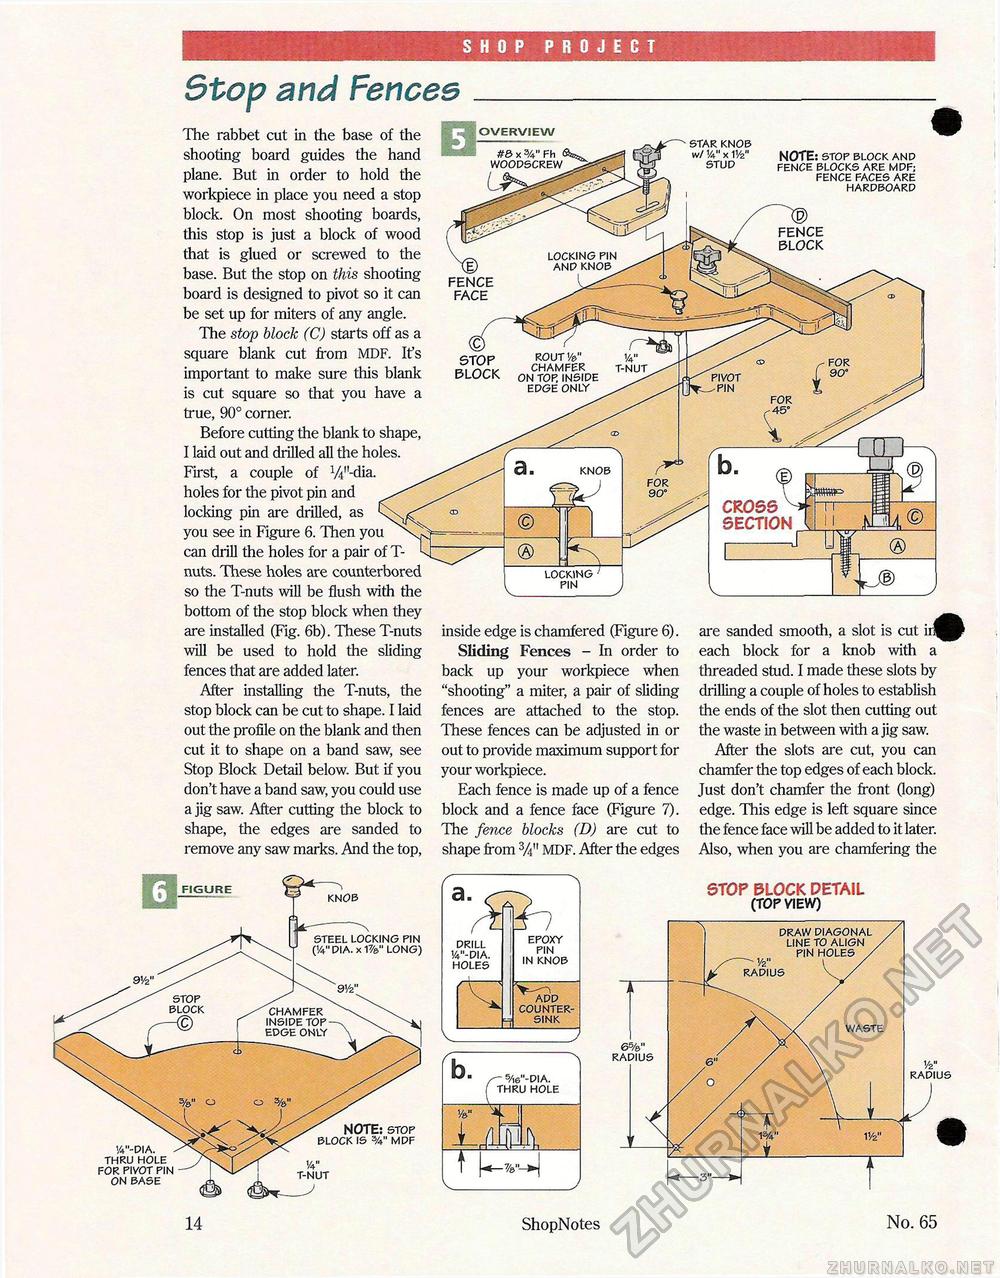
SHOP PROJECT Stop and Fences are sanded smooth, a slot is cut ir| each block for a knob with a threaded stud. I made these slots by drilling a couple of holes to establish the ends of the slot then cutting out the waste in between with a jig saw. After the slots are cut, you can chamfer the top edges of each block. Just don't chamfer the front (long) edge. This edge is left square since the fence face will be added to it later. Also, when you are chamfering the The rabbet cut in the base of the shooting board guides the hand plane. But in order to hold the workpiece in place you need a stop block. On most shooting boards, this stop is just a block of wood that is glued or screwed to the base. But the stop on this shooting board is designed to pivot so it can be set up for miters of any angle. The stop block (C) starts off as a square blank cut from MDF. Ifs important to make sure this blank is cut square so that you have a true, 90° corner. Before cutting the blank to shape, I laid out and drilled all the holes. First, a couple of W'-dia. holes for the pivot pin and locking pin are drilled, as you see in Figure 6. Then you can drill the holes for a pair of T-nuts. These holes are counterbored so the T-nuts will be flush with the bottom of the stop block when they are installed (Fig. 6b). These T-nuts will be used to hold the sliding fences that are added later. After installing the T-nuts, the stop block can be cut to shape. I laid out the profile on the blank and then cut it to shape on a band saw, see Stop Block Detail below. But if you don't have a band saw, you could use a jig saw. After cutting the block to shape, the edges are sanded to remove any saw marks. And the top, inside edge is chamfered (Figure 6). Sliding Fences - In order to back up your workpiece when "shooting" a miter, a pair of sliding fences are attached to the stop. These fences can be adjusted in or out to provide maximum support for your workpiece. Each fence is made up of a fence block and a fence face (Figure 7). The fence blocks (D) are cut to shape from MDF. After the edges star knob w/ Va" x V/z" stud NOTE: stop block and fence blocks are mdf; fence faces are hardboard FENCE BLOCK OVERVIEW #& x Fh woodscrew FENCE FACE STOP BLOCK chamfer on top, inside edge only t-nut FIGURE steel locking pin (1/4"dia. x1%" long) '/v'-dia. thru hole for pivot pin on base NOTE: stop block is mdf drill 1/4"-dia. holes epoxy pin in knob ADD COUNTERSINK b. _LJ 5/i6"-DIA. THRU HOLE t STOP BLOCK DETAIL (TOP VIEW) 14 ShopNotes No. 65 |


