69 - Bench Top Storage System, страница 31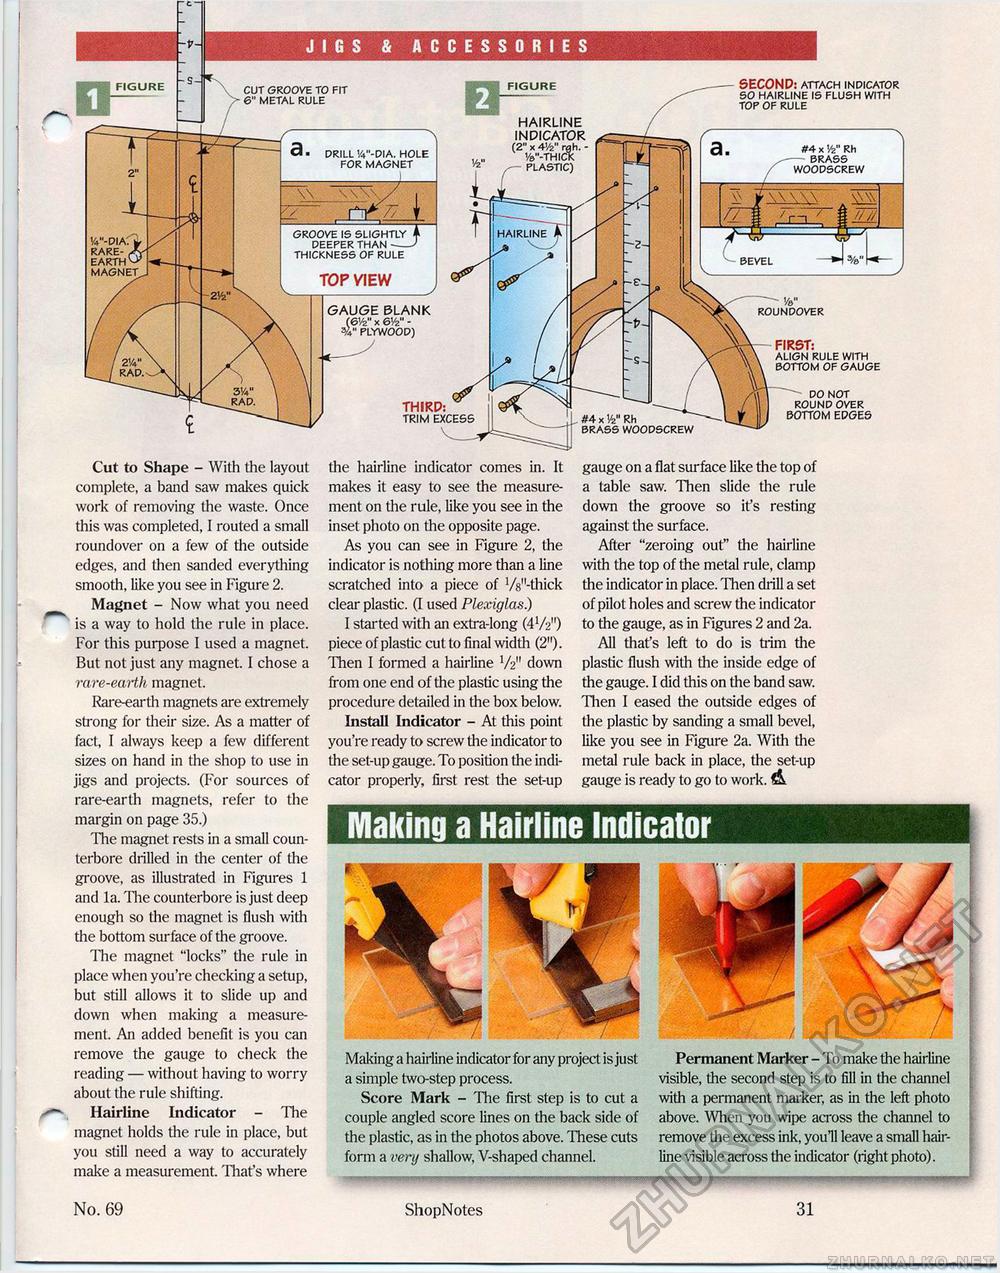
JIGS & ACCESSORIES SECOND: attach indicator so hairline is flush with top of rule SECOND: attach indicator so hairline is flush with top of rule
#4 x %» Rh brass woodscrew FIRST: align rule with bottom of gauge do not round over bottom edges Cut to Shape - With the layout complete, a band saw makes quick work of removing the waste. Once this was completed, I routed a small roundover on a few of the outside edges, and then sanded everything smooth, like you see in Figure 2. Magnet - Now what you need is a way to hold the rule in place. For this purpose I used a magnet. But not just any magnet. I chose a rare-earth magnet. Rare-earth magnets are extremely strong for their size. As a matter of fact, I always keep a few different sizes on hand in the shop to use in jigs and projects. (For sources of rare-earth magnets, refer to the margin on page 35.) 'Hie magnet rests in a small coun-terbore drilled in the center of the groove, as illustrated in Figures 1 and la. 'Hie counterbore is just deep enough so the magnet is flush with the bottom surface of the groove. The magnet "locks" the rule in place when you're checking a setup, but still allows it to slide up and down when making a measurement. An added benefit is you can remove the gauge to check the reading — without having to worry about the rule shifting. Hairline Indicator - The magnet holds die rule in place, but you still need a way to accurately make a measurement. That's where the hairline indicator comes in. It makes it easy to see the measurement on the rule, like you see in the inset photo on the opposite page. As you can see in Figure 2, the indicator is nothing more than a line scratched into a piece of '/V'-thick clear plastic. (I used Plexiglas.) I started with an extra-long (4V2M) piece of plastic cut to final width (2"). Then I formed a hairline V2'1 down from one end of the plastic using the procedure detailed in the box below. Install Indicator - At this point you're ready to screw the indicator to the set-up gauge. To position the indicator properly, first rest the set-up gauge on a flat surface like the top of a table saw. Then slide die rule down the groove so it's resting against the surface. After "zeroing out" the hairline with the top of the metal rule, clamp the indicator in place. Then drill a set of pilot holes and screw the indicator to the gauge, as in Figures 2 and 2a. All that's left to do is trim the plastic flush with the inside edge of the gauge. I did this on the band saw. Then I eased die outside edges of the plastic by sanding a small bevel, like you see in Figure 2a. With the metal rule back in place, the set-up gauge is ready to go to work. & Making a Hairline IndicatorMaking a hairline indicator for any project is just a simple two-step process. Score Mark - The first step is to cut a couple angled score lines on the back side of the plastic, as in the photos above. These cuts form a very shallow, V-shaped channel. Permanent Marker - To make the hairline visible, the second step is to fill in the channel with a permanent marker, as in the left photo above. When you wipe across the channel to remove the excess ink, you 11 leave a small hairline visible across the indicator (right photo). No. 69 ShopNotes 31 |
||||||||||||


