77 - Sliding Door Shop Cabinet, страница 8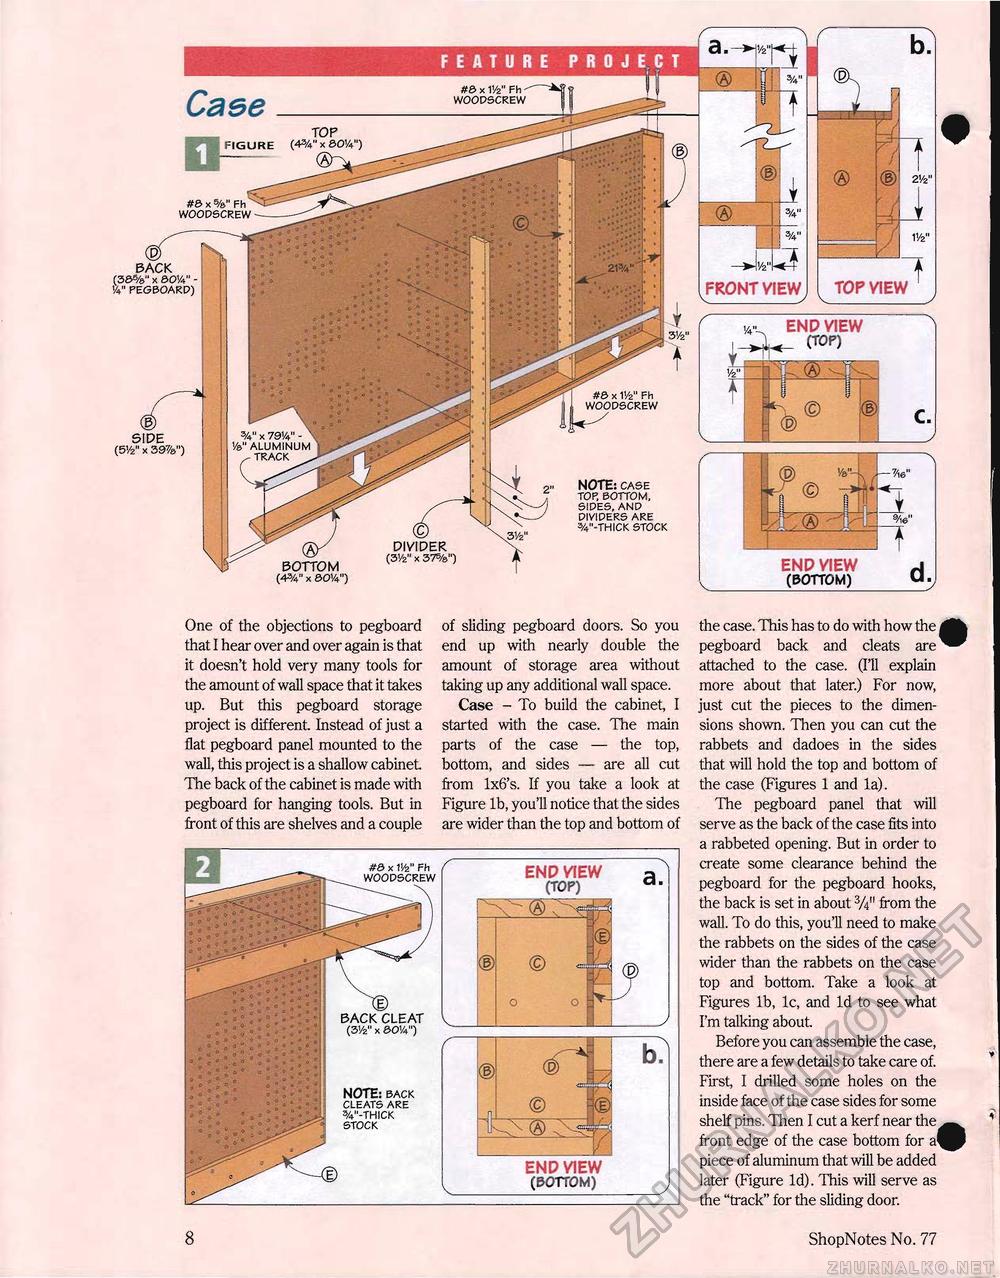
FEATURE PROJECT imm BACK f36%" x so'a" ■ •A" pegboard) (g SIDE (5v2" X 39%") BOTTOM (■4%" x &0v4") END VIEW (BOTTOM) One of the objections to pegboard that I hear over and over again is that it doesn't hold very many tools for the amount of wall space that it takes up. But this pegboard storage project is different Instead of just a flat pegboard panel mounted to the wall, this project is a shallow cabinet The back of the cabinet is made with pegboard for hanging tools. But in front of this are shelves and a couple of sliding pegboard doors. So you end up with nearly double the amount of storage area without taking up any additional wall space. Case - To build the cabinet I started with the case. The main parts of the case — the top, bottom, and sides — are all cut from lx6's. If you take a look at Figure lb, you'll notice that the sides are wider than the top and bottom of #0 x W Fh woodscrew ENP VIEW (TOP) a. BACK CLEAT (3vz" x &0'a") NOTE: back cleats are v-thick stock ENP VIEW (TOP)
" J0 b. END VIEW (BOTTOM) the case. This has to do with how the 4 pegboard back and cleats are attached to the case. (I'll explain more about that later.) For now, just cut the pieces to the dimensions shown. Then you can cut the rabbets and dadoes in the sides that will hold the top and bottom of the case (Figures 1 and la). The pegboard panel that will serve as the back of the case fits into a rabbeted opening. But in order to create some clearance behind the pegboard for the pegboard hooks, the back is set in about 3A" from the wall. To do this, you'll need to make the rabbets on the sides of the case wider than the rabbets on the case top and bottom. Take a look at Figures lb, lc, and Id to see what I'm talking about Before you can assemble the case, there are a few details to take care of. First I drilled some holes on the inside face of the case sides for some shelf pins. Then I cut a kerf near the front edge of the case bottom for a| piece of aluminum that will be added later (Figure Id). This will serve as the "track" for the sliding door. 8 ShopNotes No. 77 |
||||||||||||||||


