81 - Ultimate Sharpening Station, страница 6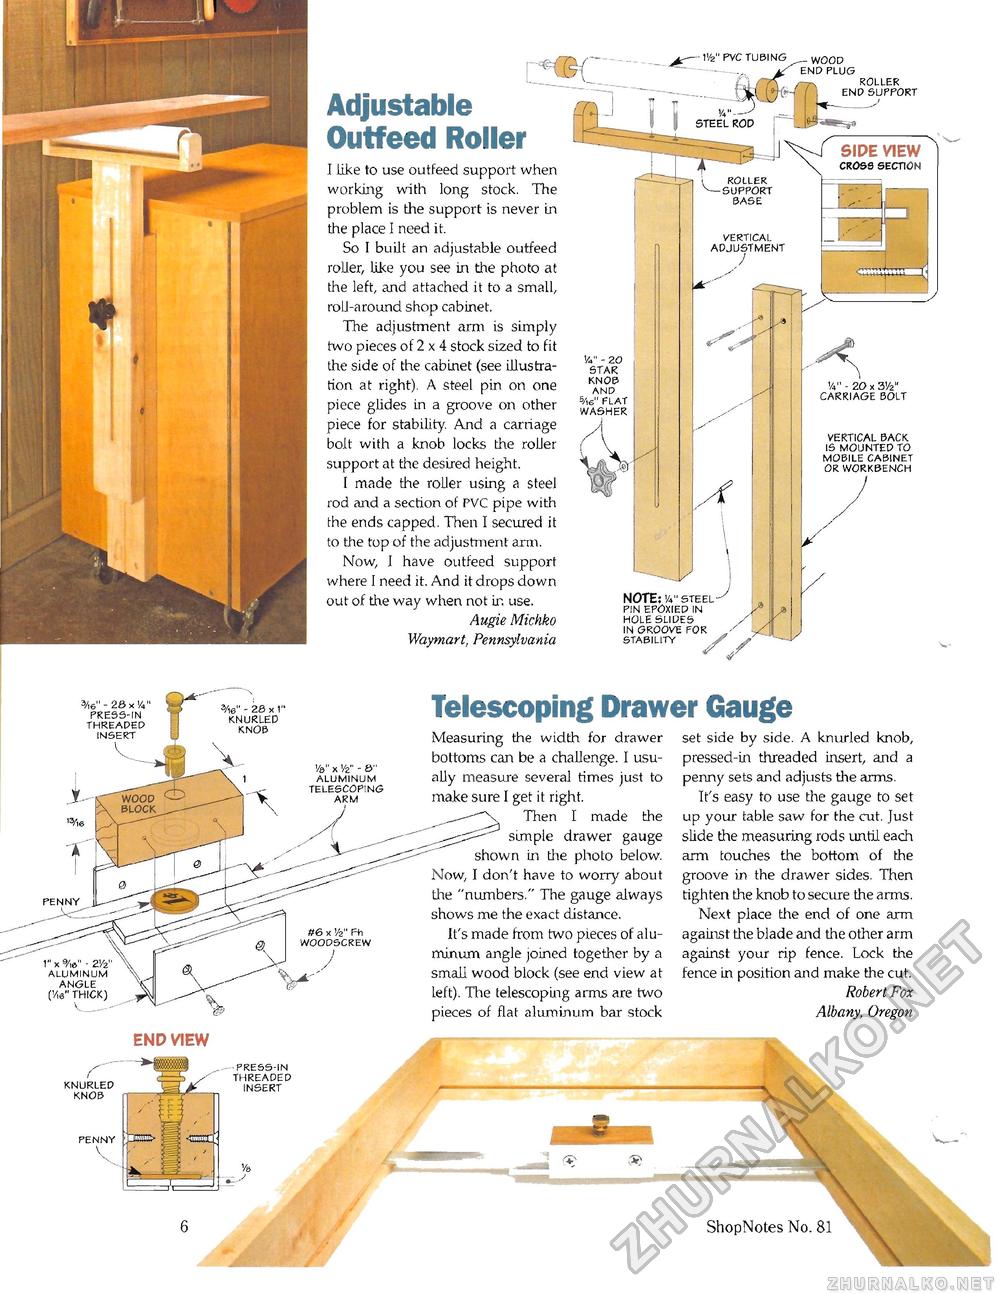
Adjustable Outfeed Roller I like to use outfeed support when working with long stock. The problem is the support is never in the place I need it. So I built an adjustable outfeed roller, like you see in the photo at the left, and attached it to a small, roli-around shop cabinet. The adjustment arm is simply two pieces of 2 x 4 stock sized to fit the side of the cabinet (see illustration at right). A steel pin on one piece glides in a groove on other piece for stability. And a carriage bolt with a knob locks the roller support at the desired height. I made the roller using a steel rod and a section of PVC pipe with the ends capped. Then I secured it to the top of the adjustment arm. Now, I have outfeed support where I need it. And it drops down out of the way when not ir. use. Augie Michko Waymart, Pennsylvania V - 20 STAR KNOB AND s/,e" PLAT WASHER BASE VERTICAL ADJUSTMENT J V4" - 20 x 3V2" CARRIAGE BOLT VERTICAL BACK. IS MOUNTED TO MOBILE CABINET OR WORKBENCH WOOD END PLUG ROLLER END SUPPORT NOTE: '/." STEEL FIN EPOXIED IN HOLE SLIDES IN GROOVE FOR STABILITY side view CROSS SECTION ROLLER SUPPORT 3Ae" - 23 x 1" KNURLED KNOB ' x Vz" - S" ALUMINUM TELESCOPING ARM Telescoping Drawer Gauge 1" X 9/,e" - ZVz ALUMINUM ANGLE ('/,«" THICK) Measuring the width for drawer bottoms can be a challenge. I usually measure several times just to make sure I get it right. Then I made the simple drawer gauge shown in the photo below. Now, I don't have to worry about the "numbers." The gauge always shows me the exact distance. It's made from two pieces of aluminum angle joined together by a small wood block (see end view at left). The telescoping arms are two pieces of flat aluminum bar stock set side by side. A knurled knob, pressed-in threaded insert, and a penny sets and adjrists the arms. It's easy to use the gauge to set up your table saw for the cut. Just slide the measuring rods Lintil each arm touches the bottom of the groove in the drawer sides. Then tighten the knob to secure the arms. Next place the end of one arm against the blade and the other arm against your rip fence. Lock the fence in position and make the cut. Robert Fox Albany, Oregon end view KNURLED KNOB
PRESS-IN THREADED INSERT
6 ShopNotes No. 81 |
|||||||||||||||||||||


