83, страница 19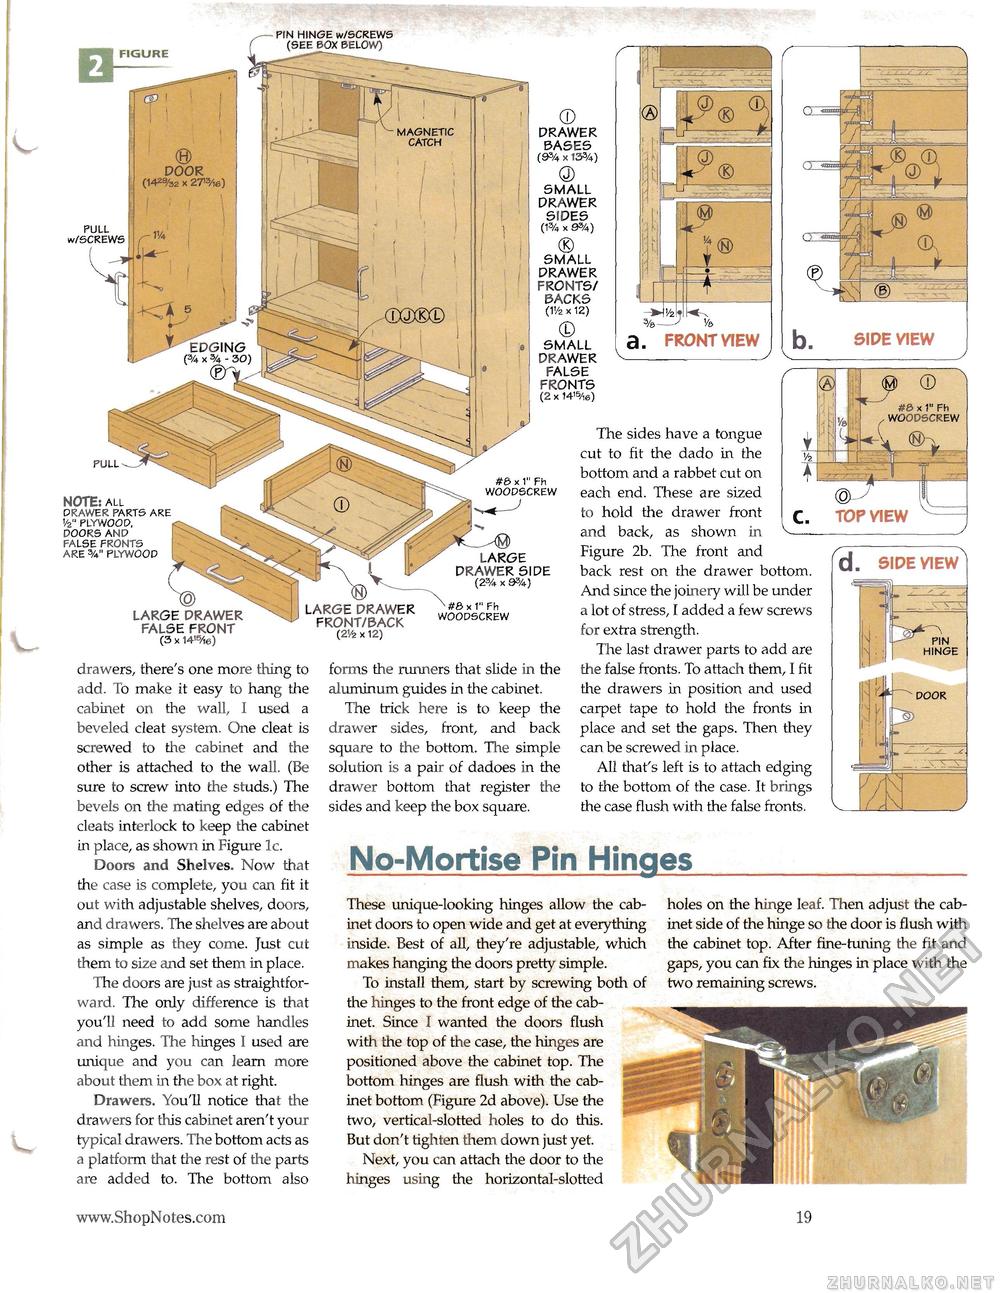
fin hinge w/screws (see box below) DRAWER BASES (9% x 13%) magnetic catch DOOR (142%2 x 2T3Ae) SMALL DRAWER SIDES (1% X SPA) PULL w/SCREWS SMALL DRAWER FRONTS/ BACKS (1'/2 X 12) a. FRONT VIEW SMALL DRAWER FALSE FRONTS (2 x 14,5/,6) EDGING (% X % - 30) #8 x 1" Fh woodscrew PULL #6 X 1" Fh woodscrew NOTE: all drawer parts are '/2" plywood, doors and false fronts are %" plywood LARGE DRAWER SIDE (2% x 8%) X#6x1" Fh woodscrew LARGE DRAWER FRONT/BACK (2</2 x 12) LARGE DRAWER FALSE FRONT (3 x 14®/t6) pin hinge forms the runners that slide in the aluminum guides in the cabinet. The trick here is to keep the drawer sides, front, and back square to the bottom. The simple solution is a pair of dadoes in the drawer bottom that register the sides and keep the box square. drawers, there's one more thing to add. To make it easy to hang the cabinet on the wall, I used a beveled cleat system. One cleat is screwed to the cabinet and the other is attached to the wall. (Be sure to screw into the studs.) The bevels on the mating edges of the door cleats interlock to keep the cabinet in place, as shown in Figure lc. Doors and Shelves. Now that the case is complete, you can fit it out with adjustable shelves, doors, and drawers. The shelves are about as simple as they come. Just cut them to size and set them in place. The doors are just as straightforward. The only difference is that you'll need to add some handles and hinges. The hinges I used are unique and you can learn more about them in the box at right. Drawers. You'll notice that the drawers for this cabinet aren't your typical drawers. The bottom acts as a platform that the rest of the parts are added to. The bottom also No-Mortise Pin Hinges These unique-looking hinges allow the cabinet doors to open wide and get at everything inside. Best of all, they're adjustable, which makes hanging the doors pretty simple. To install them, start by screwing both of the hinges to the front edge of the cabinet. Since I wanted the doors flush with the top of the case, the hinges are positioned above the cabinet top. The bottom hinges are flush with the cabinet bottom (Figure 2d above). Use the two, vertical-slotted holes to do this. But don't tighten them down just yet. Next, you can attach the door to the hinges using the horizontal-slotted holes on the hinge leaf. Then adjust the cabinet side of the hinge so the door is flush with the cabinet top. After fine-tuning the fit and gaps, you can fix the hinges in place with the two remaining screws. 19 |


