83, страница 18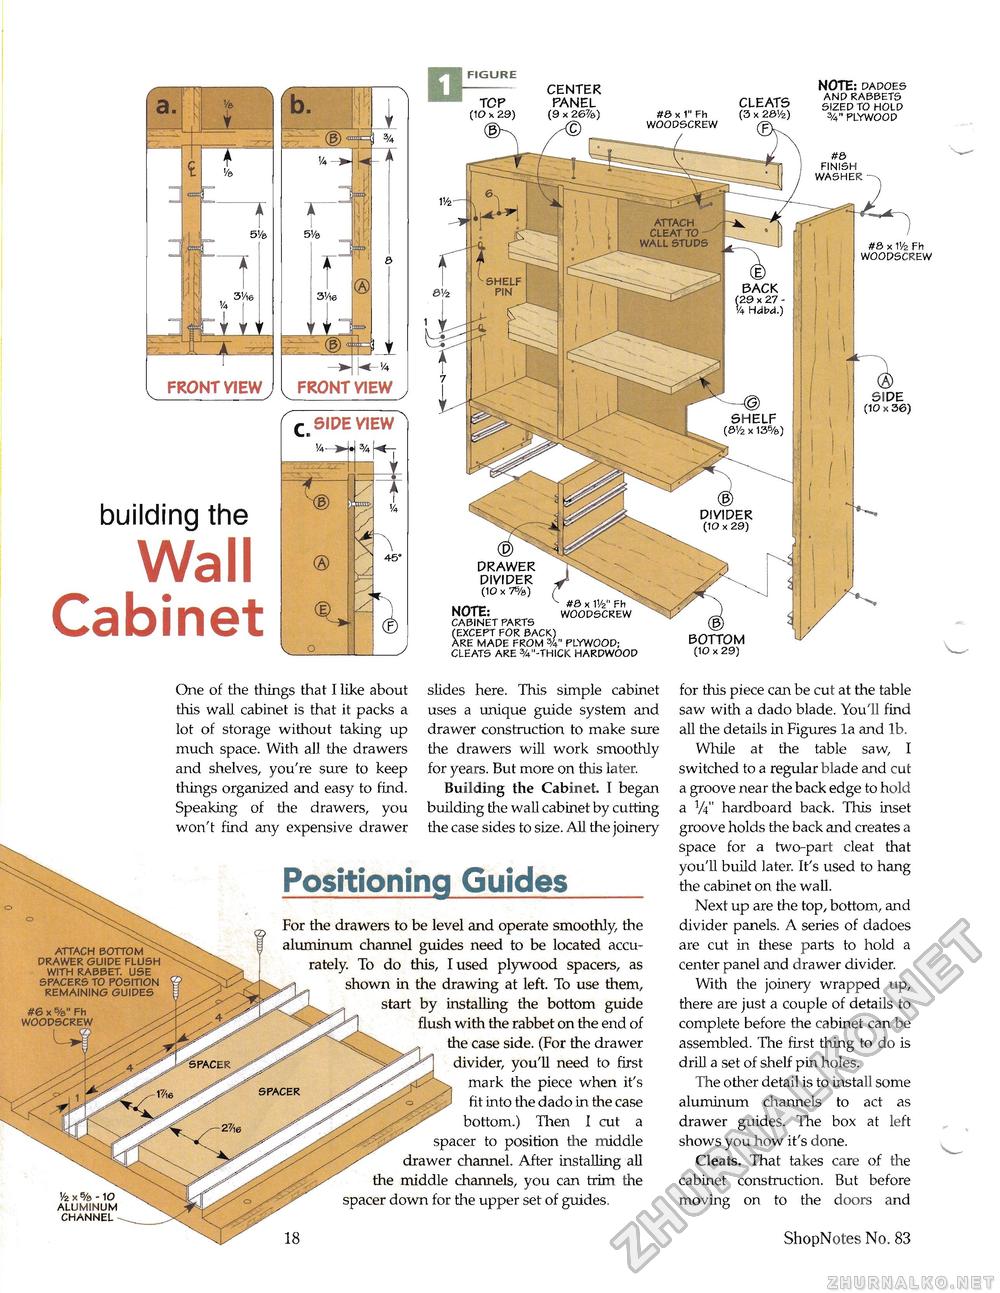
b. 4 % M 5Va 3 3'/l6 ® FRONT VIEW FRONT VIEW building the Wall Cabinet ^CSIPE VIEWn 3/4 45" / ® r V_O One of the things that I like about this wall cabinet is that it packs a lot of storage without taking up much space. With all the drawers and shelves, you're sure to keep things organized and easy to find. Speaking of the drawers, you won't find any expensive drawer slides here. This simple cabinet uses a unique guide system and drawer construction to make sure the drawers will work smoothly for years. But more on this later. Building the Cabinet. I began building the wall cabinet by cutting the case sides to size. All the joinery for this piece can be cut at the table saw with a dado blade. You'll find all the details in Figures la and lb. While at the table saw, I switched to a regular blade and cut a groove near the back edge to hold a V4" hardboard back. This inset groove holds the back and creates a space for a two-part cleat that you'll build later. It's used to hang the cabinet on the wall. Next up are the top, bottom, and divider panels. A series of dadoes are cut in these parts to hold a center panel and drawer divider. With the joinery wrapped up, there are just a couple of details to complete before the cabinet can be assembled. The first thing to do is drill a set of shelf pin holes. The other detail is to install some aluminum channels to act as drawer guides. The box at left shows you how it's done. Cleats. That takes care of the cabinet construction. But before moving on to the doors and 18 ShopNotes No. 83 TCP (10 X 29) CENTER PANEL (9 x #0 x 1" Fh CLEATS NOTE: dadoes and rabbets sized to hold %" plywood antu- BACK (29 x 27 -'/4 Hdbd.) SHELF (S'/2 x 13%) DIVIDER (10 x 29) DRAWER DIVIDER (10 x 7%) NOTE: cabinet parts woodscrew (except for back) are made from plywood; cleats are 3 -thick hardwood BOTTOM (10 x 29) SIDE (10 x 36) 1/2 x % -10 aluminum channel Positioning Guides For the drawers to be level and operate smoothly, the aluminum channel guides need to be located accurately. To do this, I used plywood spacers, as shown in the drawing at left. To use them, start by installing the bottom guide flush with the rabbet on the end of the case side. (For the drawer divider, you'll need to first mark the piece when it's fit into the dado in the case bottom.) Then I cut a spacer to position the middle drawer channel. After installing all the middle channels, you can trim the spacer down for the upper set of guides. |


