83, страница 21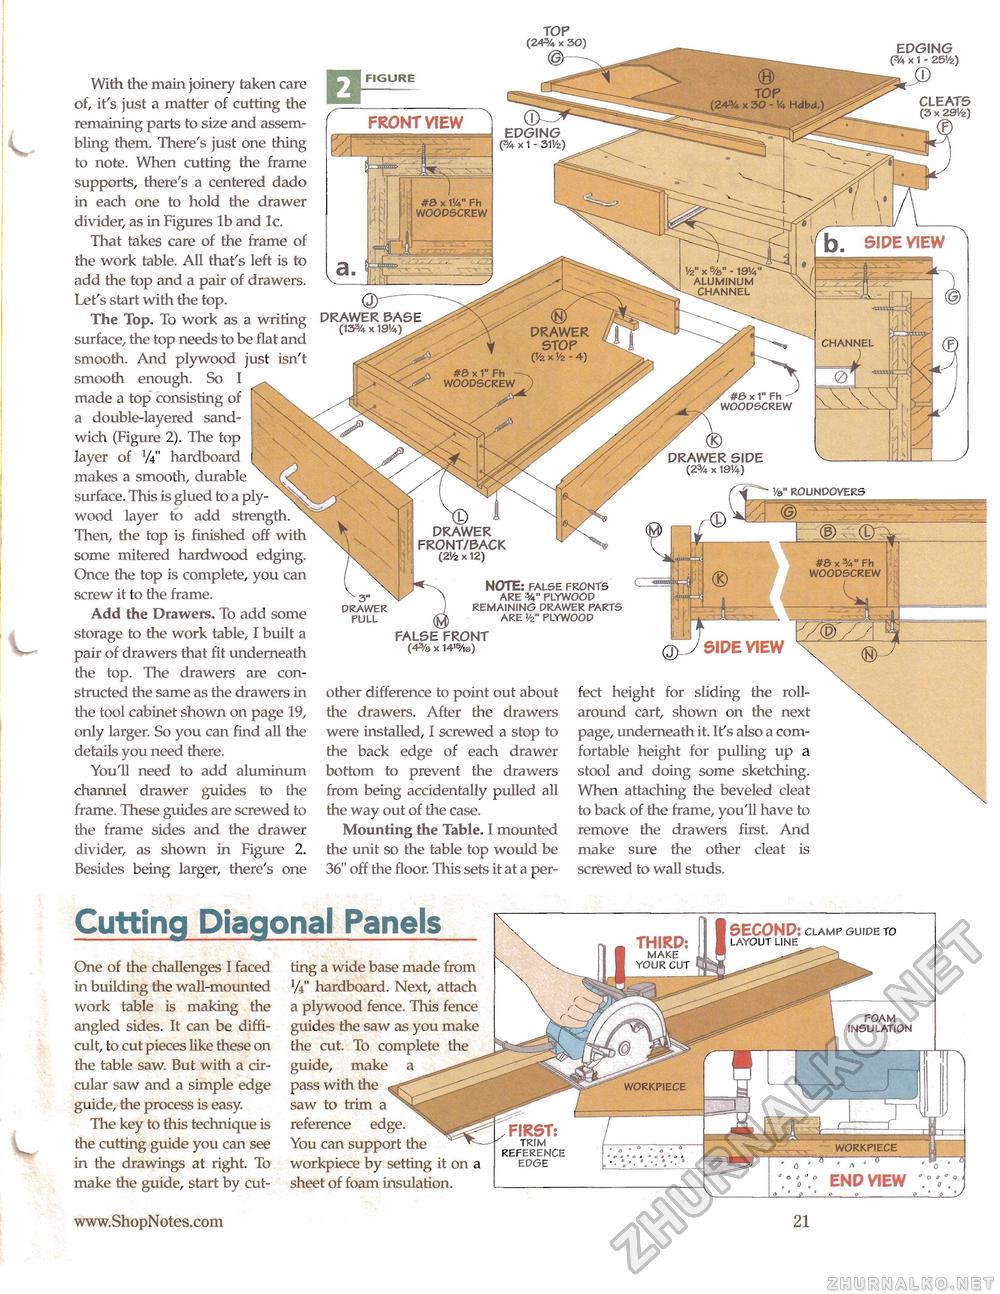
TOP (24% x 3D - 1/4 Hdbd.) y2" x - 19V4 aluminum ^channel DRAWER STOP (Vz x '/z - 4) channel #0x1" FH WOODSCREW TOP (24% x 30) With the main joinery taken care of, it's just a matter of cutting the remaining parts to size and assembling them. There's just one thing to note. When cutting the frame supports, there's a centered dado in each one to hold the drawer divider, as in Figures lb and lc. That takes care of the frame of the work table. All that's left is to add the top and a pair of drawers. Let's start with the top. The Top. To work as a writing surface, the top needs to be flat and smooth. And plywood just isn't smooth enough. So I made a top consisting of a double-layered sandwich (Figure 2). The top layer of V4" hardboard makes a smooth, durable surface. This is glued to a plywood layer to add strength. Then, the top is finished off with some mitered hardwood edging. Once the top is complete, you can screw it to the frame. Add the Drawers. To add some storage to the work table, I built a pair of drawers that fit underneath the top. The drawers are constructed the same as the drawers in the tool cabinet shown on page 19, only larger. So you can find all the details you need there. You'll need to add aluminum channel drawer guides to the frame. These guides are screwed to the frame sides and the drawer divider, as shown in Figure 2. Besides being larger, there's one EDGING (% X1 - 25</z) D FIGURE CLEATS (3 x 29VZ) _ (F) front view EDGING (% X1 - 31%) DRAWER BASE (13% xW) #0 x 1" Fh ^ woodscrew DRAWER SIDE (2V. 19'/4) />, roundovers DRAWER FRONT/BACK (2'/2 x 12) #8 x %" Fh woodscrew NOTE: false fronts are %" plywood remaining drawer parts are v2" plywood side view drawer pull FALSE FRONT (4% x 14's/i6) other difference to point out about the drawers. After the drawers were installed, I screwed a stop to the back edge of each drawer bottom to prevent the drawers from being accidentally pulled all the way out of the case. Mounting the Table. I mounted the unit so the table top would be 36" off the floor. This sets it at a per fect height for sliding the roll-around cart, shown on the next page, underneath it. It's also a comfortable height for pulling up a stool and doing some sketching. When attaching the beveled cleat to back of the frame, you'll have to remove the drawers first. And make sure the other cleat is screwed to wall studs. third: make your cut Cutting Diagonal Panels One of the challenges I faced in building the wall-mounted work table is making the angled sides. It can be difficult, to cut pieces like these on the table saw. But with a circular saw and a simple edge guide, the process is easy. The key to this technique is the cutting guide you can see in the drawings at right. To make the guide, start by cut ting a wide base made from y4" hardboard. Next, attach a plywood fence. This fence guides the saw as you make the cut. To complete the guide, make a pass with the saw to trim a reference edge. You can support the workpiece by setting it on a sheet of foam insulation. second: clamp guide to layout line foam insulation WORKPIECE frst trim reference edge workpiece end view 21 |


