83, страница 29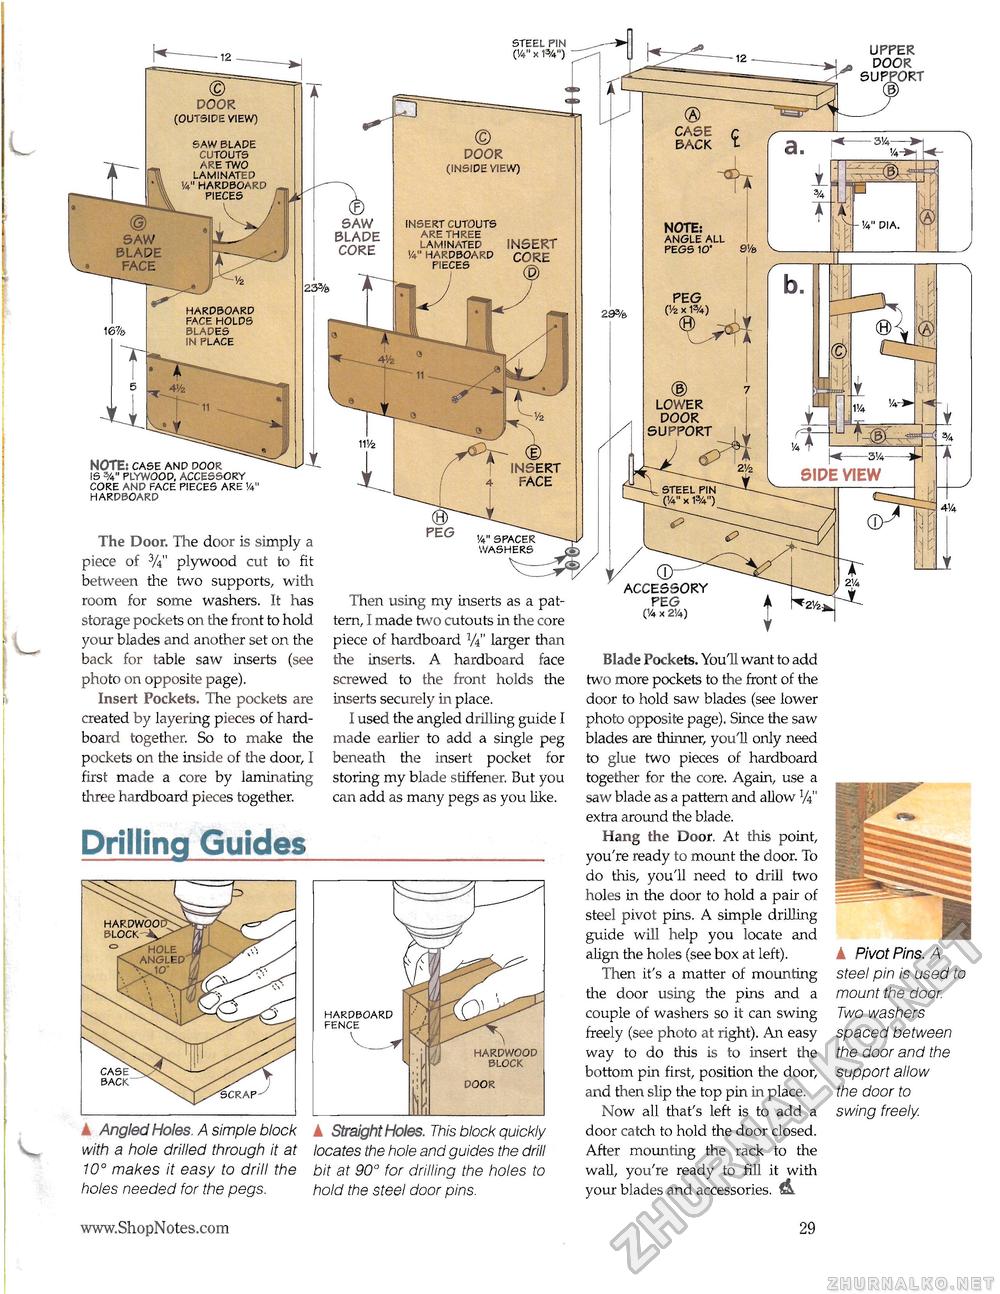
UPPER DOOR SUPPORT DOOR (outside view) CASE BACK saw blade cutouts are two laminated !4" hardboard pieces DOOR (inside view) SAW BLADE CORE insert cutouts are three laminated vv hardboard pieces NOTE: angle all pegs 10' SAW BLADE FACE INSERT CORE hardboard face holds blades in place LOWER DOOR SUPPORT NOTE: case and door is plywood, accessory core and face pieces are w hardboard T INSERT 4 FACE The Door. The door is simply a piece of 3/t" plywood cut to fit between the two supports, with room for some washers. It has storage pockets on the front to hold your blades and another set on the back for table saw inserts (see photo on opposite page). Insert Pockets. The pockets are created by layering pieces of hard-board together. So to make the pockets on the inside of the door, I first made a core by laminating three hardboard pieces together. ACCESSORY Then using my inserts as a pat- PEG a tern, I made two cutouts in the core (Ax 2/4) I piece of hardboard fyi" larger than the inserts. A hardboard face Blade Pockets. You'll want to add screwed to the front holds the two more pockets to the front of the inserts securely in place. door to hold saw blades (see lower I used the angled drilling guide I photo opposite page). Since the saw made earlier to add a single peg blades are thinner, you'll only need beneath the insert pocket for to glue two pieces of hardboard storing my blade stiffener. But you together for the core. Again, use a can add as many pegs as you like. saw blade as a pattern and allow V4" extra around the blade. Hang the Door. At this point, you're ready to mount the door. To do this, you'll need to drill two holes in the door to hold a pair of steel pivot pins. A simple drilling guide will help you locate and align the holes (see box at left). Then it's a matter of mounting the door using the pins and a couple of washers so it can swing freely (see photo at right). An easy way to do this is to insert the bottom pin first, position the door, and then slip the top pin in place. Now all that's left is to add a ▲ Pivot Pins. A steel pin is used to mount the door. Two washers spaced between the door and the support allow the door to swing freely. door catch to hold the door closed. After mounting the rack to the wall, you're ready to fill it with your blades and accessories. & Drilling Guides hardboard fence A Angled Holes. A simple block with a hole drilled through it at 10° makes it easy to drill the holes needed for the pegs. A Straight Holes. This block quickly locates the hole and guides the drill bit at 90° for drilling the holes to hold the steel door pins. 29 |


