84, страница 44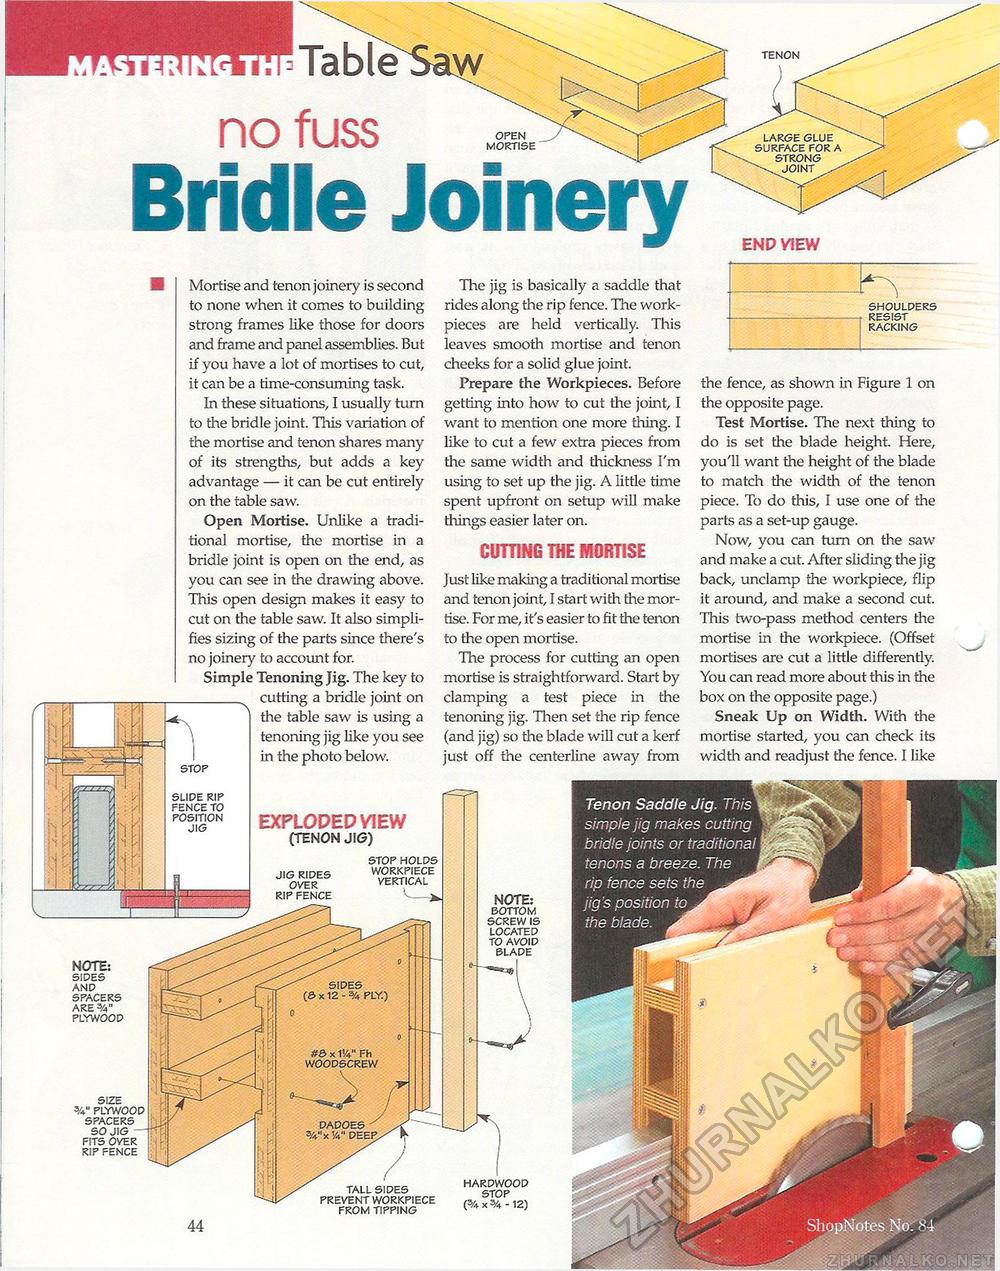
SHOULDERS RESIST RACKING the fence, as shown in Figure 1 on the opposite page. Test Mortise. The next thing to do is set the blade height. Here, you'll want the height of the blade to match the width of the tenon piece. To do this, I use one of the parts as a set-up gauge. Now, you can turn on the saw and make a cut. After sliding the jig back, unclamp the workpiece, flip it around, and make a second cut. This two-pass method centers the mortise in the workpiece. (Offset mortises are cut a little differently. You can read more about this in the box on the opposite page.) Sneak Up on Width. With the mortise started, you can check its width and readjust the fence. I like SIZE =4" PLYWOOD FITS OVER RIP FENCE TALL SIDES PREVENT WORKPIECE FROM TIPPING HARDWOOD STOP (% x % -12) NOTE: SIDES AND SPACERS ARE %" PLYWOOD Mortise and tenon joinery is second to none when it comes to building strong frames like those for doors and frame and panel assemblies. But if you have a lot of mortises to cut, it can be a time-consuming task. In these situations, I usually turn to the bridle joint. This variation of the mortise and tenon shares many of its strengths, but adds a key advantage — it can be cut entirely on the table saw. Open Mortise. Unlike a traditional mortise, the mortise in a bridle joint is open on the end, as you can see in the drawing above. This open design makes it easy to cut on the table saw. It also simplifies sizing of the parts since there's no joiner)' to account for. Simple Tenoning Jig. The key to _N cutting a bridle joint on the table saw is using a tenoning jig like you see in the photo below. EXPLODED VIEW (TENON JIG) STOP SLIDE RIP FENCE TO POSITION JIG STOP HOLDS RIP FENCE '--- NOTE: BOTTOM SCREW IS LOCATED TO AVOID BLADE The jig is basically a saddle that rides along the rip fence. Hie work-pieces are held vertically. This leaves smooth mortise and tenon cheeks for a solid glue joint. Prepare the Workpieces. Before getting into how to cut the joint, I want to mention one more thing. I like to cut a few extra pieces from the same width and thickness I'm using to set up the jig. A little time spent upfront on setup will make things easier later on. CUTTING THE MORTISE Just like making a traditional mortise and tenon joint, I start with the mortise. For me, it's easier to fit the tenon to the open mortise. The process for cutting an open mortise is straightforward. Start by clamping a test piece in the tenoning jig. Then set the rip fence (and jig) so the blade will cut a kerf just off the centerline away from |


