85 - Router Table, страница 37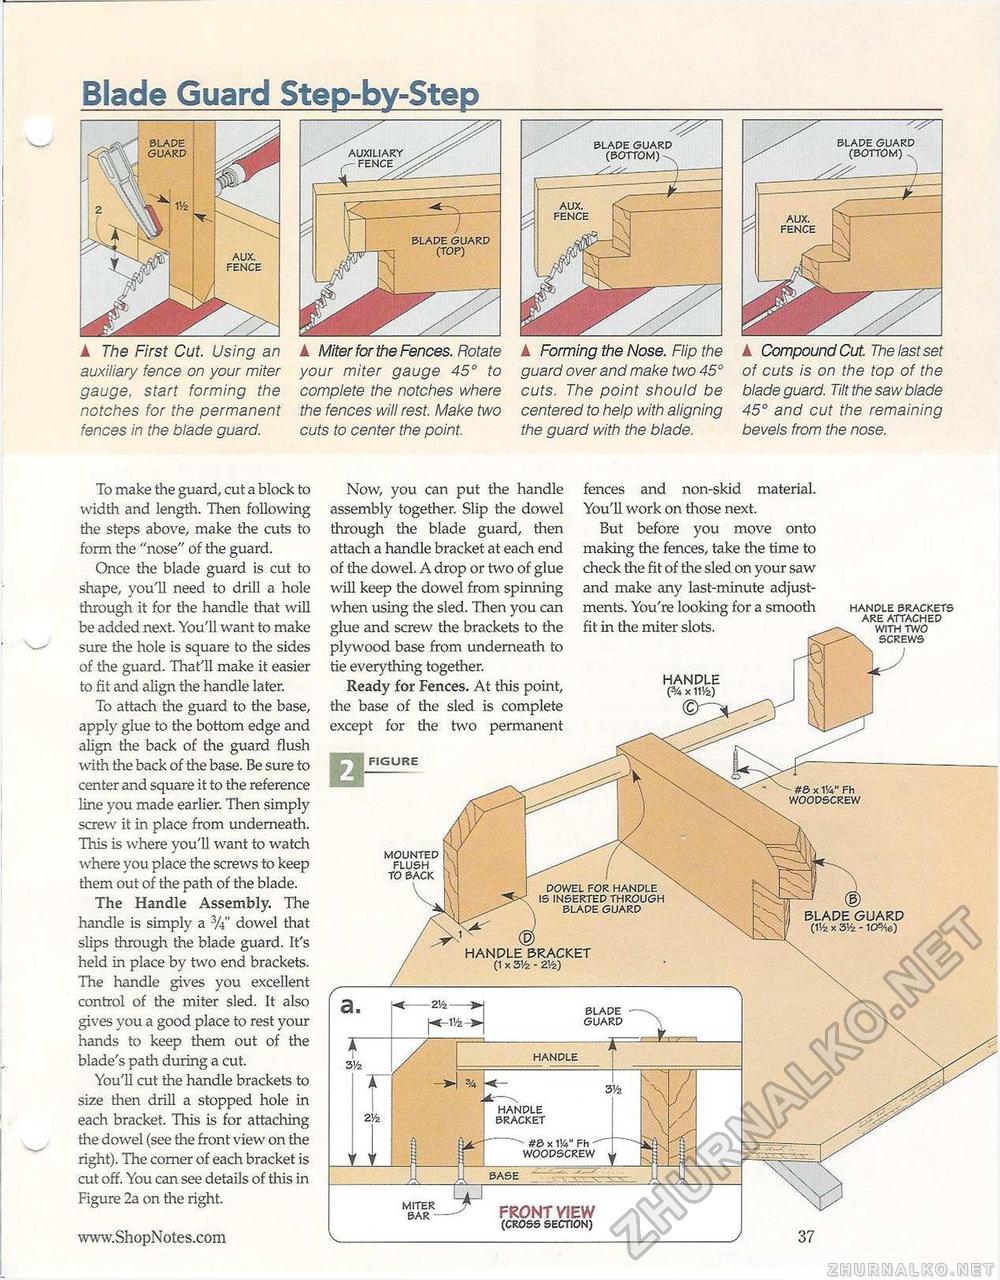
Blade Guard Step-by-Step blade guard (bottom) blade guard aux. fence blade guard (top) A The First Cut. Using an auxiliary fence on your miter gauge, start forming the notches for the permanent fences in the blade guard. k Miter for the Fences. Rotate your miter gauge 45° to complete the notches where the fences will rest. Make two cuts to center the point. ▲ Forming the Nose. Flip the guard over and make two 45° cuts. The point should be centered to help with aligning the guard with the blade. ▲ Compound Cut. The last set of cuts is on the top of the blade guard. Tilt the saw blade 45° and cut the remaining bevels from the nose. To make the guard, cut a block to width and length. Then following the steps above, make the cuts to form the "nose" of the guard. Once the blade guard is cut to shape, you'll need to drill a hole through it for the handle that will be added next. You'll want to make sure the hole is square to the sides of the guard. That'll make it easier to fit and align the handle later. To attach the guard to the base, apply glue to the bottom edge and align tlie back of the guard flush with the back of the base. Be sure to center and square it to the reference line you made earlier. Then simply screw it in place from underneath. This is where you'll want to watch where you place the screws to keep them out of the path of the blade. The Handle Assembly. The handle is simply a %" dowel that slips through the blade guard. It's held in place by two end brackets. The handle gives you excellent control of the miter sled. It also gives you a good place to rest your hands to keep them out of the blade's path during a cut. You'll cut the handle brackets to size then drill a stopped hole in each bracket. This is for attaching the dowel (see the front view on the right). The comer of each bracket is cut off. You can see details of this in Figure 2a on the right. FIGURE #B x W Fh woodscrew mounted flush to back BLADE GUARD (1'/2 X 3'/2 - 105/,6) Now, you can put the handle assembly together. Slip the dowel through the blade guard, then attach a handle bracket at each end of the dowel. A drop or two of glue will keep the dowel from spinning when using the sled. Then you can glue and screw the brackets to the plywood base from underneath to tie everything together. Ready for Fences. At this point, the base of the sled is complete except for the two permanent fences and non-skid material. You'll work on those next. But before you move onto making the fences, take the time to check the fit of the sled on your saw and make any last-minute adjustments. You're looking for a smooth handle brackets ... . ., , , ° are attached ht in the miter slots. ^—^ with two screws HANDLE (% x iiy2) miter v bar - base FRONT VIEW (cross section) -214- blade guard "3 r handle handle bracket #& x 114" Fh woodscrew |


