85 - Router Table, страница 38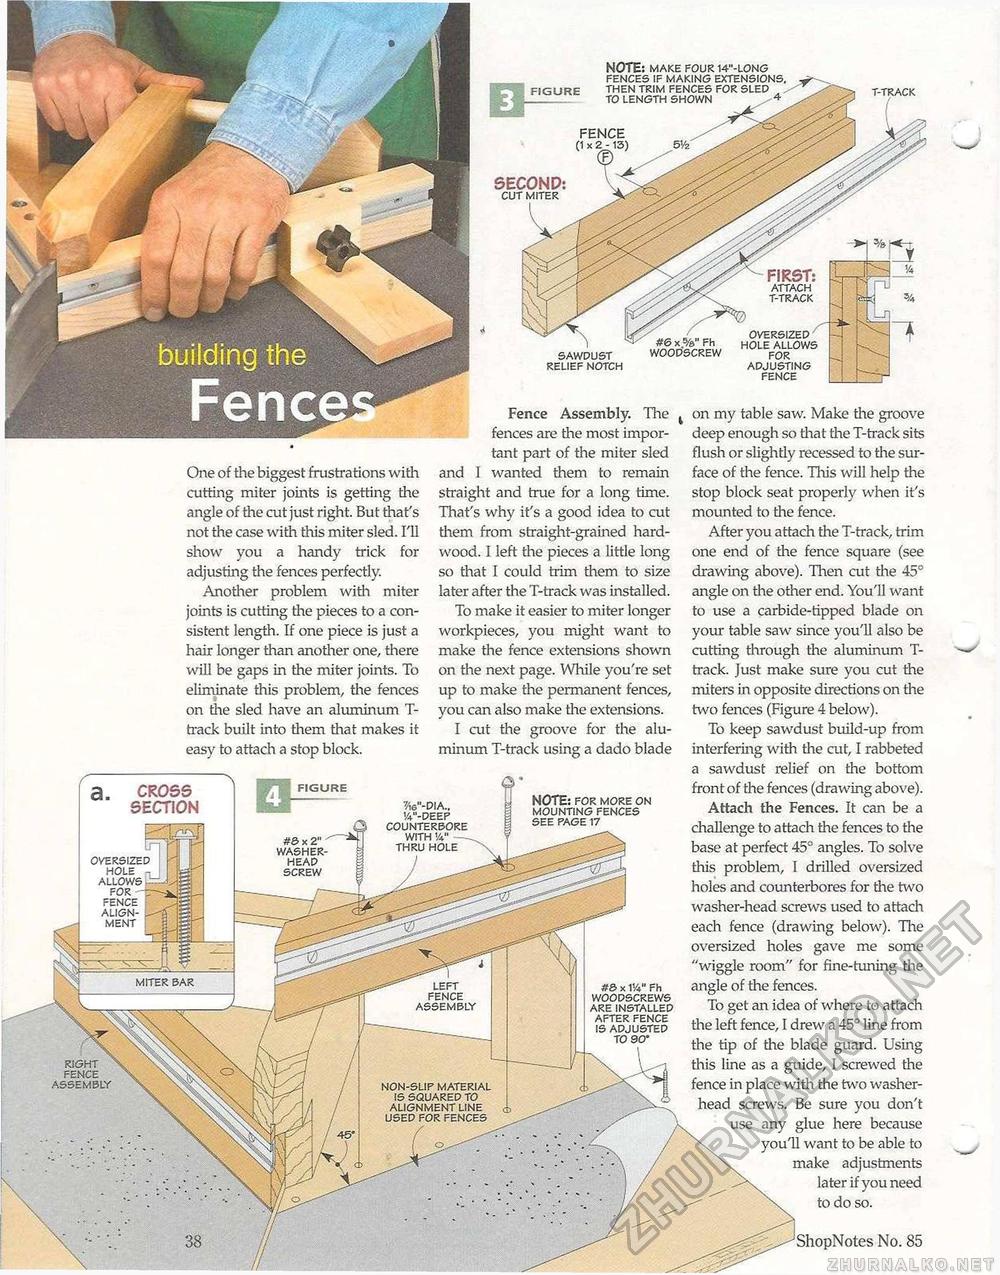
#e> x 2" WASHER-HEAD SCREW MITER BAR NON-SLIP MATERIAL IS SQUARED TO ALIGNMENT LINE USED FOR FENCES ShopNotes One of the biggest frustrations with cutting miter joints is getting tire angle of the cut just right. But that's not the case with this miter sled. I'll show you a handy trick for adjusting the fences perfectly. Another problem with miter joints is cutting tire pieces to a consistent length. If one piece is just a hair longer than another one, there will be gaps in the miter joints. To eliminate this problem, the fences on the sled have an aluminum T-track built into them that makes it easy to attach a stop block. Fence Assembly. The fences are the most important part of the miter sled and I wanted them to remain straight and true for a long time. That's why it's a good idea to cut them from straight-grained hardwood. I left the pieces a little long so that I could trim them to size later after the T-track was installed. To make it easier to miter longer workpieces, you might want to make the fence extensions shown on the next page. While you're set up to make the permanent fences, you can also make tire extensions. I cut the groove for the aluminum T-track using a dado blade NOTE: FOR MORE ON MOUNTING FENCES SEE PAGE 17 CROSS SECTION FIGURE 7/i6"-DIA.. VV'-DEEP COUNTERBORE WITH'A" — THRU HOLE OVERSIZED HOLE -ALLOWS -FOR -FENCE ALIGN- -MENT LEFT FENCE ASSEMBLY #0 x 1Vi" Fh WOODSCREWS ARE INSTALLED AFTER FENCE IS ADJUSTED TO 90° RIGHT ASSEMBLY on my table saw. Make the groove deep enough so that the T-track sits flush or slightly recessed to the surface of the fence. This will help the stop block seat properly when it's mounted to the fence. After you attach the T-track, trim one end of the fence square (see drawing above). Then cut the 45° angle on the other end. You'll want to use a carbide-tipped blade on your table saw since you'll also be cutting through the aluminum T-track. Just make sure you cut the miters in opposite directions on the two fences (Figure 4 below). To keep sawdust build-up from interfering with the cut, I rabbeted a sawdust relief on the bottom front of the fences (drawing above). Attach the Fences. It can be a challenge to attach the fences to the base at perfect 45° angles. To solve this problem, I drilled oversized holes and counterbores for the two washer-head screws used to attach each fence (drawing below). The oversized holes gave me some "wiggle room" for fine-tuning the angle of the fences. To get an idea of where to attach tire left fence, I drew a 45° line from the tip of the blade guard. Using this line as a guide, I screwed the fence in place with the two washer-head screws. Be sure you don't use any glue here because you'll want to be able to make adjustments later if you need to do so. FIGURE NOTE: MAKE FOUR 14"-LONG FENCES IF MAKING EXTENSIONS, THEN TRIM FENCES FOR SLED TO LENGTH SHOWN SECOND: CUT MITER FIRST: ATTACH T-TRACK OVERSIZED HOLE ALLOWS FOR ADJUSTING FENCE SAWDUST RELIEF NOTCH ______ Fh WOOD'SCREW |


