86, страница 8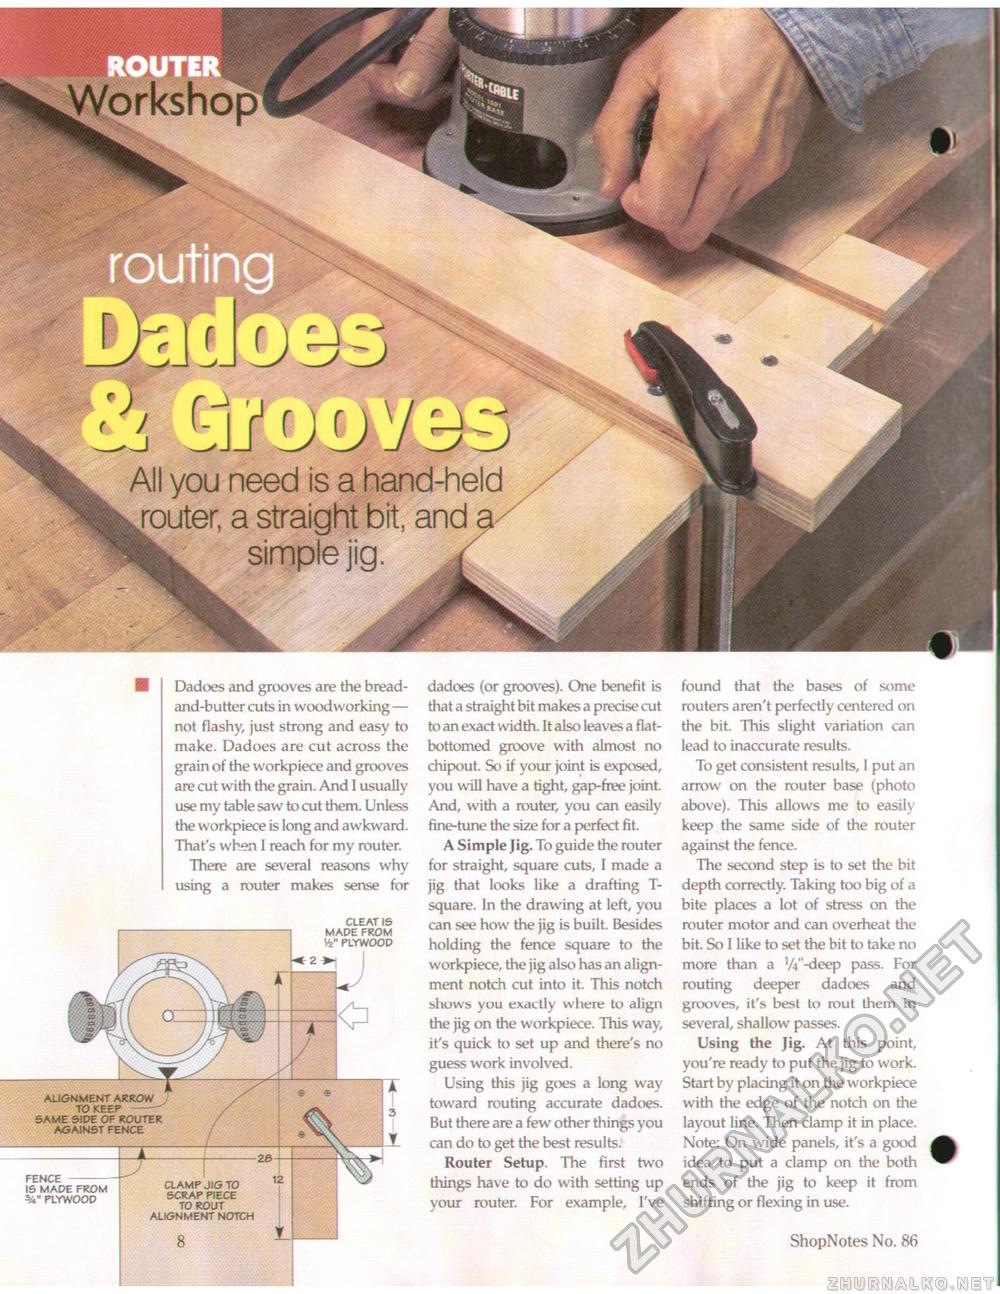
All you need is a hand-held router, a straight bit, and simple jig. Dadoes and grooves are the bread-and-butter cuts in woodworking — not flashy, just strong and easy to make. Dadoes are cut across the grain of the workpiece and grooves are cut with the grain. And I usually use my table saw to cut them. Unless the workpiece is long and awkward. That's when I reach for my router. There are several reasons why using a router makes sense for dadoes (or grooves). One benefit is that a straight bit makes a precise cut to an exact width. It also leaves a flat-bottomed groove with almost no chipout. So if your joint is exposed, you will have a tight, gap-free joint. And, with a router, you can easily fine-tune the size for a perfect fit. A Simple Jig. To guide the router for straight, square cuts, I made a jig that looks like a drafting T-square. In the drawing at left, you can see how the jig is built. Besides holding the fence square to the workpiece, the jig also has an alignment notch cut into it. This notch shows you exactly where to align the jig on the workpiece. This way, it's quick to set up and there's no guess work involved. Using this jig goes a long way toward routing accurate dadoes. But there are a few other things you can do to get the best results. Router Setup. The first two things have to do with setting up your router. For example, I've found that the bases of some routers aren't perfectly centered on the bit. This slight variation can lead to inaccurate results. To get consistent results, I put an arrow on the router base (photo above). This allows me to easily keep the same side of the router against the fence. The second step is to set the bit depth correctly. Taking too big of a bite places a lot of stress on the router motor and can overheat the bit. So I like to set the bit to take no more than a VV'-deep pass. For routing deeper dadoes and grooves, it's best to rout them in several, shallow passes. Using the Jig. At this point, you're ready to put the jig to work. Start by placing it on the workpiece with the edge of the notch on the layout line. Then clamp it in place. Note: On wide panels, it's a gcxxi idea to put a clamp on the both ends of the jig to keep it from shifting or flexing in use. 8 ShopNotes No. 86 CLEAT 15 MADE FROM Vfe" PLYWOOD alignment arrow to keep — same side of router against fence FENCE — IS MADE FROM PLYWOOD clamp jig to scrap piece to rout alignment notch |


