88, страница 47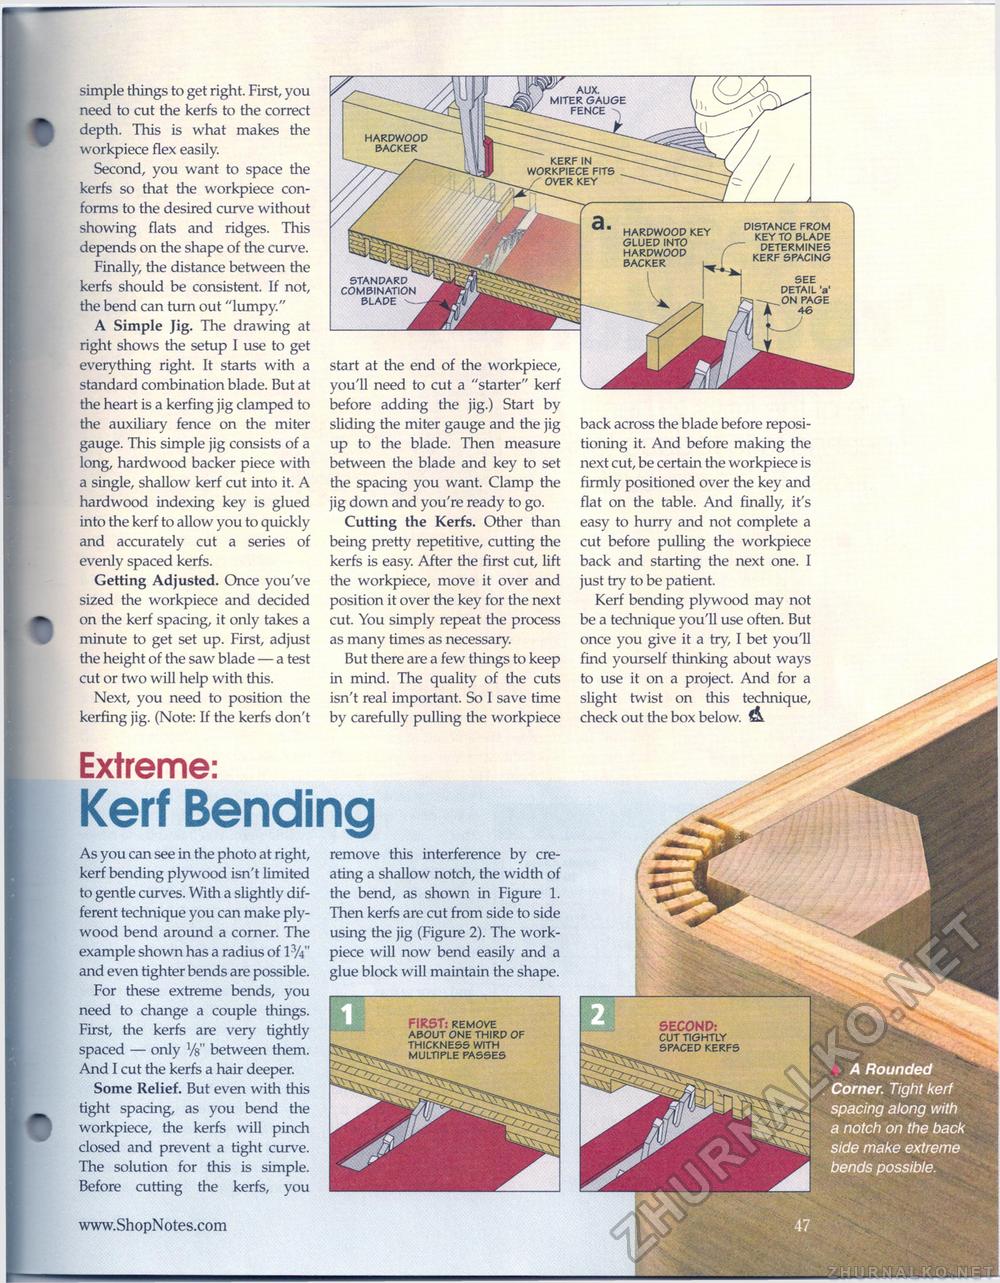
A Rounded Corner. Tight kerf spacing along with a notch on the back side make extreme bends possible. simple things to get right. First, you need to cut the kerfs to the correct depth. This is what makes the workpiece flex easily. Second, you want to space the kerfs so that the workpiece conforms to the desired curve without showing flats and ridges. This depends on the shape of the curve. Finally, the distance between the kerfs should be consistent. If not, the bend can turn out "lumpy." A Simple Jig. The drawing at right shows the setup I use to get everything right. It starts with a standard combination blade. But at the heart is a kerfing jig clamped to the auxiliary fence on the miter gauge. This simple jig consists of a long, hardwood backer piece with a single, shallow kerf cut into it. A hardwood indexing key is glued into the kerf to allow you to quickly and accurately cut a series of evenly spaced kerfs. Getting Adjusted. Once you've sized the workpiece and decided on the kerf spacing, it only takes a minute to get set up. First, adjust the height of the saw blade — a test cut or two will help with this. Next, you need to position the kerfing jig. (Note: If the kerfs don't Extreme:Kerf BendingHARDWOOD BACKER As you can see in the photo at right, kerf bending plywood isn't limited to gentle curves. With a slightly different technique you can make plywood bend around a corner. The example shown has a radius of 13A" and even tighter bends are possible. For these extreme bends, you need to change a couple things. First, the kerfs are very tightly spaced — only Vs" between them. And I cut the kerfs a hair deeper. Some Relief. But even with this tight spacing, as you bend the workpiece, the kerfs will pinch closed and prevent a tight curve. The solution for this is simple. Before cutting the kerfs, you STANDARD COMBINATION BLADE start at the end of the workpiece, you'll need to cut a "starter" kerf before adding the jig.) Start by sliding the miter gauge and the jig up to the blade. Then measure between the blade and key to set the spacing you want. Clamp the jig down and you're ready to go. Cutting the Kerfs. Other than being pretty repetitive, cutting the kerfs is easy. After the first cut, lift the workpiece, move it over and position it over the key for the next cut. You simply repeat the process as many times as necessary. But there are a few things to keep in mind. The quality of the cuts isn't real important. So I save time by carefully pulling the workpiece remove this interference by creating a shallow notch, the width of the bend, as shown in Figure 1. Then kerfs are cut from side to side using the jig (Figure 2). The work-piece will now bend easily and a glue block will maintain the shape. DISTANCE FROM KEY TO BLADE DETERMINES KERF SPACING SEE DETAIL 'a' ON PAGE 46 back across the blade before repositioning it. And before making the next cut, be certain the workpiece is firmly positioned over the key and flat on the table. And finally, it's easy to hurry and not complete a cut before pulling the workpiece back and starting the next one. I just try to be patient. Kerf bending plywood may not be a technique you'll use often. But once you give it a try, I bet you'll find yourself thinking about ways to use it on a project. And for a slight twist on this technique, check out the box below. HARDWOOD KEY SECOND: cut tightly spaced kerfs FIRST: remove about one third of thickness with multiple passes |


