90 - Get the Most out of a Plunge Router, страница 35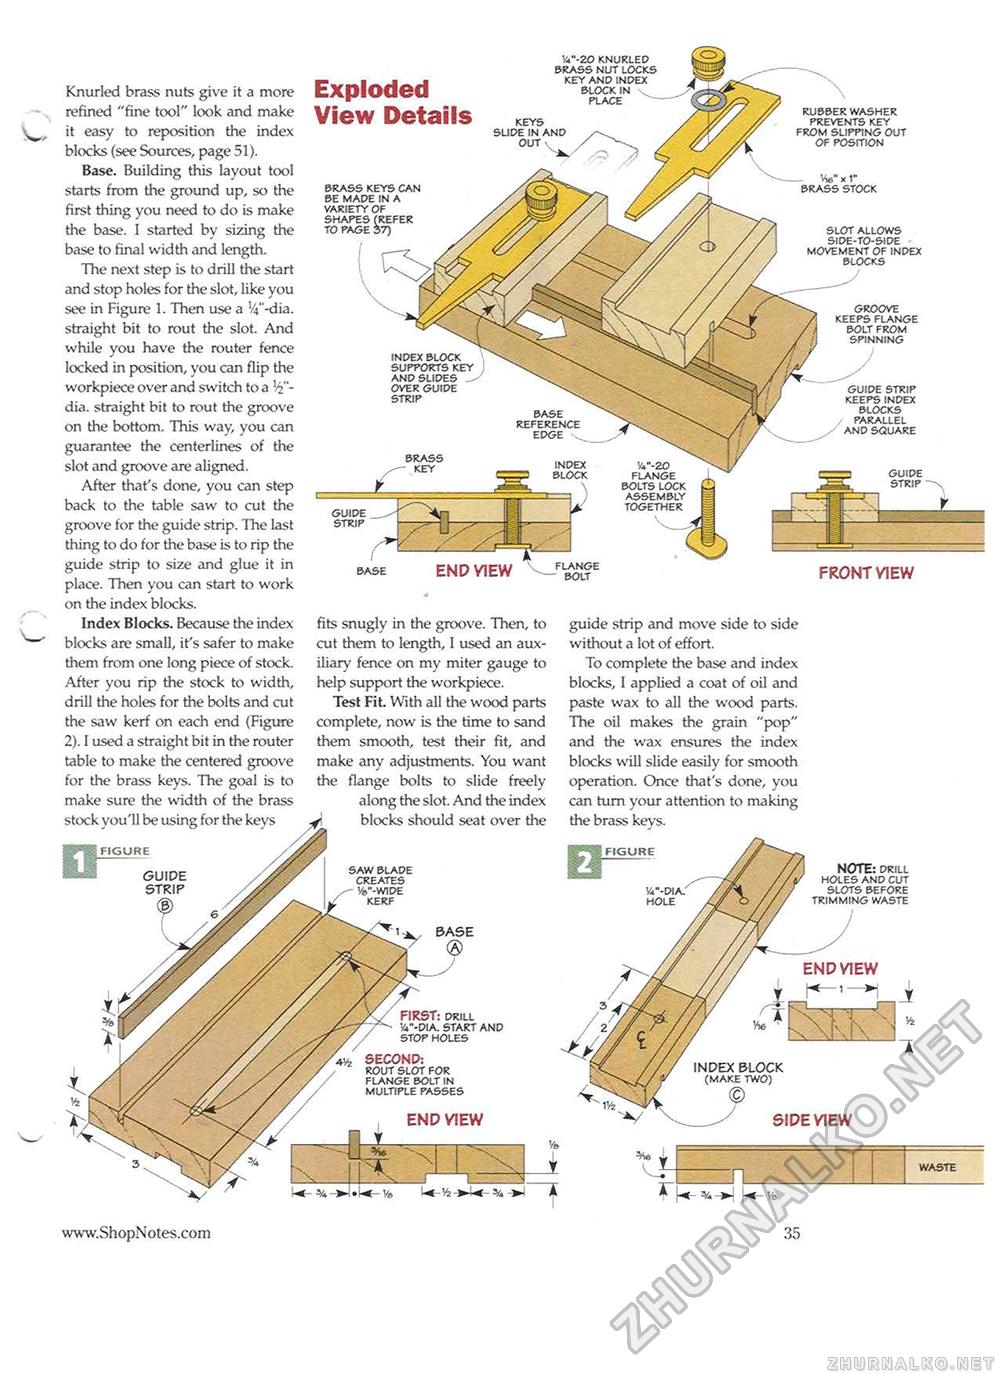
Exploded View Details V*"-20 knurled brass nut locks key and index block in place brass keys can be made in a variety of shapes (refer to page 37) index block supports key and slides over guide strip brass key i_ FRONT VIEW guide strip base END VIEW base reference edge rubber washer prevents key from slipping out of position xl" stock slot allows side-to-side movement of index blocks groove keeps flange bolt from spinning guide strip keeps index blocks parallel and square Knurled brass nuts give it a more refined "fine tool" look and make it easy to reposition the index blocks (see Sources, page 51). Base. Building this layout tool starts from the ground up, so the first thing you need to do is make the base. I started by sizing the base to final width and length. The next step is to drill the start and stop holes for the slot, like you see in Figure 1. Then use a V-dia. straight bit to rout the slot. And while you have the router fence locked in position, you can flip the workpiece over and switch to a dia. straight bit to rout the groove on the bottom. This way, you can guarantee the centerlines of the slot and groove are aligned. After that's done, you can step back to the table saw to cut the groove for the guide strip. The last thing to do for the base is to rip the guide strip to size and glue it in place. Then you can start to work on the index blocks. Index Blocks. Because the index blocks are small, it's safer to make them from one long piece of stock. After you rip the stock to width, drill the holes for the bolts and cut the saw kerf on each end (Figure 2). I used a straight bit in the router table to make the centered groove for the brass keys. The goal is to make sure the width of the brass stock you '11 be using for the keys y fits snugly in the groove. Then, to cut them to length, I used an auxiliary fence on my miter gauge to help support the workpiece. Test Fit. With all the wood parts complete, now is the time to sand them smooth, test their fit, and make any adjustments. You want the flange bolts to slide freely along the slot. And the index blocks should seat over the guide strip and move side to side without a lot of effort. To complete the base and index blocks, I applied a coat of oil and paste wax to all the wood parts. The oil makes the grain "pop" and the wax ensures the index blocks will slide easily for smooth operation. Once that's done, you can turn your attention to making the brass keys. NOTE: drill holes and cut slots before trimming waste SIDE VIEW
35 |
||||||||||||||


