91 - Planer Stand, страница 9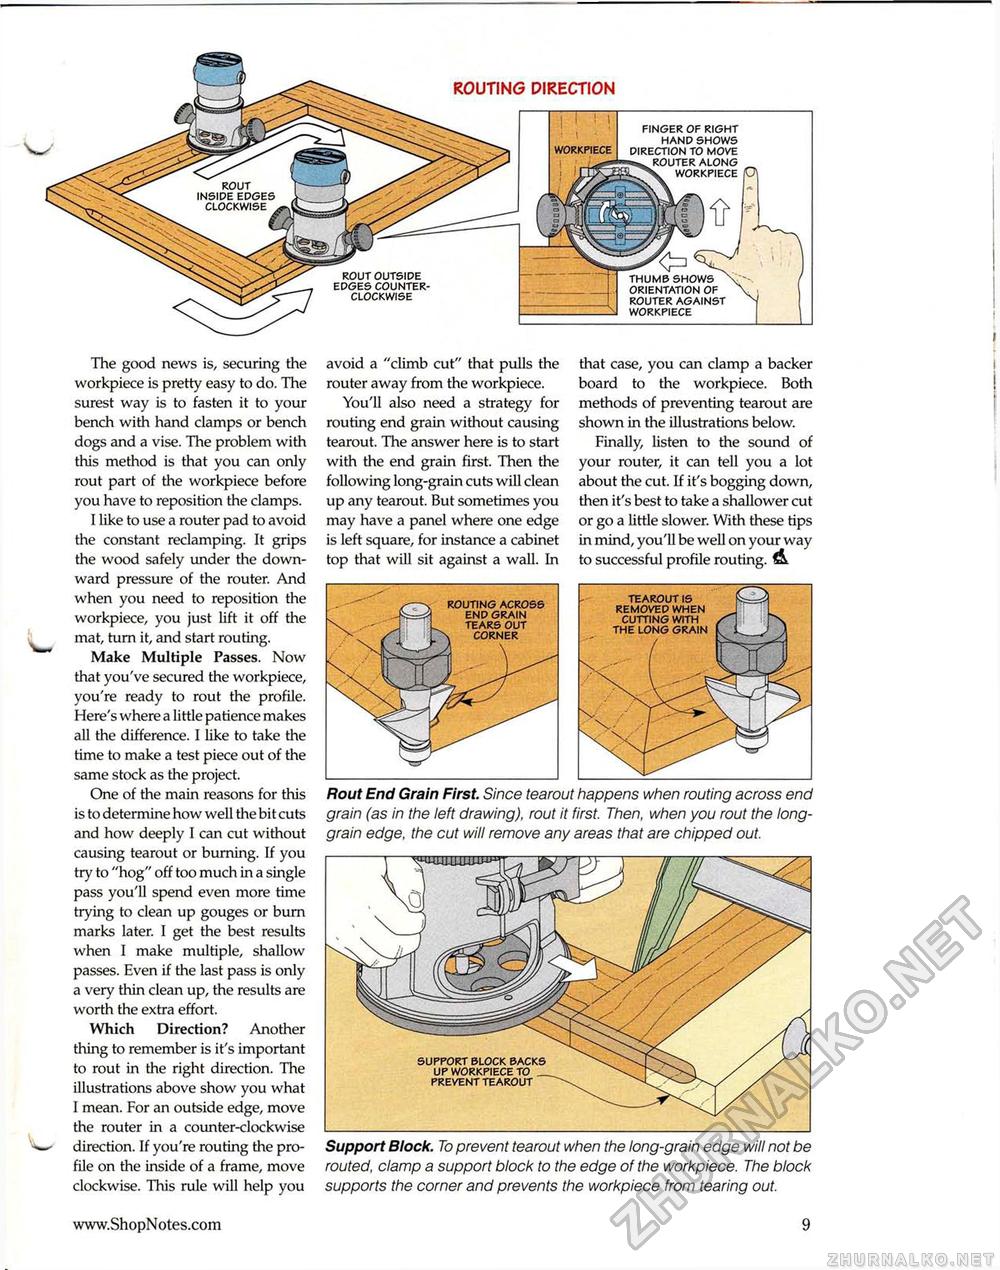
rout outside edges counterclockwise ROUTING DIRECTION thumb shows orientation of router against workpiece TT7 \ • workpiece finger of right hand shows direction to move router along workpiece The good news is, securing the workpiece is pretty easy to do. The surest way is to fasten it to your bench with hand clamps or bench dogs and a vise. The problem with this method is that you can only rout part of the workpiece before you have to reposition the clamps. I like to use a router pad to avoid the constant reclamping. It grips the wood safely under the downward pressure of the router. And when you need to reposition the workpiece, you just lift it off the mat, turn it, and start routing. Make Multiple Passes. Now that you've secured the workpiece, you're ready to rout the profile. Here's where a little patience makes all the difference. I like to take the time to make a test piece out of the same stock as the project. One of the main reasons for this is to determine how well the bit cuts and how deeply I can cut without causing tearout or burning. If you try to "hog" off too much in a single pass you'll spend even more time trying to clean up gouges or burn marks later. I get the best results when I make multiple, shallow passes. Even if the last pass is only a very thin clean up, the results are worth the extra effort. Which Direction? Another thing to remember is it's important to rout in the right direction. The illustrations above show you what I mean. For an outside edge, move the router in a counter-clockwise direction. If you're routing the profile on the inside of a frame, move clockwise. This rule will help you avoid a "climb cut" that pulls the router away from the workpiece. You'll also need a strategy for routing end grain without causing tearout. The answer here is to start with the end grain first. Then the following long-grain cuts will clean up any tearout. But sometimes you may have a panel where one edge is left square, for instance a cabinet top that will sit against a wall. In that case, you can clamp a backer board to the workpiece. Both methods of preventing tearout are shown in the illustrations below. Finally, listen to the sound of your router, it can tell you a lot about the cut. If it's bogging down, then it's best to take a shallower cut or go a little slower. With these tips in mind, you'll be well on your way to successful profile routing. Rout End Grain First. Since tearout happens when routing across end grain (as in the left drawing), rout it first. Then, when you rout the long-grain edge, the cut will remove any areas that are chipped out. Support Block. To prevent tearout when the long-grain edge will not be routed, clamp a support block to the edge of the workpiece. The block supports the corner and prevents the workpiece from tearing out. tearout is removed when cutting with the long grain support block backs up workpiece to prevent tearout 9 |


