92, страница 29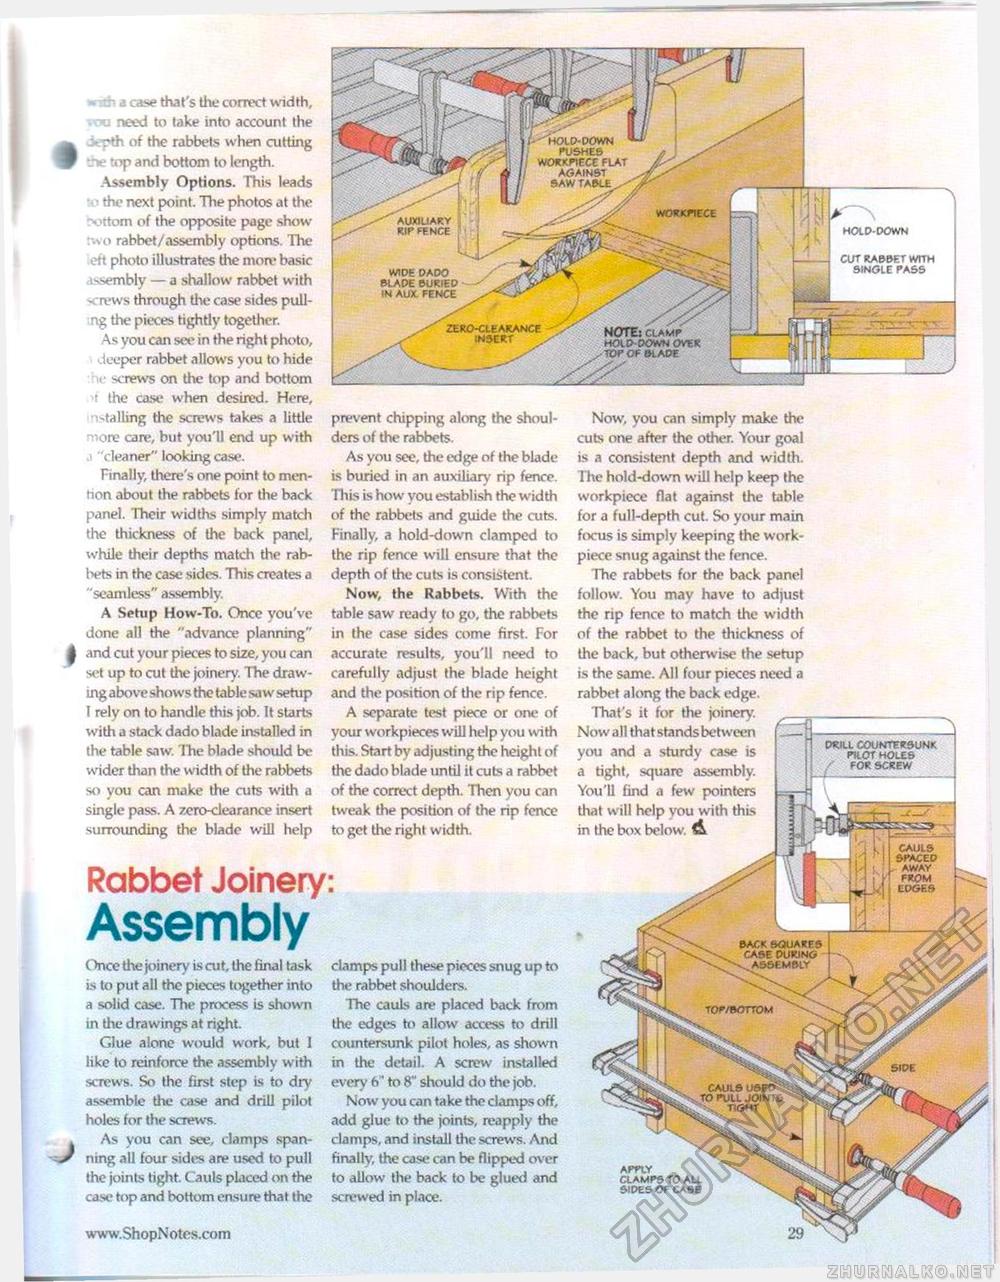
case that's die correct width, need to take into account the ~ pth of the rabbets when cutting W ">' top and bottom to length. Assembly Options. This leads the next point. The photos at the vrtom of the opposite page show o rabbet/assembly options. The eft photo illustrates the more basic issembly — a shallow rabbet with -rews through the case sides puling the pieces tightly together. As you can see in the right photo, deeper rabbet allows you to hide he screws on the top and bottom r the case when desired. Here, -^stalling the screws takes a little more care, but you'll end up with .1 'cleaner" looking case. Finally, there's one point to mention about the rabbets for the bark panel. Their widths simply match the thickness of the back panel, while their depths match the rabbets in the case sides. This creates a "seamless" assembly. A Setup How-To. Once you've done all the "advance planning" | and cut your pieces to size, you can set up to cut the joiner)'. The drawing above shows the table saw setup I rely on to handle this job. It starts with a stack dado blade installed in the table saw. The blade should be wider than the width of the rabbets so you can make the cuts with a single pass. A zero-clearance insert surrounding the blade will help prevent chipping along the shoulders of the rabbets. As you see, the edge of the blade is buried in an auxiliary rip fence. This is how you establish the width of the rabbets and guide the cuts. Finally, a hold-down clamped to the rip fence will ensure that the depth of the cuts is consistent. Now, the Rabbets. With the table saw ready to go, the rabbets in the case sides come first. For accurate results, you'll need to carefully adjust the blade height and the position of the rip fence. A separate test piece or one of your workpieces will help you with this. Start bv adjusting the height of the dado blade until it cuts a rabbet of the correct depth. Then you can tweak the position of the rip fence to get the right width. Rabbet Joinery: Assembly Once die joinery is cut, the final task is to put all the pieces together into a solid case. The process is shown in the drawings at right. Glue alone would work, but 1 like to reinforce the assembly with screws. So the first step is to dry assemble die case and drill pilot holes for the screws. As you can see, clamps spanning all four sides are used to pull the joints tight. Cauls placed on the case top and bottom ensure that the clamps pull these pieces snug up to the rabbet shoulders. The cauls are placed back from the edges to allow access to drill countersunk pilot holes, as shown in the detail. A screw installed every 6" to 8" should do the job. Now you can take the clamps off, add glue to the joints, reapply the clamps, and install the screws. And finally, the case can be flipped over to allow the back to be glued and screwed in place. DRILL COUNTERSUNK PILOT HOLES / FOR SCREW cauls spaced away from edges sack squares case during v, assembly top/bottom cauls u6ed -• to pull joints ^ tight - hold-down ' pushes workpiece flat against saw table auxiliary rip fence wide dado blade buried in aux fence zero-clearance insert NOTE: clamp hotdroown over top of blade Now, you can simply make the cuts one after the other. Your goal is a consistent depth and width. The hold-down will help keep the workpiece flat against the table for a full-depth cut. So your main focus is simply keeping the work-piece snug against die fence. The rabbets for the back panel follow. You may have to adjust the rip fence to match the width of the rabbet to the thickness of die back, but otherwise the setup is the same. All four pieces need a rabbet along the back edge. That's it for the joinery. Now all that stands between you and a sturdy case is a tight, square assembly. You'll find a few pointers that will help you with this in the box below. A apply clamps to all sides of case \ _____ hold-down cut rabbet with single pass |


