93, страница 15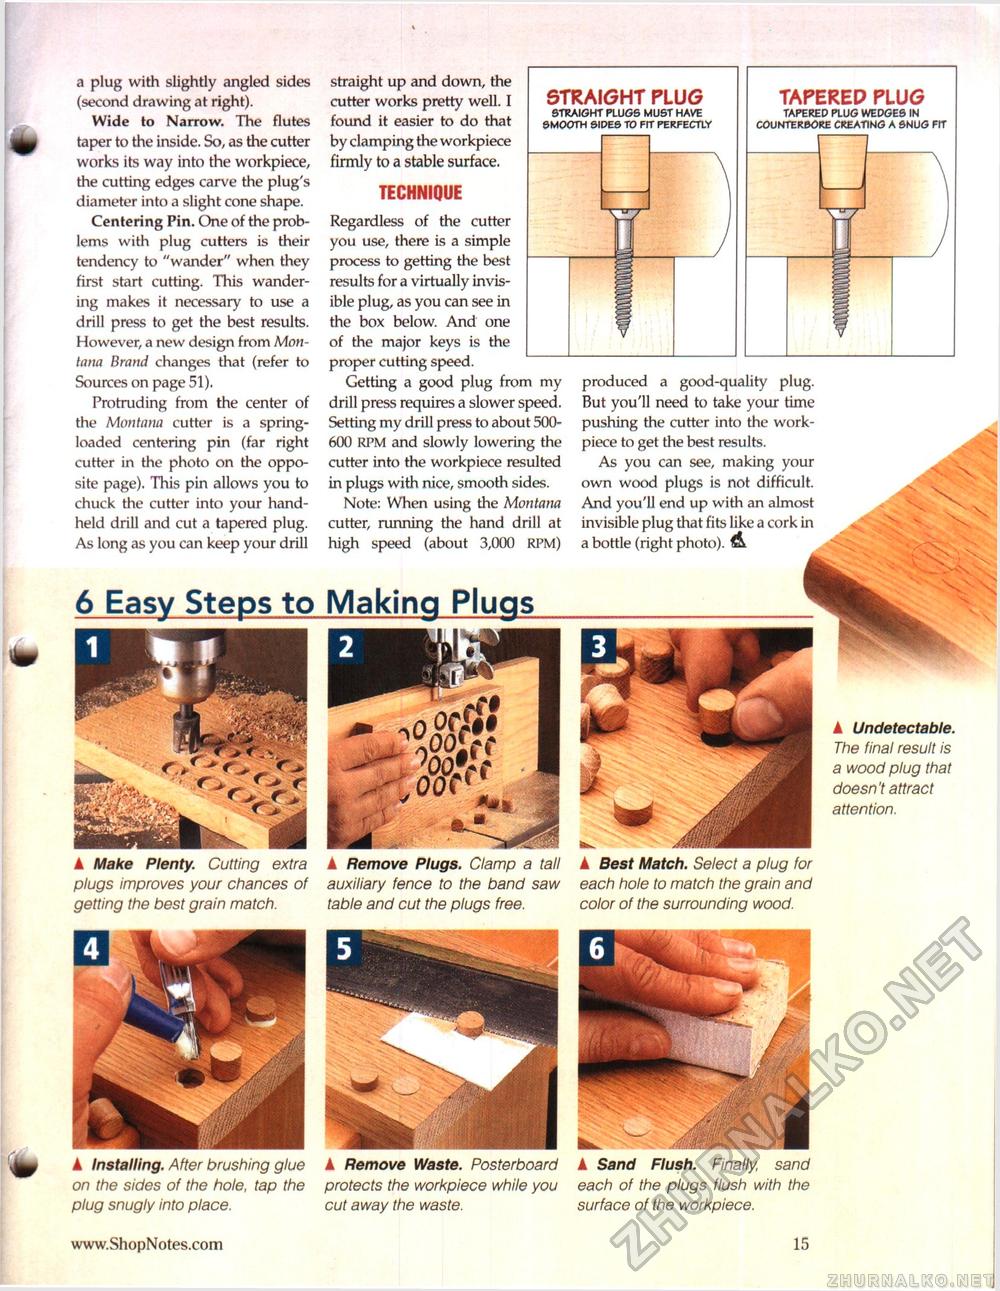
a plug with slightly angled sides (second drawing at right). Wide to Narrow. The flutes taper to the inside. So, as the cutter works its way into the workpiece, the cutting edges carve the plug's diameter into a slight cone shape. Centering Pin. One of the problems with plug cutters is their tendency to "wander" when they first start cutting. This wandering makes it necessary to use a drill press to get the best results. However, a new design from Montana Brand changes that (refer to Sources on page 51). Protruding from the center of the Montana cutter is a spring-loaded centering pin (far right cutter in the photo on the opposite page). This pin allows you to chuck the cutter into your handheld drill and cut a tapered plug. As long as you can keep your drill A Make Plenty. Cutting extra plugs improves your chances of getting the best grain match. A Remove Plugs. Clamp a tall auxiliary fence to the band saw table and cut the plugs free. A Best Match. Select a plug for each hole to match the grain and color of the surrounding wood. A Undetectable. The final result is a wood plug that doesn't attract attention. straight up and down, the cutter works pretty well. I found it easier to do that by clamping the workpiece firmly to a stable surface. TECHNIQUE Regardless of the cutter you use, there is a simple process to getting the best results for a virtually invisible plug, as you can see in the box below. And one STRAIGHT PLUG STRAIGHT PLUGS MUST HAVE SMOOTH SIDES TO FIT PERFECTLY of the major keys is the proper cutting speed. Getting a good plug from my drill press requires a slower speed. Setting my drill press to about 500-600 RPM and slowly lowering the cutter into the workpiece resulted in plugs with nice, smooth sides. Note: When using the Montana cutter, running the hand drill at high speed (about 3,000 RPM) 6 Easy Steps to Making Plugs -^ 11 if......... — produced a good-quality plug. But you'll need to take your time pushing the cutter into the work-piece to get the best results. As you can see, making your own wood plugs is not difficult. And you'll end up with an almost invisible plug that fits like a cork in a bottle (right photo). TAPEREP PLUG TAPERED PLUG WEDGES IN COUNTERBORE CREATING A SNUG FIT A Installing. After brushing glue on the sides of the hole, tap the plug snugly into place. A Remove Waste. Posterboard protects the workpiece while you cut away the waste. A Sand Flush. Finally sand each of the plugs flush with the surface of the workpiece. 15 |


