93, страница 32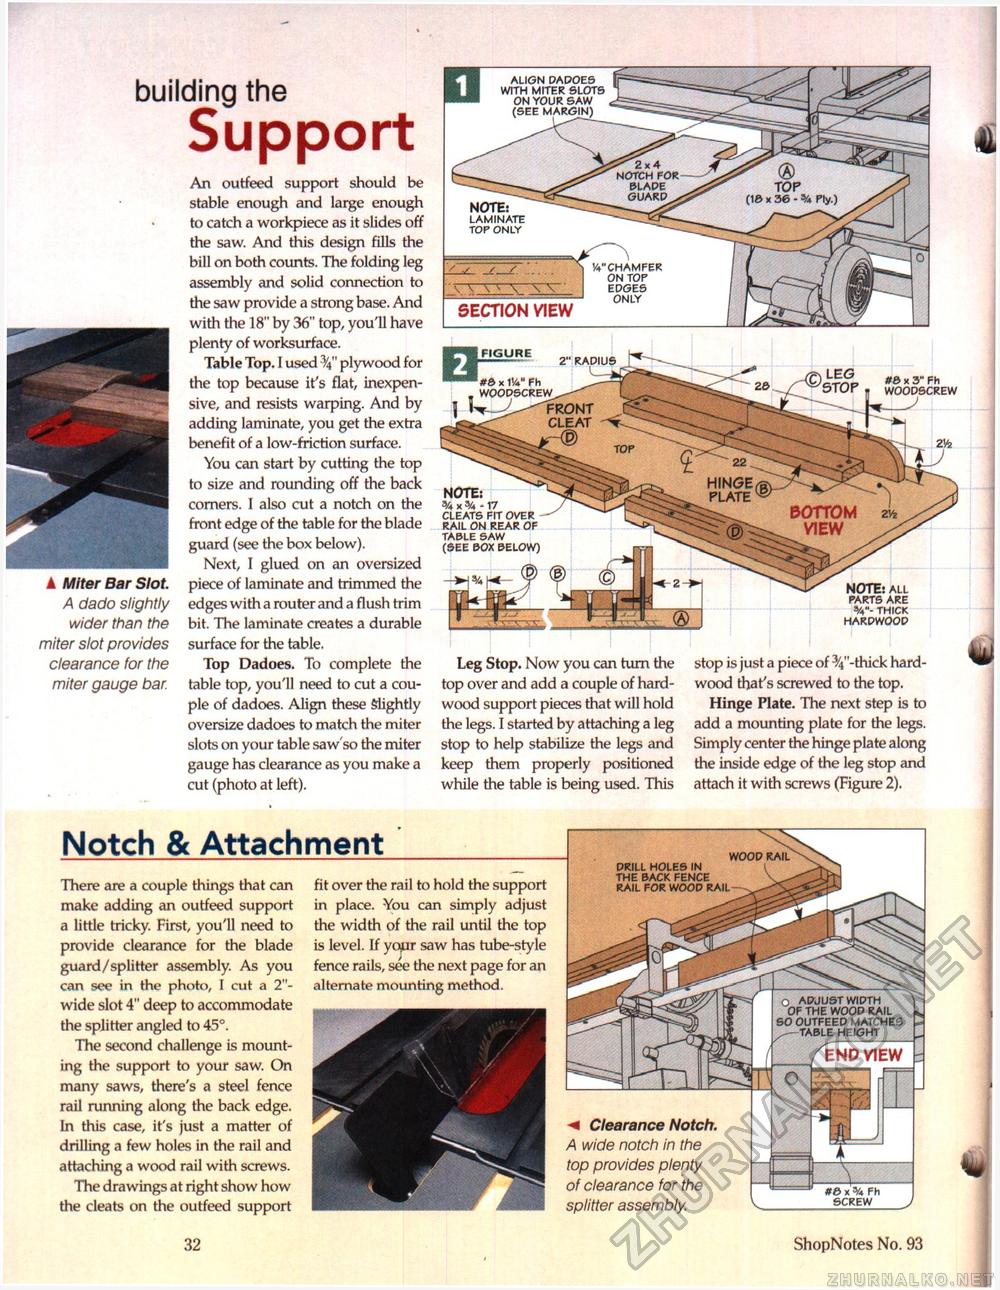
#0 x 3" Fh WOODSCREW HINGE plate note: X % -17 CLEATS FIT OVER RAIL ON REAR OF bottom 2h view TABLE SAW (SEE BOX BELOW) note: ALL PARTS ARE THICK HARDWOOD 2" RADIUS ZM \_* WOODSCREW^--- I W-^-^FRONT cleat ^ A Miter Bar Slot. A dado slightly wider than the miter slot provides clearance for the miter gauge bar. building the SupportAn outfeed support should be stable enough and large enough to catch a workpiece as it slides off the saw. And this design fills the bill on both counts. The folding leg assembly and solid connection to the saw provide a strong base. And with the 18" by 36" top, you'll have plenty of worksurface. Table Top. I used plywood for the top because it's flat, inexpensive, and resists warping. And by adding laminate, you get the extra benefit of a low-friction surface. You can start by cutting the top to size and rounding off the back corners. I also cut a notch on the front edge of the table for the blade guard (see the box below). Next, I glued on an oversized piece of laminate and trimmed the edges with a router and a flush trim bit. The laminate creates a durable surface for the table. Top Dadoes. To complete the table top, you'll need to cut a couple of dadoes. Align these Slightly oversize dadoes to match the miter slots on your table saw'so the miter gauge has clearance as you make a cut (photo at left). note: LAMINATE TOP ONLY SECTION VIEW CHAMFER ON TOP EDGES ONLY Leg Stop. Now you can turn the top over and add a couple of hardwood support pieces that will hold the legs. I started by attaching a leg stop to help stabilize the legs and keep them properly positioned while the table is being used. This stop is just a piece of ^"-thick hardwood that's screwed to the top. Hinge Plate. The next step is to add a mounting plate for the legs. Simply center the hinge plate along the inside edge of the leg stop and attach it with screws (Figure 2). Notch & Attachment There are a couple things that can make adding an outfeed support a little tricky. First, you'll need to provide clearance for the blade guard/splitter assembly. As you can see in the photo, I cut a 2"-wide slot 4" deep to accommodate the splitter angled to 45°. The second challenge is mounting the support to your saw. On many saws, there's a steel fence rail running along the back edge. In this case, it's just a matter of drilling a few holes in the rail and attaching a wood rail with screws. The drawings at right show how the cleats on the outfeed support fit over the rail to hold the support in place. You can simply adjust the width of the rail until the top is level. If yojir saw has tube-style fence rails, see the next page for an alternate mounting method. WOOD RAIL DRILL HOLES IN THE BACK FENCE RAIL FOR WOOD RAIL Clearance Notch. A wide notch in the top provides plenty of clearance for the splitter assembly. 32 ShopNotes No. 93 |


