93, страница 33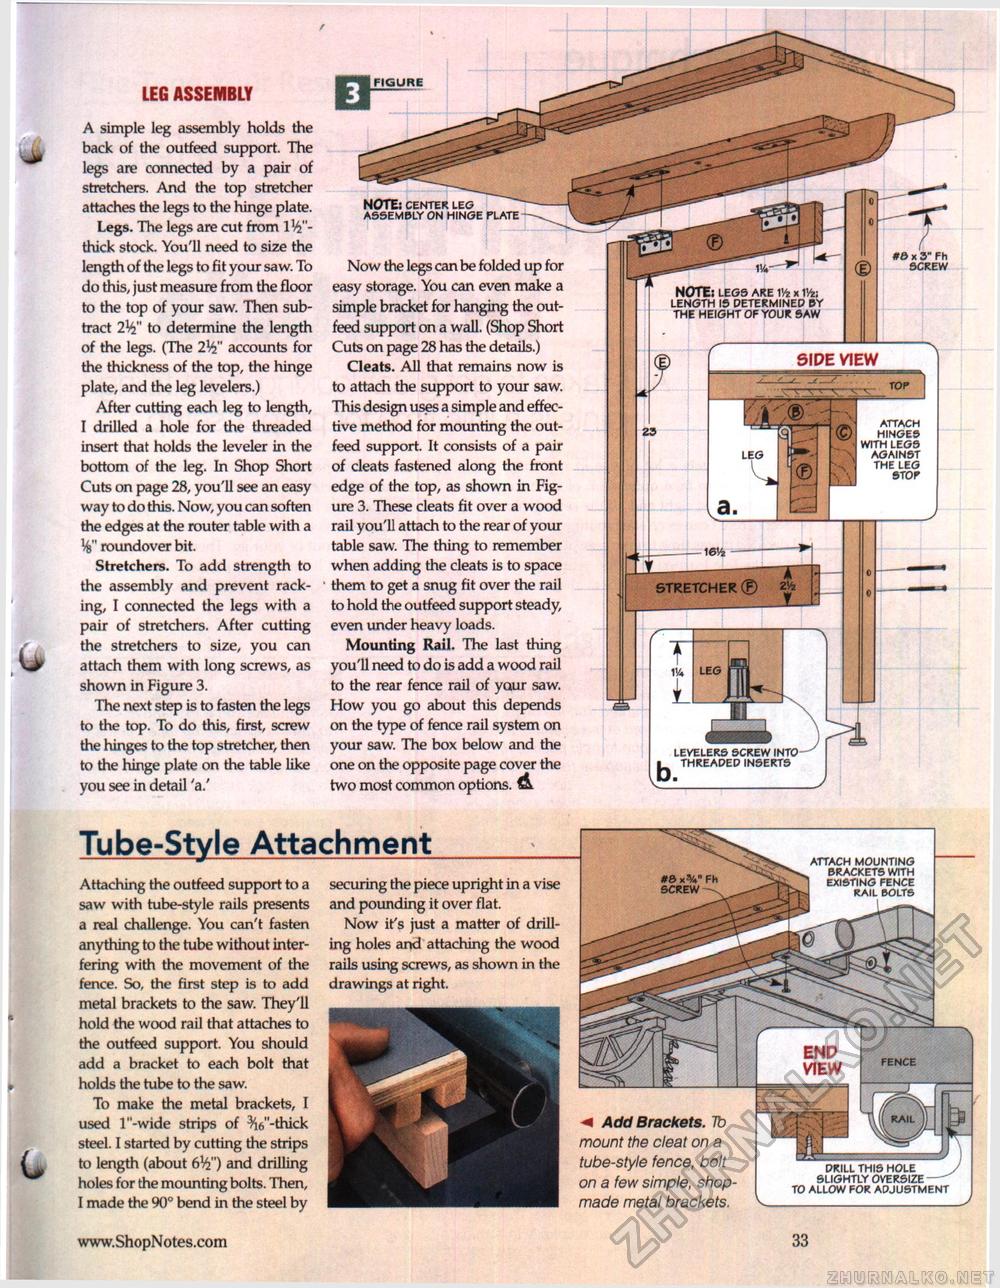
NOTE: CENTER LEG ASSEMBLY ON HINGE PLATE NOTE: LEGS ARE 1Vz X V/ii LENGTH IS DETERMINED BY THE HEIGHT OF YOUR SAW LEG ASSEMBLY A simple leg assembly holds the back of the outfeed support. The legs are connected by a pair of stretchers. And the top stretcher attaches the legs to the hinge plate. Legs. The legs are cut from W-thick stock. You'll need to size the length of the legs to fit your saw. To do this, just measure from the floor to the top of your saw. Then subtract iVi' to determine the length of the legs. (The 2^" accounts for the thickness of the top, the hinge plate, and the leg levelers.) After cutting each leg to length, I drilled a hole for the threaded insert that holds the leveler in the bottom of the leg. In Shop Short Cuts on page 28, you'll see an easy way to do this. Now, you can soften the edges at the router table with a roundover bit. Stretchers. To add strength to the assembly and prevent racking, I connected the legs with a pair of stretchers. After cutting the stretchers to size, you can attach them with long screws, as shown in Figure 3. The next step is to fasten the legs to the top. To do this, first, screw the hinges to the top stretcher, then to the hinge plate on the table like you see in detail 'a.' FIGURE Now the legs can be folded up for easy storage. You can even make a simple bracket for hanging the out-feed support on a wall. (Shop Short Cuts on page 28 has the details.) Cleats. All that remains now is to attach the support to your saw. This design uses a simple and effective method for mounting the out-feed support. It consists of a pair of cleats fastened along the front edge of the top, as shown in Figure 3. These cleats fit over a wood rail you'll attach to the rear of your table saw. The thing to remember when adding the cleats is to space them to get a snug fit over the rail to hold the outfeed support steady, even under heavy loads. Mounting Rail. The last thing you'll need to do is add a wood rail to the rear fence rail of your saw. How you go about this depends on the type of fence rail system on your saw. The box below and the one on the opposite page cover the two most common options. A #» x 3" Fh SCREW SIDE VIEW
ATTACH HINGES WITH LEGS AGAINST THE LEG STOr STRETCHER © LEVELERS SCREW INTO THREADED INSERTS Tube-Style Attachment Attaching the outfeed support to a saw with tube-style rails presents a real challenge. You can't fasten anything to the tube without interfering with the movement of the fence. So, the first step is to add metal brackets to the saw. They'll hold the wood rail that attaches to the outfeed support. You should add a bracket to each bolt that holds the tube to the saw. To make the metal brackets, I used l"-wide strips of ^W'-thick steel. I started by cutting the strips to length (about 6^") and drilling holes for the mounting bolts. Then, I made the 90° bend in the steel by securing the piece upright in a vise and pounding it over flat. Now it's just a matter of drilling holes and attaching the wood rails using screws, as shown in the drawings at right. #8 xV Fh screw ATTACH MOUNTING BRACKETS WITH EXISTING FENCE RAIL BOLTS END VIEW FENCE m Add Brackets, lb mount the cleat on a tube-style fence, bolt on a few simple, shop-made metal brackets. DRILL THIS HOLE SLIGHTLY OVERSIZE -TO ALLOW FOR ADJUSTMENT 33 |


