93, страница 45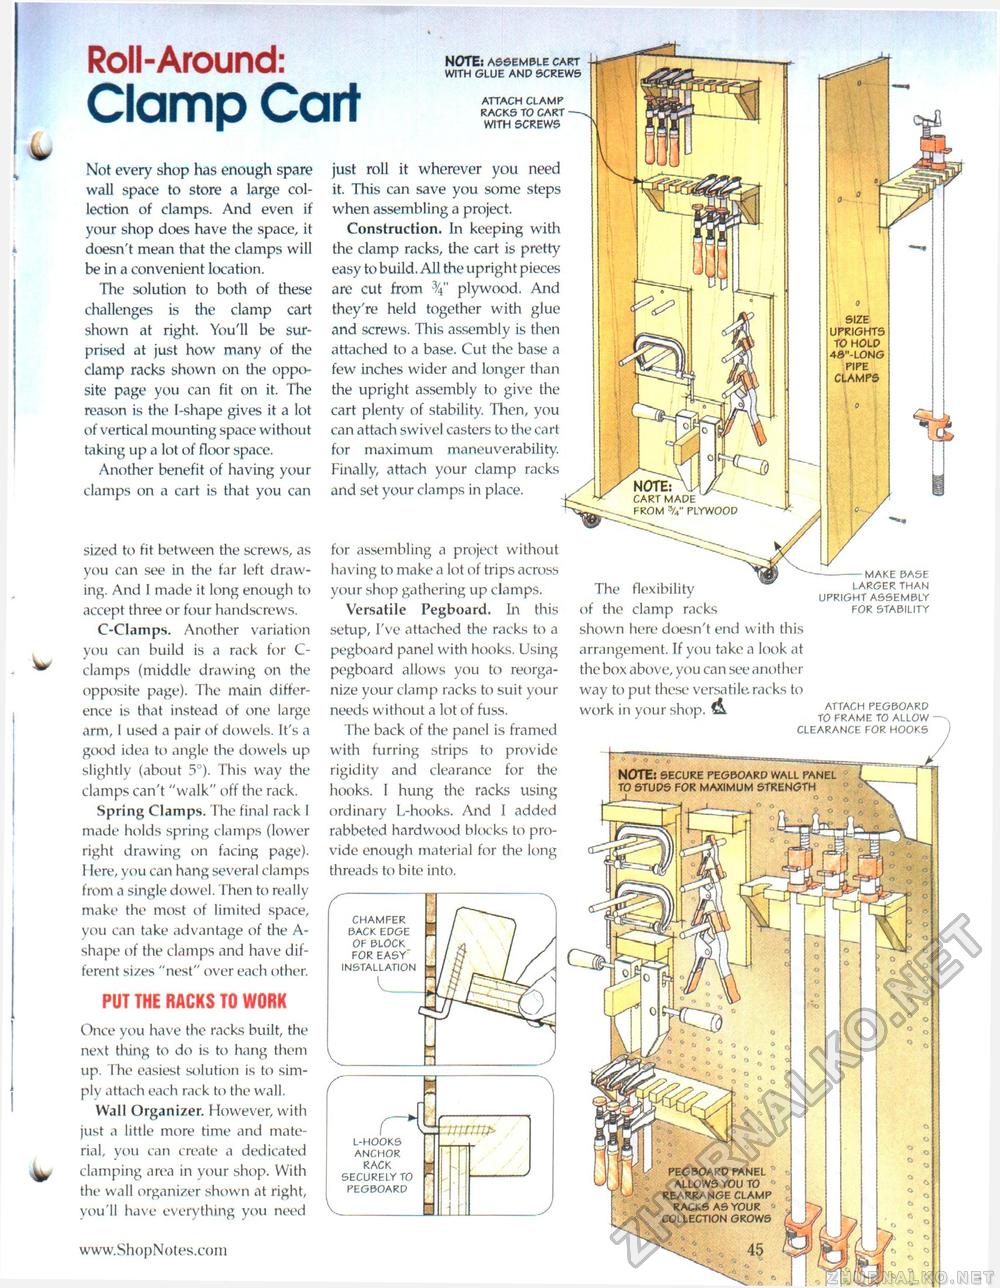
Roll-Around: Clamp Cart note: assemble cart with glue and screws attach clamp racks to cart with screws just roll it wherever you need it. This can save you some steps when assembling a project. Construction. In keeping with the clamp racks, the cart is pretty easy to build. All the upright pieces are cut from 34" plywood. And they're held together with glue and screws. This assembly is then attached to a base. Cut the base a few inches wider and longer than the upright assembly to give the cart plenty of stability. Then, you can attach swivel casters to the cart for maximum maneuverability. Finally, attach your clamp racks and set your clamps in place. Not every shop has enough spare wall space to store a large collection of clamps. And even if your shop does have the space, it doesn't mean that the clamps will be in a convenient location. The solution to both of these challenges is the clamp cart shown at right. You'll be surprised at just how many of the clamp racks shown on the opposite page you can fit on it. The reason is the I-shape gives it a lot of vertical mounting space without taking up a lot of floor space. Another benefit of having your clamps on a cart is that you can size uprights to hold 4s"-l0ng pipe clamps NOTE: M / CART MADE FROM 3/4" PLYWOOD for assembling a project withoLit having to make a lot of trips across your shop gathering up clamps. Versatile Pegboard. In this setup, I've attached the racks to a pegboard panel with hooks. Using pegboard allows you to reorganize your clamp racks to suit your needs without a lot of fuss. The back of the panel is framed with furring strips to provide rigidity and clearance for the hooks. I hung the racks using ordinary L-hooks. And I added rabbeted hardwood blocks to provide enough material for the long threads to bite into. sized to fit between the screws, as you can see in the far left drawing. And I made it long enough to accept three or four handscrews. C-CIamps. Another variation you can build is a rack for C-clamps (middle drawing on the opposite page). The main difference is that instead of one large arm, 1 used a pair of dowels. It's a good idea to angle the dowels up slightly (about 5°). This way the clamps can't "walk" off the rack. Spring Clamps. The final rack I made holds spring clamps (lower right drawing on facing page). I lere, you can hang several clamps from a single dowel. Then to really make the most of limited space, you can take advantage of the A-shape of the clamps and have different sizes "nest" over each other. —--MAKE BASE LARGER THAN UPRIGHT ASSEMBLY FOR STABILITY The flexibility of the clamp racks shown here doesn't end with this arrangement. If you take a look at the box above, you can see another way to put these versatile, racks to work in your shop. A ATTACH PEGBOARD TO FRAME TO ALLOW CLEARANCE FOR HOOKS note: secure pegboard wall panel to studs for maximum strength CHAMFER BACK EDGE OF BLOCK FOR EASY" INSTALLATION PUT THE RACKS TO WORK Once you have the racks built, the next thing to do is to hang them up. The easiest solution is to simply attach each rack to the wall. Wall Organizer. However, with just a little more time and material, you can create a dedicated clamping area in your shop. With the wall organizer shown at right, you'll have everything you need L-HOOKS ANCHOR RACK SECURELY TO PEGBOARD pegboard panel 0 allows you to rearrange clamp racks as your « collection grows |


