93, страница 47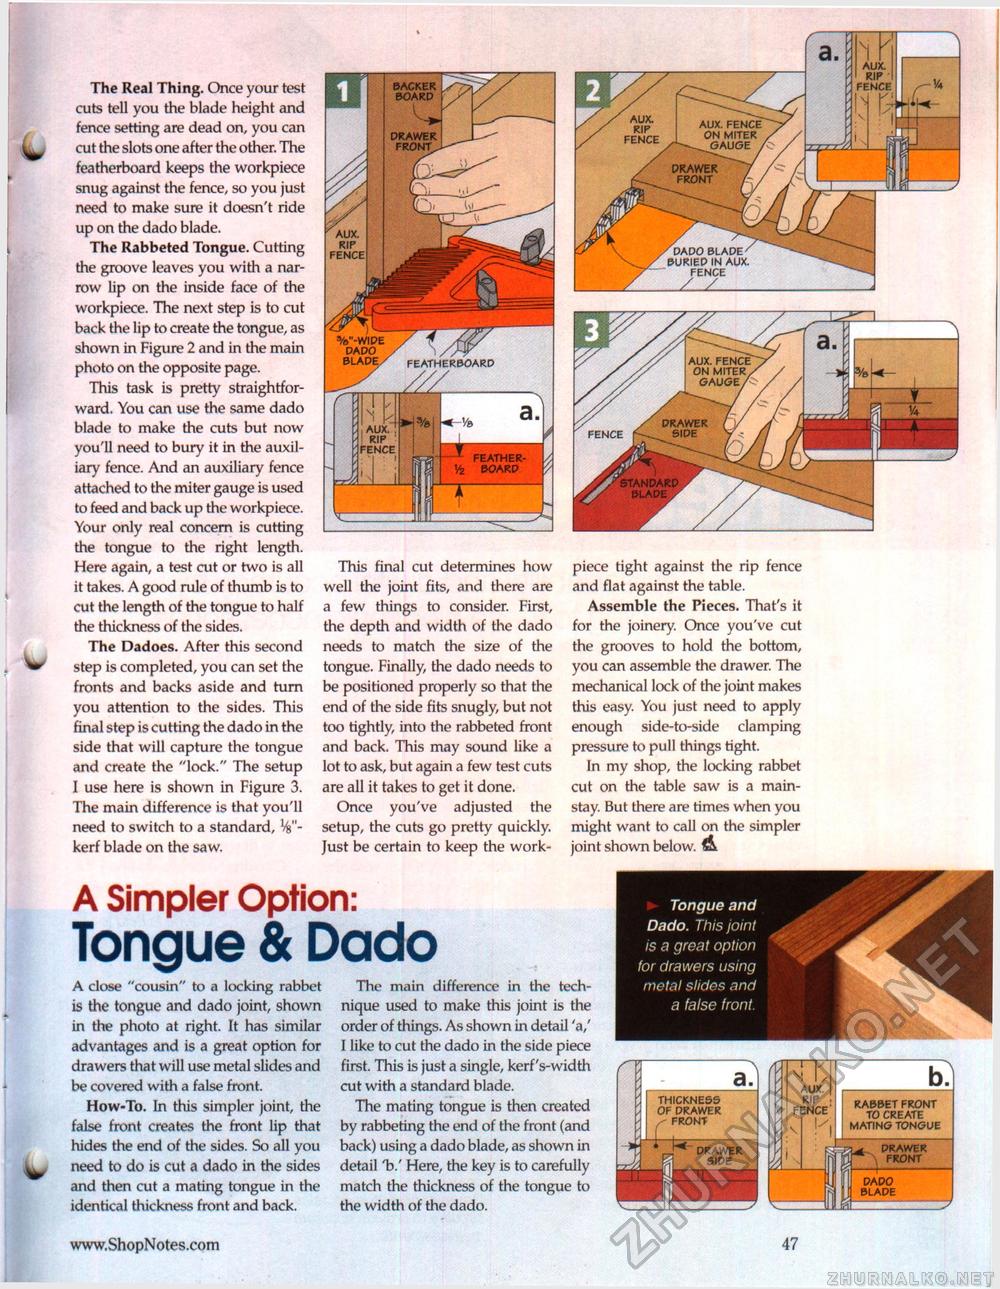
The Real Thing. Once your test cuts tell you the blade height and fence setting are dead on, you can cut the slots one after the other. The featherboard keeps the workpiece snug against the fence, so you just need to make sure it doesn't ride up on the dado blade. The Rabbeted Tongue. Cutting the groove leaves you with a narrow lip on the inside face of the workpiece. The next step is to cut back the lip to create the tongue, as shown in Figure 2 and in the main photo on the opposite page. This task is pretty straightforward. You can use the same dado blade to make the cuts but now you'll need to bury it in the auxiliary fence. And an auxiliary fence attached to the miter gauge is used to feed and back up the workpiece. Your only real concern is cutting the tongue to the right length. Here again, a test cut or two is all it takes. A good rule of thumb is to cut the length of the tongue to half the thickness of the sides. The Dadoes. After this second W step is completed, you can set the fronts and backs aside and turn you attention to the sides. This final step is cutting the dado in the side that will capture the tongue and create the "lock." The setup I use here is shown in Figure 3. The main difference is that you'll need to switch to a standard, kerf blade on the saw. This final cut determines how well the joint fits, and there are a few things to consider. First, the depth and width of the dado needs to match the size of the tongue. Finally, the dado needs to be positioned properly so that the end of the side fits snugly, but not too tightly, into the rabbeted front and back. This may sound like a lot to ask, but again a few test cuts are all it takes to get it done. Once you've adjusted the setup, the cuts go pretty quickly. Just be certain to keep the work- piece tight against the rip fence and flat against the table. Assemble the Pieces. That's it for the joinery. Once you've cut the grooves to hold the bottom, you can assemble the drawer. The mechanical lock of the joint makes this easy. You just need to apply enough side-to-side clamping pressure to pull things tight. In my shop, the locking rabbet cut on the table saw is a mainstay. But there are times when you might want to call on the simpler joint shown below. A A Simpler Option: Tongue & Dado A close "cousin" to a locking rabbet is the tongue and dado joint, shown in the photo at right. It has similar advantages and is a great option for drawers that will use metal slides and be covered with a false front. How-To. In this simpler joint, the false front creates the front lip that hides the end of the sides. So all you ^ need to do is cut a dado in the sides and then cut a mating tongue in the identical thickness front and back. The main difference in the technique used to make this joint is the order of things. As shown in detail 'a/ I like to cut the dado in the side piece first. This is just a single, kerf's-width cut with a standard blade. The mating tongue is then created by rabbeting the end of the front (and back) using a dado blade, as shown in detail Here, the key is to carefully match the thickness of the tongue to the width of the dado.
JA z ~T N AUX. RIP FENCE I-/ V: b. RABBET FRONT TO CREATE MATING TONGUE E3T21 vr^ PRAWER FRONT —I—;- DADO BLADE 47 |
||||||||||||||||


