95, страница 39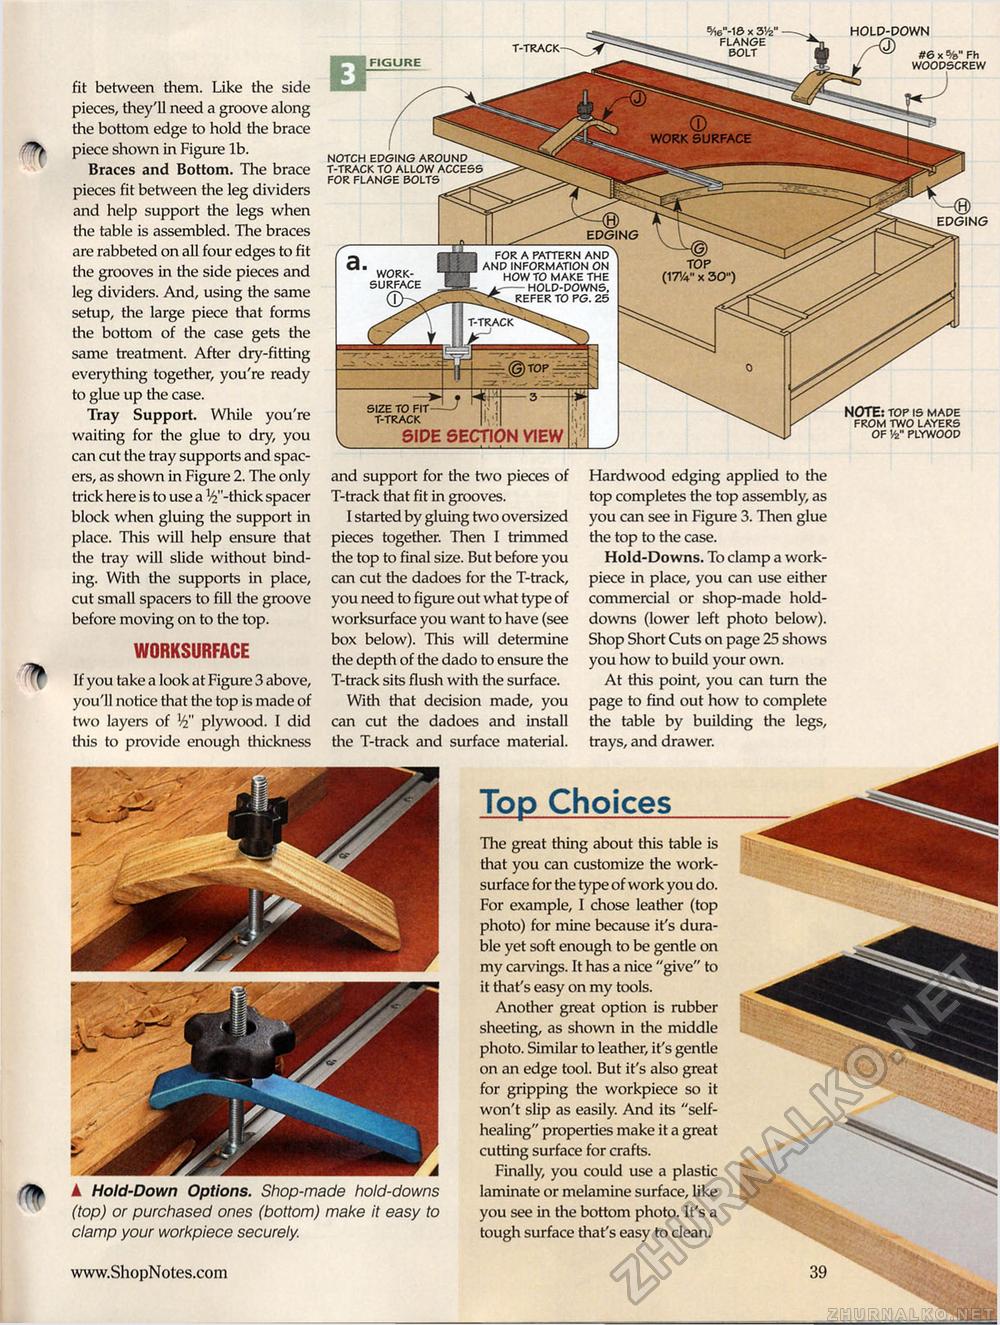
Top Choices The great thing about this table is that you can customize the work-surface for the type of work you do. For example, I chose leather (top photo) for mine because it's durable yet soft enough to be gentle on my carvings. It has a nice "give" to it that's easy on my tools. Another great option is rubber sheeting, as shown in the middle photo. Similar to leather, it's gentle on an edge tool. But it's also great for gripping the workpiece so it won't slip as easily. And its "self-healing" properties make it a great cutting surface for crafts. Finally, you could use a plastic laminate or melamine surface, like you see in the bottom photo. It's a tough surface that's easy to clean. fit between them. Like the side pieces, they'll need a groove along the bottom edge to hold the brace piece shown in Figure lb. Braces and Bottom. The brace pieces fit between the leg dividers and help support the legs when the table is assembled. The braces are rabbeted on all four edges to fit the grooves in the side pieces and leg dividers. And, using the same setup, the large piece that forms the bottom of the case gets the same treatment. After dry-fitting everything together, you're ready to glue up the case. Tray Support. While you're waiting for the glue to dry, you can cut the tray supports and spacers, as shown in Figure 2. The only trick here is to use a '^"-thick spacer block when gluing the support in place. This will help ensure that the tray will slide without binding. With the supports in place, cut small spacers to fill the groove before moving on to the top. WORKSURFACE If you take a look at Figure 3 above, you'll notice that the top is made of two layers of plywood. I did this to provide enough thickness ▲ Hold-Down Options. Shop-made hold-downs (top) or purchased ones (bottom) make it easy to clamp your workpiece securely. 5/i6"-16 x 3W FLANGE BOLT T-TRACK WORK SURFACE edging edging I FIGURE NOTCH EDGING AROUND T-TRACK TO ALLOW ACCESS FOR FLANGE BOLTS SIZE TO FIT T-TRACK SIDE SECTION VIEW and support for the two pieces of T-track that fit in grooves. I started by gluing two oversized pieces together. Then I trimmed the top to final size. But before you can cut the dadoes for the T-track, you need to figure out what type of worksurface you want to have (see box below). This will determine the depth of the dado to ensure the T-track sits flush with the surface. With that decision made, you can cut the dadoes and install the T-track and surface material. Hardwood edging applied to the top completes the top assembly, as you can see in Figure 3. Then glue the top to the case. Hold-Downs. To clamp a work-piece in place, you can use either commercial or shop-made hold-downs (lower left photo below). Shop Short Cuts on page 25 shows you how to build your own. At this point, you can turn the page to find out how to complete the table by building the legs, trays, and drawer. _ f-T-j—i FOR A PATTERN AND bWKM AND INFORMATION ON WORK- -W- H0W TO MAKE THE SURFACE ..ay.- -HOLD-DOWNS, J?EFER TO PG. 25 T-TRACK top (1W x 30") 39 |


