95, страница 38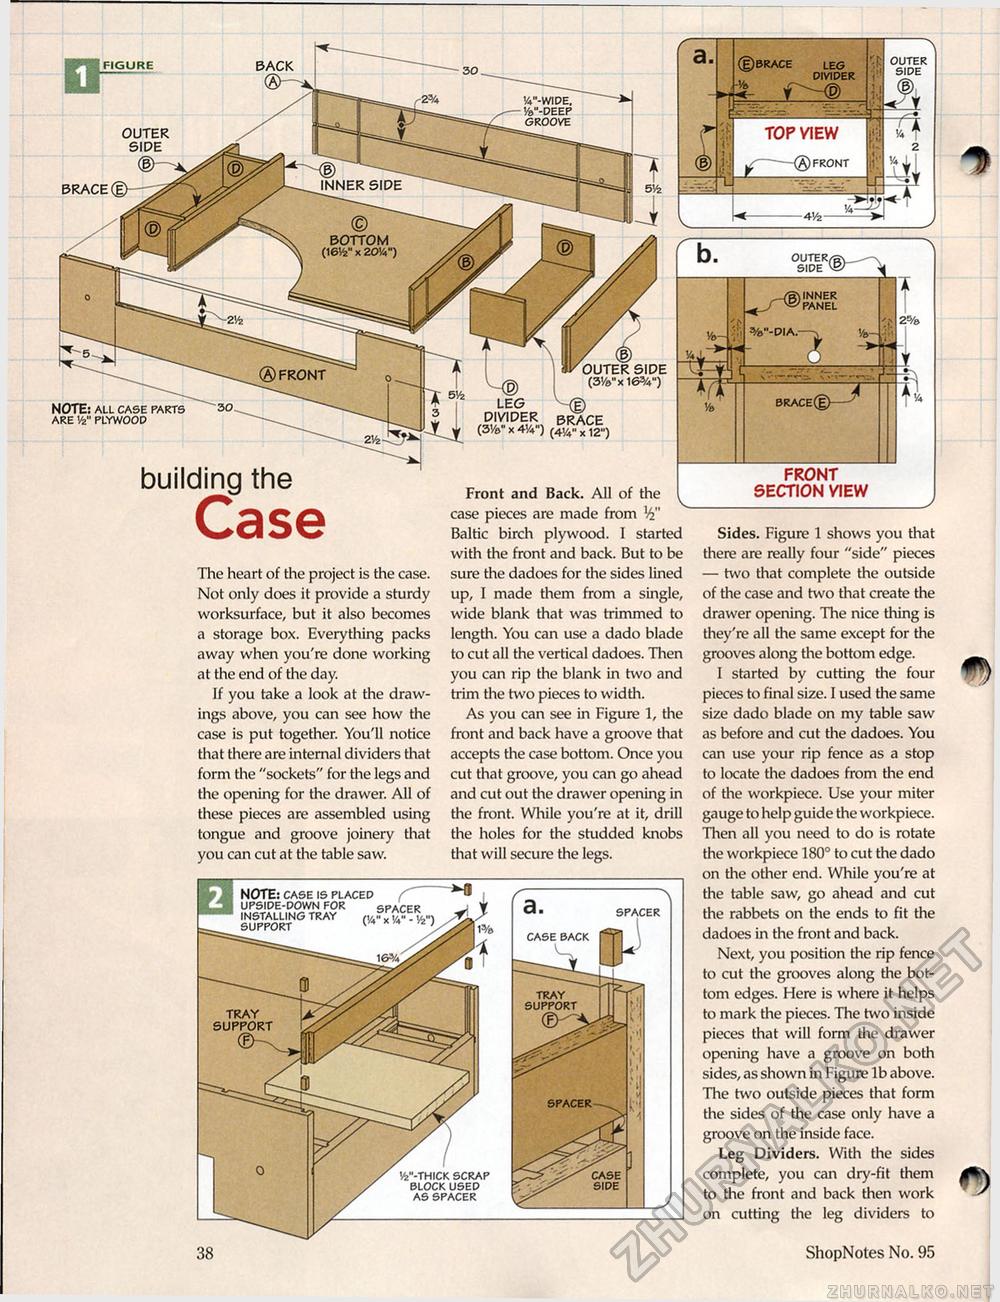
'A"-W1DE, Vo"-DEEP INNER SIDE BOTTOM (16V4" x 20V4") ®FRONT leg divider brace » *« ) (414"x 12") OUTER SIDE inner panel -vo-dia. BRACE
OUTER SIDE The heart of the project is the case. Not only does it provide a sturdy worksurface, but it also becomes a storage box. Everything packs away when you're done working at the end of the day. If you take a look at the drawings above, you can see how the case is put together. You'll notice that there are internal dividers that form the "sockets" for the legs and the opening for the drawer. All of these pieces are assembled using tongue and groove joinery that you can cut at the table saw. Front and Back. All of the case pieces are made from Baltic birch plywood. I started with the front and back. But to be sure the dadoes for the sides lined up, I made them from a single, wide blank that was trimmed to length. You can use a dado blade to cut all the vertical dadoes. Then you can rip the blank in two and trim the two pieces to width. As you can see in Figure 1, the front and back have a groove that accepts the case bottom. Once you cut that groove, you can go ahead and cut out the drawer opening in the front. While you're at it, drill the holes for the studded knobs that will secure the legs. FRONT SECTION VIEW Sides. Figure 1 shows you that there are really four "side" pieces — two that complete the outside of the case and two that create the drawer opening. The nice thing is they're all the same except for the grooves along the bottom edge. I started by cutting the four pieces to final size. I used the same size dado blade on my table saw as before and cut the dadoes. You can use your rip fence as a stop to locate the dadoes from the end of the workpiece. Use your miter gauge to help guide the workpiece. Then all you need to do is rotate the workpiece 180° to cut the dado on the other end. While you're at the table saw, go ahead and cut the rabbets on the ends to fit the dadoes in the front and back. Next, you position the rip fence to cut the grooves along the bottom edges. Here is where it helps to mark the pieces. The two inside pieces that will form the drawer opening have a groove on both sides, as shown in Figure lb above. The two outside pieces that form the sides of the case only have a groove on the inside face. Leg Dividers. With the sides complete, you can dry-fit them to the front and back then work on cutting the leg dividers to BACK FIGURE OUTER SIDE NOTE: ALL CASE PARTS ARE Vz PLYWOOD OUTER SIDE (3'/8"X 16%") tray support V5>"-THICK SCRAP BLOCK USED AS SPACER tray support building the Case CASE BACK 38 ShopNotes No. 95 |
|||||||||||||||||||


