95, страница 41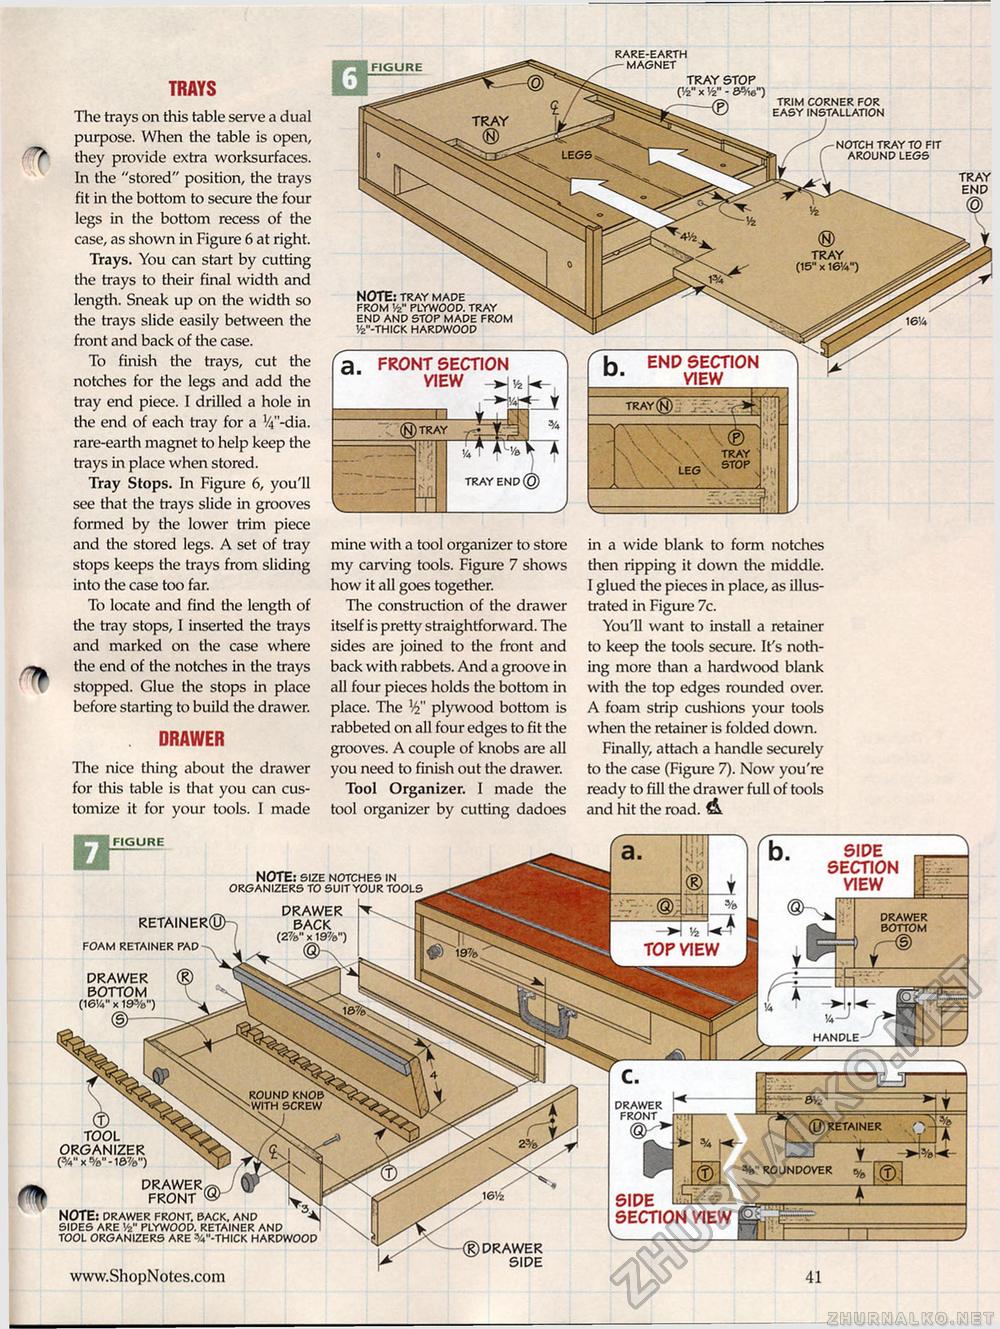
TRAYS The trays on this table serve a dual purpose. When the table is open, they provide extra worksurfaces. In the "stored" position, the trays fit in the bottom to secure the four legs in the bottom recess of the case, as shown in Figure 6 at right. Trays. You can start by cutting the trays to their final width and length. Sneak up on the width so the trays slide easily between the front and back of tine case. To finish the trays, cut the notches for the legs and add the tray end piece. I drilled a hole in the end of each tray for a V^'-dia. rare-earth magnet to help keep the trays in place when stored. Tray Stops. In Figure 6, you'll see that the trays slide in grooves formed by the lower trim piece and the stored legs. A set of tray stops keeps the trays from sliding into the case too far. To locate and find the length of the tray stops, I inserted the trays and marked on the case where the end of the notches in the trays stopped. Glue the stops in place before starting to build the drawer. DRAWER The nice thing about the drawer for this table is that you can customize it for your tools. I made mine with a tool organizer to store my carving tools. Figure 7 shows how it all goes together. The construction of the drawer itself is pretty straightforward. The sides are joined to the front and back with rabbets. And a groove in all four pieces holds the bottom in place. The plywood bottom is rabbeted on all four edges to fit the grooves. A couple of knobs are all you need to finish out the drawer. Tool Organizer. I made the tool organizer by cutting dadoes in a wide blank to form notches then ripping it down the middle. I glued the pieces in place, as illustrated in Figure 7c. You'll want to install a retainer to keep the tools secure. It's nothing more than a hardwood blank with the top edges rounded over. A foam strip cushions your tools when the retainer is folded down. Finally, attach a handle securely to the case (Figure 7). Now you're ready to fill the drawer full of tools and hit the road. A TRIM CORNER FOR EASY INSTALLATION TRAY tray end tray (15" x 16V)
3 FRONT SECTION VIEW ->|fck-. —n )tray 77pt U. TRAY END @ NOTE: TRAY MADE FROM W PLYWOOD. TRAY END AND STOP MADE FROM JV'-THICK HARDWOOD □ FIGURE NOTCH TRAY TO FIT AROUND LEGS RARE-EARTH - MAGNET tray stop (V X Vi" - Wl6") NOTE: SIZE NOTCHES IN ORGANIZERS TO SUIT YOUR TOOLS DRAWER BACK ^J (2%" x 19%") DRAWER BOTTOM (16'/4" x 19%") round knob -with screw RETAINER^ FOAM RETAINER PAD FIGURE SIDE SECTION VIEW drawer bottom f® TOP VIEW HANDLE DRAWER FRONT CL TOOL ORGANIZER (%" x %"- l&V) DRAWER FRONT NOTE: DRAWER FRONT. BACK. AND SIDES ARE PLYWOOD. RETAINER AND TOOL ORGANIZERS ARE W-THICK HARDWOOD (u) retainer %" roundover % 0 SIDE SECTION VIEW (R) DRAWER SIDE |
||||||||||||||||||||||


