95, страница 9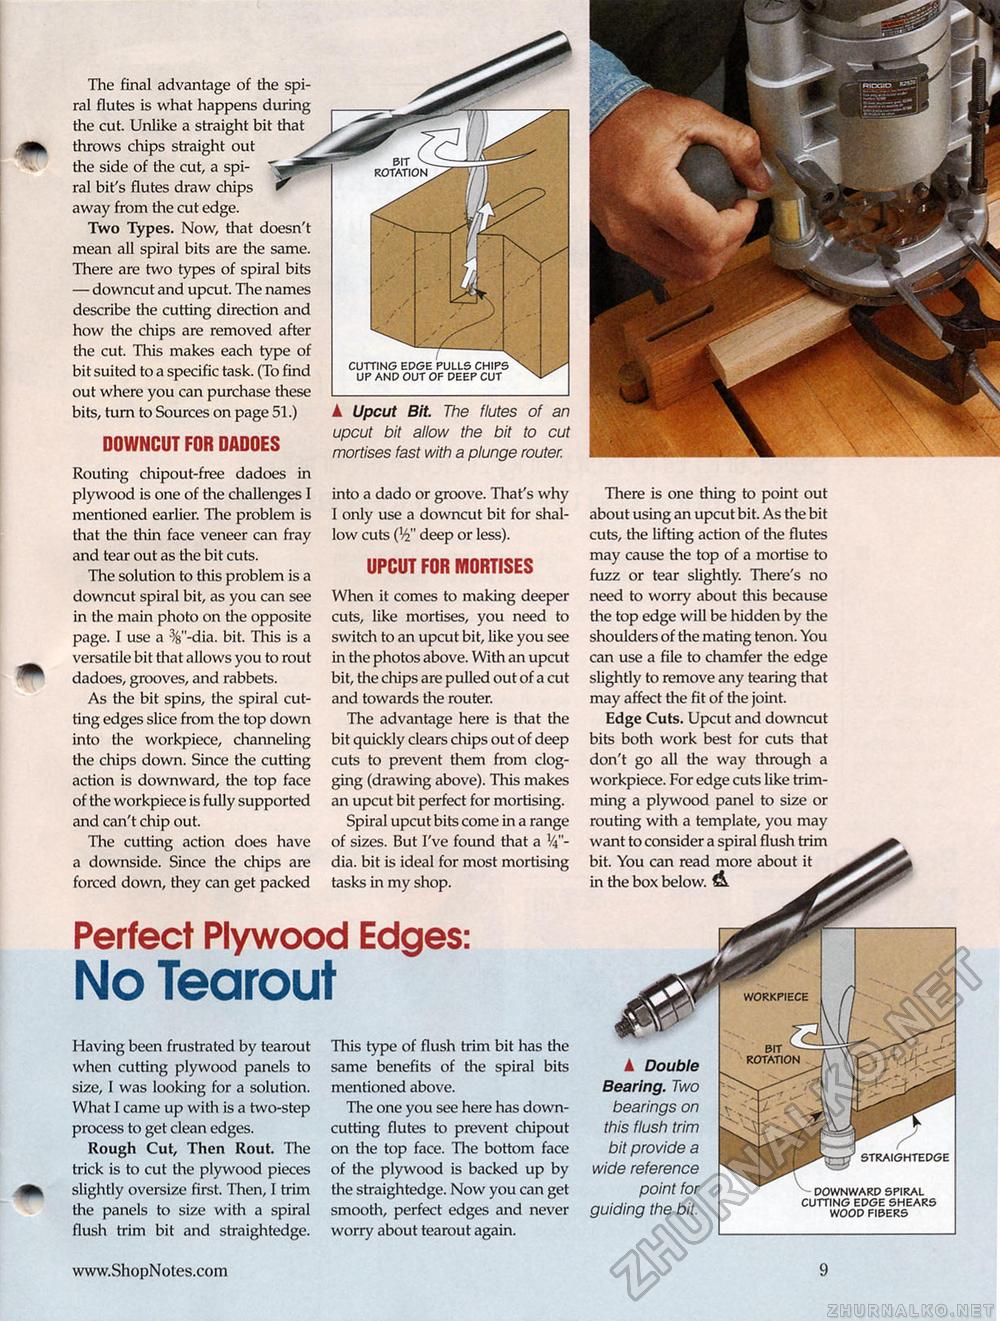
Routing chipout-free dadoes in plywood is one of the challenges I mentioned earlier. The problem is that the thin face veneer can fray and tear out as the bit cuts. The solution to this problem is a downcut spiral bit, as you can see in the main photo on the opposite page. I use a %"-dia. bit. This is a versatile bit that allows you to rout dadoes, grooves, and rabbets. As the bit spins, the spiral cutting edges slice from the top down into the workpiece, channeling the chips down. Since the cutting action is downward, the top face of the workpiece is fully supported and can't chip out. The cutting action does have a downside. Since the chips are forced down, they can get packed into a dado or groove. That's why I only use a downcut bit for shallow cuts (V deep or less). UPCUT FOR MORTISES When it comes to making deeper cuts, like mortises, you need to switch to an upcut bit, like you see in the photos above. With an upcut bit, the chips are pulled out of a cut and towards the router. The advantage here is that the bit quickly clears chips out of deep cuts to prevent them from clogging (drawing above). This makes an upcut bit perfect for mortising. Spiral upcut bits come in a range of sizes. But I've found that a H"-dia. bit is ideal for most mortising tasks in my shop. Perfect Plywood Edges: No Tearout Having been frustrated by tearout when cutting plywood panels to size, I was looking for a solution. What I came up with is a two-step process to get clean edges. Rough Cut, Then Rout. The trick is to cut the plywood pieces slightly oversize first. Then, I trim the panels to size with a spiral flush trim bit and straightedge. This type of flush trim bit has the same benefits of the spiral bits mentioned above. The one you see here has down-cutting flutes to prevent chipout on the top face. The bottom face of the plywood is backed up by the straightedge. Now you can get smooth, perfect edges and never worry about tearout again. The final advantage of the spiral flutes is what happens during the cut. Unlike a straight bit that throws chips straight out the side of the cut, a spiral bit's flutes draw chips away from the cut edge. Two Types. Now, that doesn't mean all spiral bits are the same. There are two types of spiral bits — downcut and upcut. The names describe the cutting direction and how the chips are removed after the cut. This makes each type of bit suited to a specific task. (To find out where you can purchase these bits, turn to Sources on page 51.) DOWNCUT FOR DADOES cutting edge pulls chips up and out of deep cut ▲ Upcut Bit. The flutes of an upcut bit allow the bit to cut mortises fast with a plunge router. There is one thing to point out about using an upcut bit. As the bit cuts, the lifting action of the flutes may cause the top of a mortise to fuzz or tear slightly. There's no need to worry about this because the top edge will be hidden by the shoulders of the mating tenon. You can use a file to chamfer the edge slightly to remove any tearing that may affect the fit of the joint. Edge Cuts. Upcut and downcut bits both work best for cuts that don't go all the way through a workpiece. For edge cuts like trimming a plywood panel to size or routing with a template, you may want to consider a spiral flush trim bit. You can read more about it in the box below. ▲ Double Bearing. Two bearings on this flush trim bit provide a wide reference point for guiding the bit. straightedge downward spiral cutting edge shears wood fibers workpiece bit rotation |


