Woodworker's Journal 101-Projects-for-Woodworkers, страница 104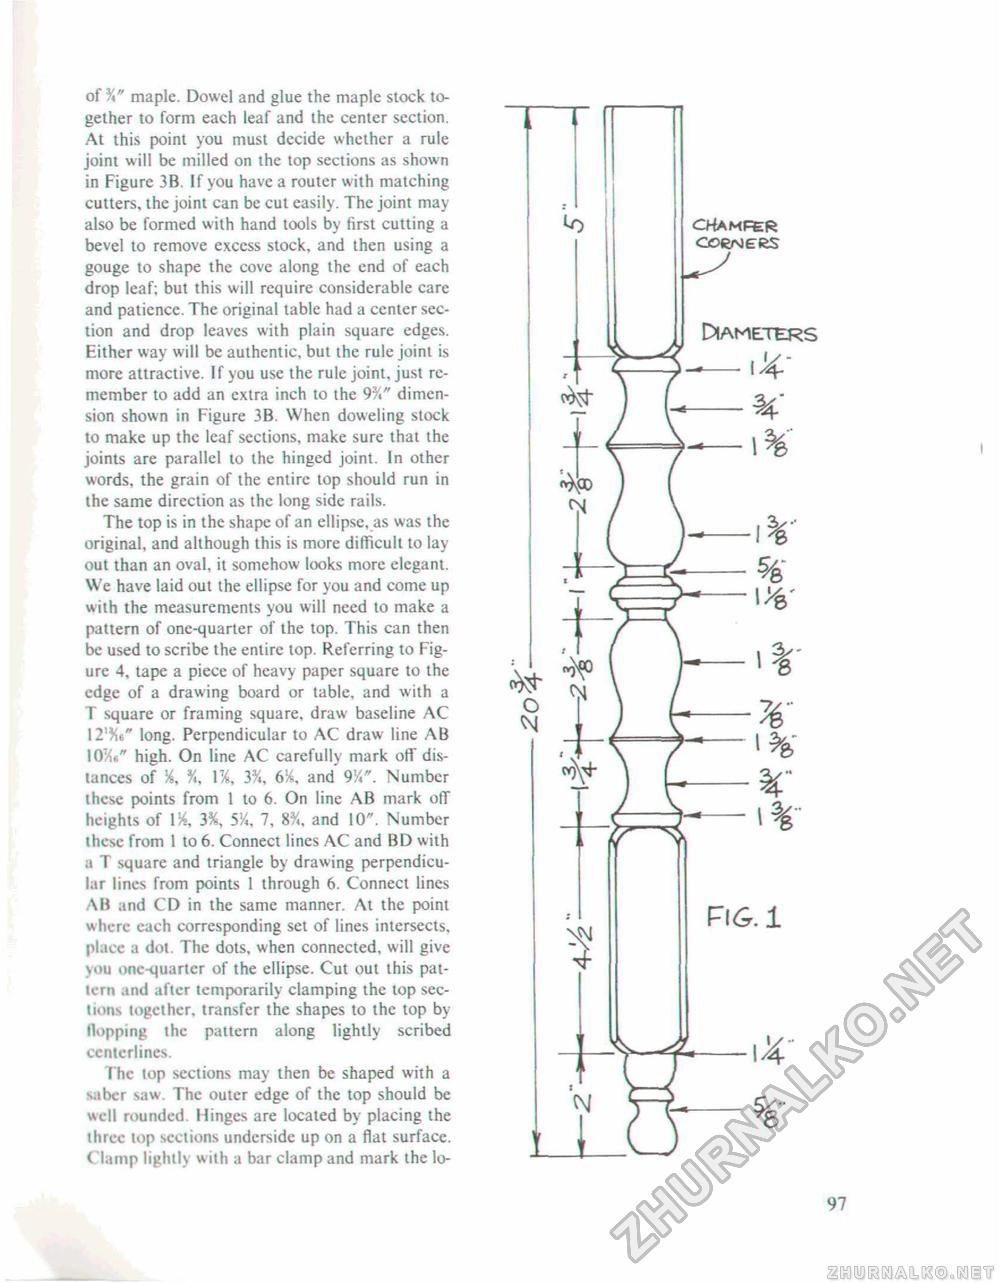
of %" maple. Dowel and glue the maple stock together to form each leaf and the center section. At this point you must decide whether a rule joint will be milled on the top sections as shown in Figure 3B. If you have a router with matching cutters, the joint can be cut easily. The joint may also be formed with hand tools by first cutting a bevel to remove excess stock, and then using a gouge to shape the cove along the end of each drop leaf; but this will require considerable care and patience. The original table had a center section and drop leaves with plain square edges. Either way will be authentic, but the rule joint is more attractive. If you use the rule joint, just remember to add an extra inch to the 9%" dimension shown in Figure 3B. When doweling stock to make up the leaf sections, make sure that the joints are parallel to the hinged joint. In other words, the grain of the entire lop should run in the same direction as the long side rails. The top is in the shape of an ellipse, as was the original, and although this is more difficult to lay out than an oval, it somehow looks more elegant. We have laid out the ellipse for you and come up with the measurements you will need to make a pattern of one-quarter of the top. This can then be used to scribe the entire lop. Referring to Figure 4, tape a piece of heavy paper square to the edge of a drawing board or table, and with a T square or framing square, draw baseline AC 12%" long. Perpendicular to AC draw line AB 10%s" high. On line AC carefully mark off distances of %, % 1%, 3%, 6%, and' 9%". Number these points from 1 to 6. On line AB mark off heights of 1 % 3%, 5X, 7, 8%, and 10". Number ihese from I to 6. Connect lines AC and BD with a T square and triangle by drawing perpendicular lines from points 1 through 6. Connect lines AB and CD in ihe same manner. At the point where each corresponding set of lines intersects, pt.ice a dot The dots, when connected, will give \ou one-quarter of the ellipse. Cut out this pat-tcrn and afier temporarily clamping the top sections together, transfer the shapes to the top by Hopping the pattern along lightly scribed cemcrlines. I he top sections may then be shaped with a saber saw The outer edge of the top should be well rounded. Hinges are located by placing the three lop sections underside up on a flat surface. C lamp lightly with a bar clamp and mark the lo- 97 |


