Woodworker's Journal 101-Projects-for-Woodworkers, страница 118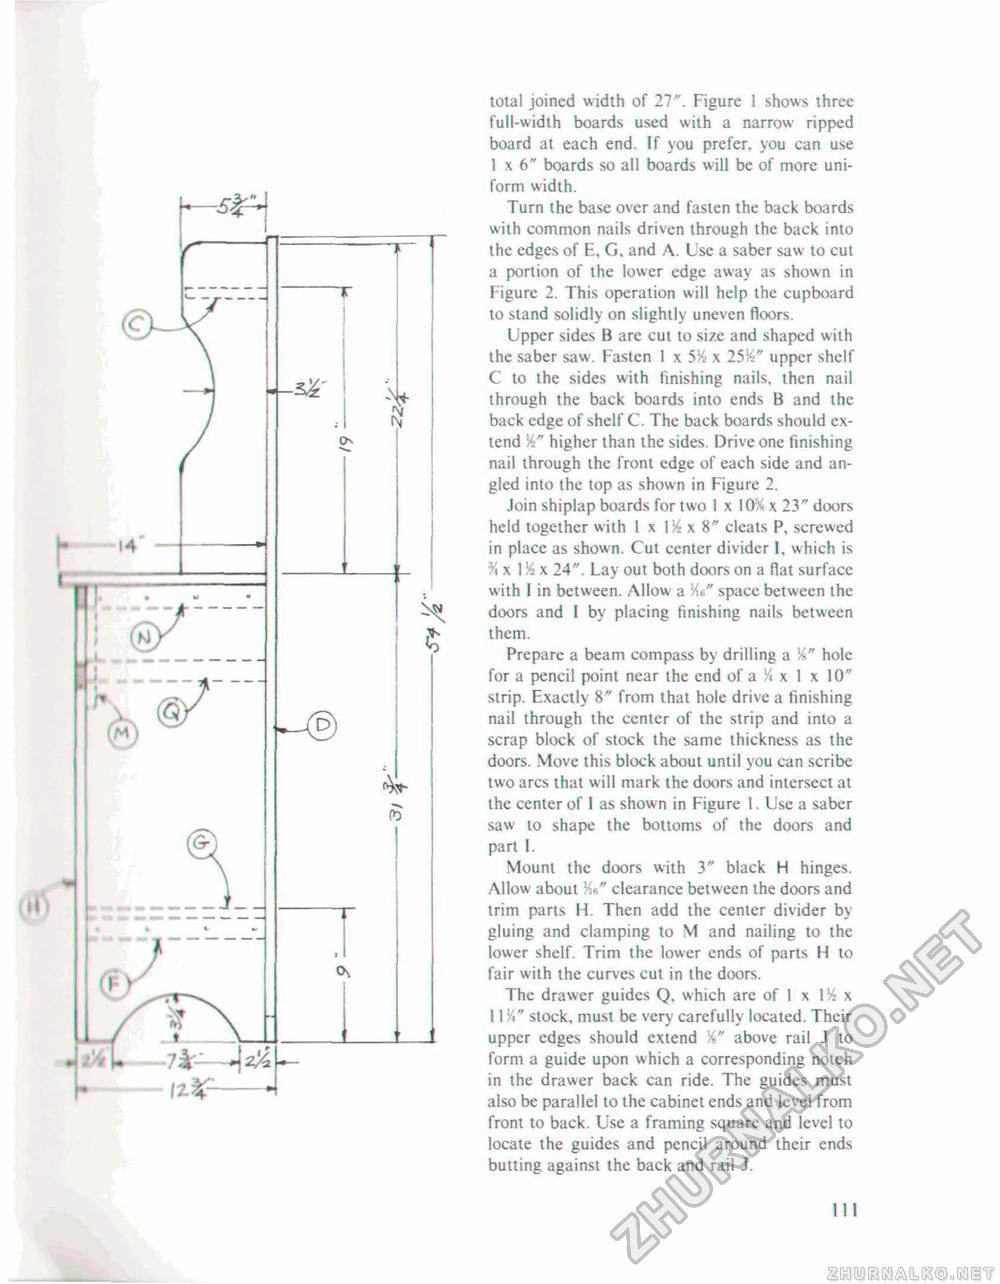
total joined width of 27". Figure 1 shows three full-width boards used with a narrow ripped board at each end. If you prefer, you can use 1 x 6" boards so all boards will be of more uniform width. Turn the base over and fasten the back boards with common nails driven through the back into the edges of E, G, and A. Use a saber saw to cut a portion of the lower edge away as shown in Figure 2. This operation will help the cupboard to stand solidly on slightly uneven floors. Upper sides B are cut to size and shaped with the saber saw. Fasten i x 5% x 25%" upper shelf C to the sides with finishing nails, then nail through the back boards into ends B and the back edge of shelf C. The back boards should extend higher than the sides. Drive one finishing nail through the front edge of each side and angled into the top as shown in Figure 2. Join shiplap boards for two I x 10% x 23" doors held together with 1 x 1^x8" cleats P, screwed in place as shown. Cut center divider I, which is % x 1 % x 24". Lay out both doors on a flat surface with 1 in between. Allow a Ke" space between the doors and I by placing finishing nails between them. Prepare a beam compass by drilling a hole for a pencil point near the end of a % x I x 10" strip. Exactly 8" from that hole drive a finishing nail through the center of the strip and into a scrap block of stock the same thickness as the doors. Move this block about until you can scribe two arcs that will mark the doors and intersect at the center of I as shown in Figure I. Use a saber saw to shape the bottoms of the doors and part I. Mount the doors with 3" black H hinges. Allow about Ms" clearance between the doors and trim parts H. Then add the center divider by gluing and clamping to M and nailing to the lower shelf Trim the lower ends of parts H to fair with the curves cut in the doors. The drawer guides Q, which are of 1 x 1% x 11H" stock, must be very carefully located. Their upper edges should extend above rail J to form a guide upon which a corresponding notch in the drawer back can ride. The guides must also be parallel to the cabinet ends and level from front to back. Use a framing square and level to locate the guides and pencil around their ends butting against the back and rail J. 111 |


