Woodworker's Journal 101-Projects-for-Woodworkers, страница 229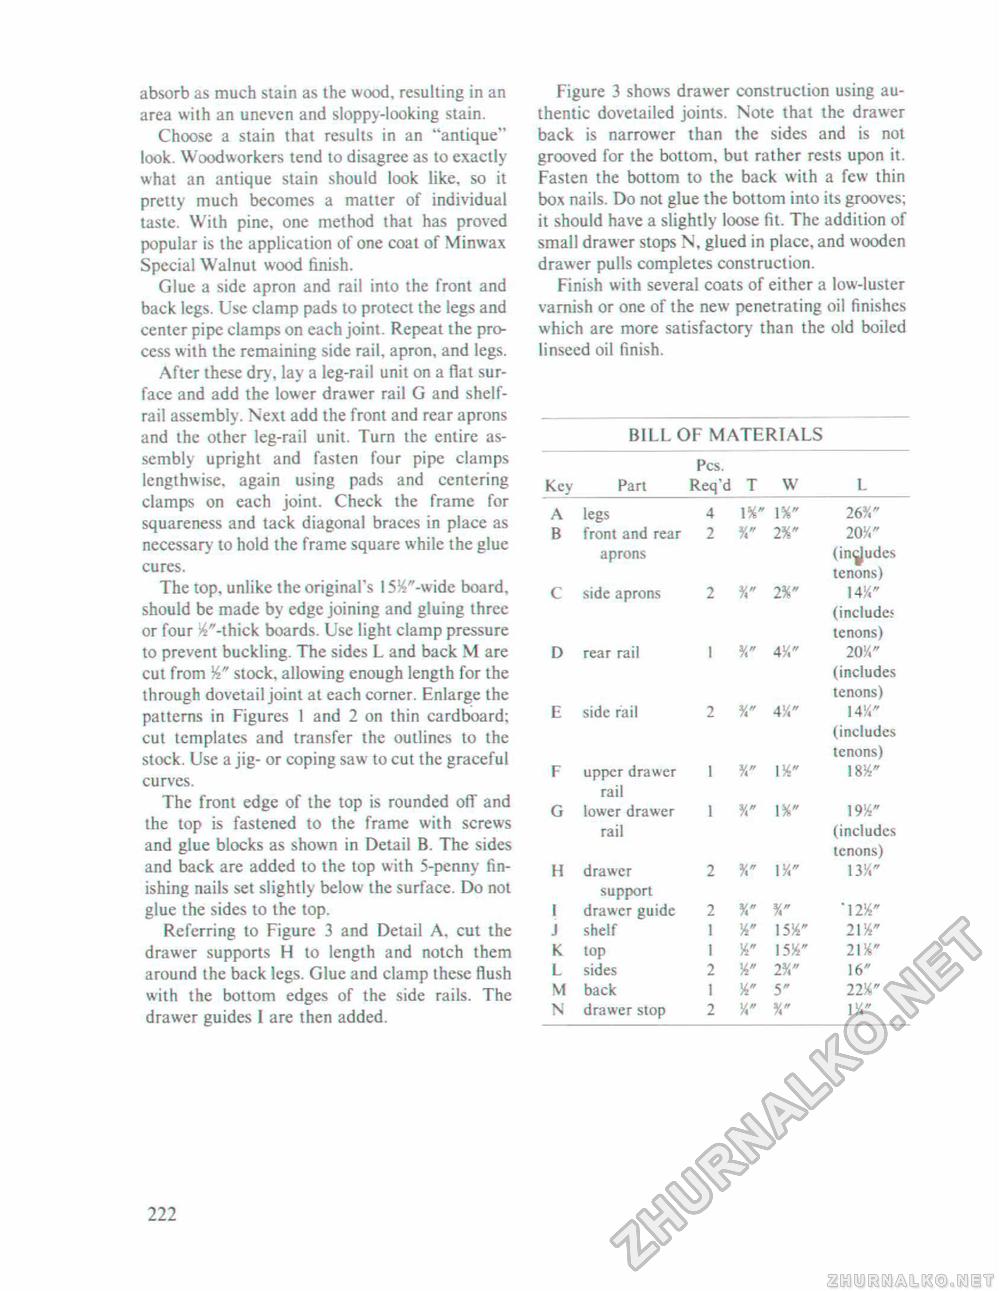
absorb as much stain as the wood, resulting in an area with an uneven and sloppy-looking stain. Choose a stain that results in an "antique" look. Woodworkers tend to disagree as to exactly what an antique stain should look like, so it pretty much becomes a matter of individual taste. With pine, one method that has proved popular is the application of one coat of Minwax Special Walnut wood finish. Glue a side apron and rail into the front and back legs. Use clamp pads to protect the legs and center pipe clamps on each joint. Repeat the process with the remaining side rail, apron, and legs. After these dry, lay a leg-rail unit on a flat surface and add the lower drawer rail G and shelf-rail assembly. Next add the front and rear aprons and the other leg-rail unit. Turn the entire assembly upright and fasten four pipe clamps lengthwise, again using pads and centering clamps on each joint. Check the frame for squareness and tack diagonal braces in place as necessary to hold the frame square while the glue cures. The top, unlike the original's 1554"-wide board, should be made by edge joining and gluing three or four )4"-thick boards. Use light clamp pressure to prevent buckling. The sides L and back M are cut from 54" stock, allowing enough length for the through dovetail joint at each corner. Enlarge the patterns in Figures I and 2 on thin cardboard; cut templates and transfer the outlines to the stock. Use a jig- or coping saw to cut the graceful curves. The front edge of the top is rounded off and the top is fastened to the frame with screws and glue blocks as shown in Detail B. The sides and back are added to the top with 5-penny finishing nails set slightly below the surface. Do not glue the sides to the top. Referring to Figure 3 and Detail A, cut the drawer supports H to length and notch them around the back legs. Glue and clamp these flush with the bottom edges of the side rails. The drawer guides I are then added. Figure 3 shows drawer construction using authentic dovetailed joints. Note that the drawer back is narrower than the sides and is not grooved for the bottom, but rather rests upon it. Fasten the bottom to the back with a few thin box nails. Do not glue the bottom into its grooves; it should have a slightly loose fit. The addition of small drawer stops N, glued in place, and wooden drawer pulls completes construction. Finish with several coats of either a low-luster varnish or one of the new penetrating oil finishes which are more satisfactory than the old boiled linseed oil finish. BILL OF MATERIALS Pes. BILL OF MATERIALS Pes.
222 |


