Woodworker's Journal 1982-6-5, страница 34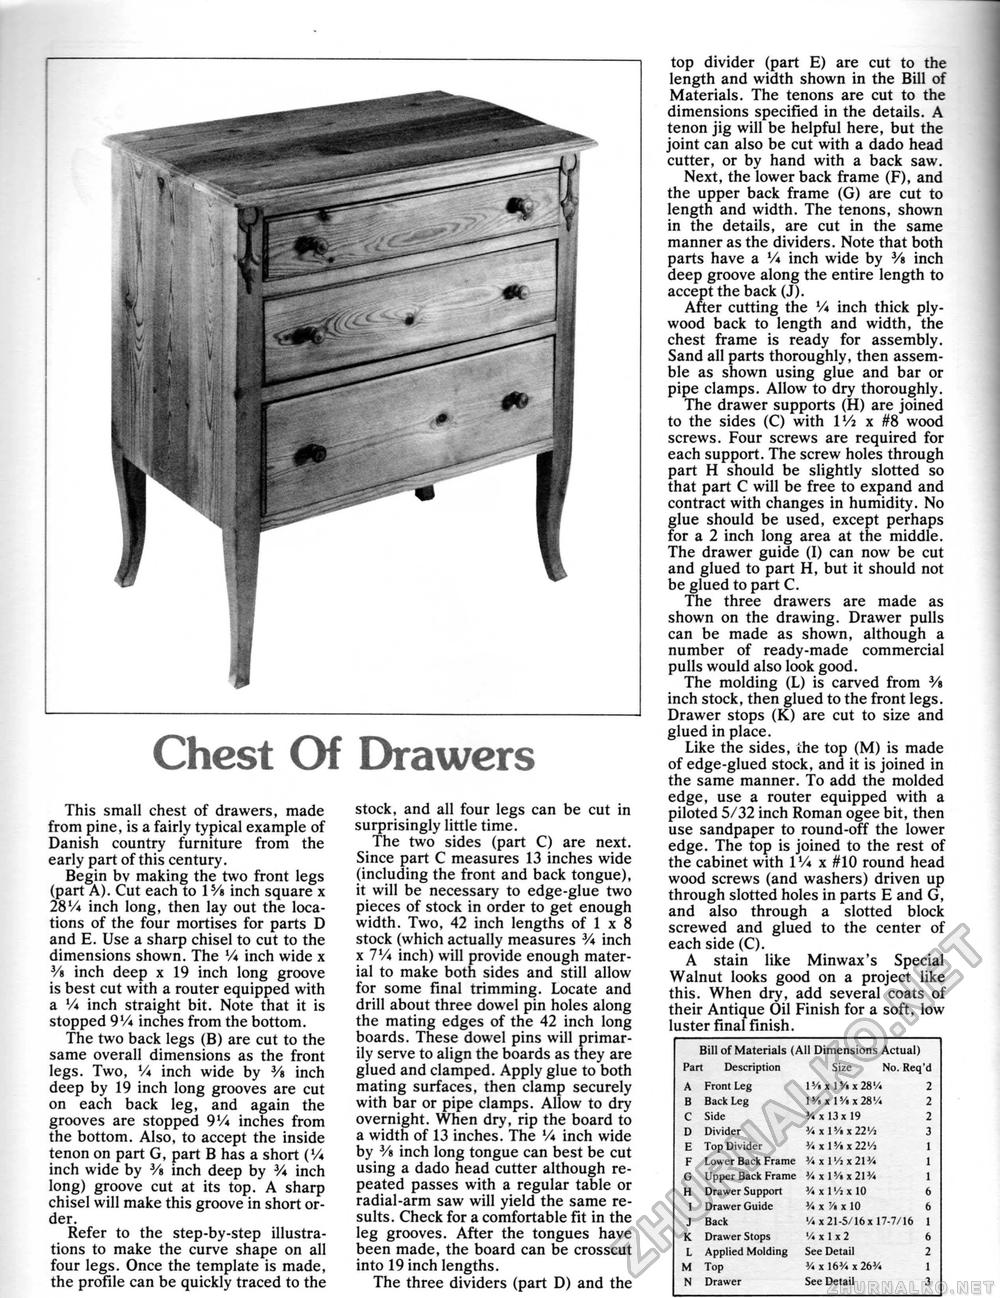
Chest Of Drawers This small chest of drawers, made from pine, is a fairly typical example of Danish country furniture from the early part of this century. Begin bv making the two front legs (part A). Cut each to l5/« inch square x 28V* inch long, then lay out the locations of the four mortises for parts D and E. Use a sharp chisel to cut to the dimensions shown. The V* inch wide x V» inch deep x 19 inch long groove is best cut with a router equipped with a V* inch straight bit. Note that it is stopped 9V* inches from the bottom. The two back legs (B) are cut to the same overall dimensions as the front legs. Two, V* inch wide by V» inch deep by 19 inch long grooves are cut on each back leg, and again the grooves are stopped 9Vi inches from the bottom. Also, to accept the inside tenon on part G, part B has a short (V* inch wide by 3/« inch deep by V* inch long) groove cut at its top. A sharp chisel will make this groove in short order. Refer to the step-by-step illustrations to make the curve shape on all four legs. Once the template is made, the profile can be quickly traced to the stock, and all four legs can be cut in surprisingly little time. The two sides (part C) are next. Since part C measures 13 inches wide (including the front and back tongue), it will be necessary to edge-glue two pieces of stock in order to get enough width. Two, 42 inch lengths of 1 x 8 stock (which actually measures V* inch x 7V* inch) will provide enough material to make both sides and still allow for some final trimming. Locate and drill about three dowel pin holes along the mating edges of the 42 inch long boards. These dowel pins will primarily serve to align the boards as they are glued and clamped. Apply glue to both mating surfaces, then clamp securely with bar or pipe clamps. Allow to dry overnight. When dry, rip the board to a width of 13 inches. The V* inch wide by Vi inch long tongue can best be cut using a dado head cutter although repeated passes with a regular table or radial-arm saw will yield the same results. Check for a comfortable fit in the leg grooves. After the tongues have been made, the board can be crosscut into 19 inch lengths. The three dividers (part D) and the top divider (part E) are cut to the length and width shown in the Bill of Materials. The tenons are cut to the dimensions specified in the details. A tenon jig will be helpful here, but the joint can also be cut with a dado head cutter, or by hand with a back saw. Next, the lower back frame (F), and the upper back frame (G) are cut to length and width. The tenons, shown in the details, are cut in the same manner as the dividers. Note that both parts have a V* inch wide by V* inch deep groove along the entire length to accept the back (J). After cutting the V* inch thick plywood back to length and width, the chest frame is ready for assembly. Sand all parts thoroughly, then assemble as shown using glue and bar or pipe clamps. Allow to dry thoroughly. The drawer supports (H) are joined to the sides (C) with IVi x #8 wood screws. Four screws are required for each support. The screw holes through part H should be slightly slotted so that part C will be free to expand and contract with changes in humidity. No glue should be used, except perhaps for a 2 inch long area at the middle. The drawer guide (I) can now be cut and glued to part H, but it should not be glued to part C. The three drawers are made as shown on the drawing. Drawer pulls can be made as shown, although a number of ready-made commercial pulls would also look good. The molding (L) is carved from V» inch stock, then glued to the front legs. Drawer stops (K) are cut to size and glued in place. Like the sides, the top (M) is made of edge-glued stock, and it is joined in the same manner. To add the molded edge, use a router equipped with a piloted 5/32 inch Roman ogee bit, then use sandpaper to round-off the lower edge. The top is joined to the rest of the cabinet with IV* x #10 round head wood screws (and washers) driven up through slotted holes in parts E and G, and also through a slotted block screwed and glued to the center of each side (C). A stain like Minwax's Special Walnut looks good on a project like this. When dry, add several coats of their Antique Oil Finish for a soft, low luster final finish.
|
||||||||||||||||||||||||||||||||||||||||||||||||||||||||||||||||


