Woodworker's Journal 1983-7-1, страница 39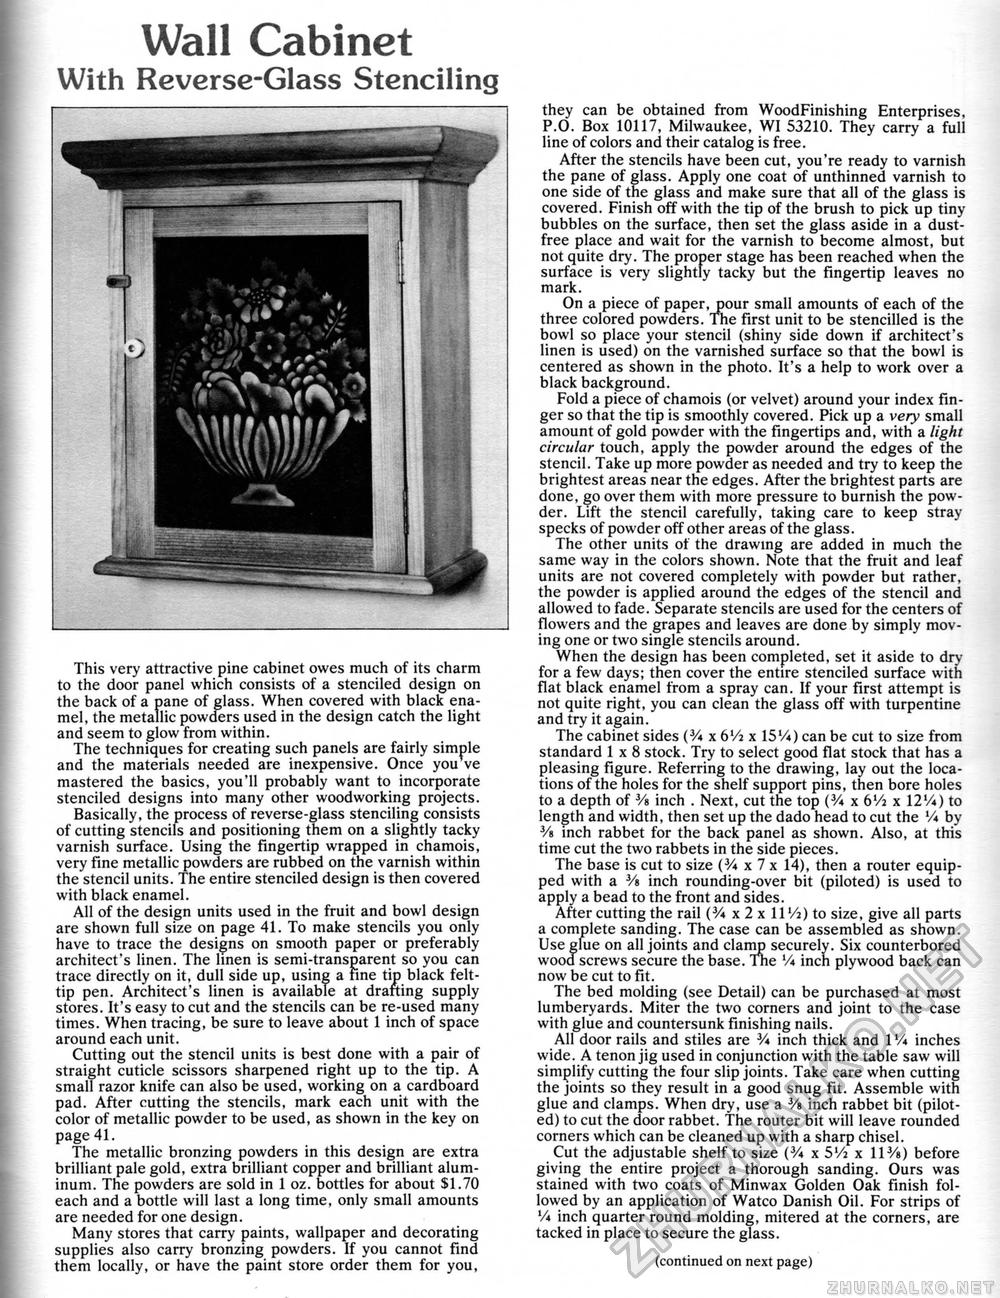
Wall CabinetWith Reverse-Glass Stenciling This very attractive pine cabinet owes much of its charm to the door panel which consists of a stenciled design on the back of a pane of glass. When covered with black enamel, the metallic powders used in the design catch the light and seem to glow from within. The techniques for creating such panels are fairly simple and the materials needed are inexpensive. Once you ve mastered the basics, you'll probably want to incorporate stenciled designs into many other woodworking projects. Basically, the process of reverse-glass stenciling consists of cutting stencils and positioning them on a slightly tacky varnish surface. Using the fingertip wrapped in chamois, very fine metallic powders are rubbed on the varnish within the stencil units. The entire stenciled design is then covered with black enamel. All of the design units used in the fruit and bowl design are shown full size on page 41. To make stencils you only have to trace the designs on smooth paper or preferably architect's linen. The linen is semi-transparent so you can trace directly on it, dull side up, using a tine tip black felt-tip pen. Architect's linen is available at drafting supply stores. It's easy to cut and the stencils can be re-used many times. When tracing, be sure to leave about 1 inch of space around each unit. Cutting out the stencil units is best done with a pair of straight cuticle scissors sharpened right up to the tip. A small razor knife can also be used, working on a cardboard pad. After cutting the stencils, mark each unit with the color of metallic powder to be used, as shown in the key on page 41. The metallic bronzing powders in this design are extra brilliant pale gold, extra brilliant copper and brilliant aluminum. The powders are sold in 1 oz. bottles for about $1.70 each and a bottle will last a long time, only small amounts are needed for one design. Many stores that carry paints, wallpaper and decorating supplies also carry bronzing powders. If you cannot find them locally, or have the paint store order them for you, they can be obtained from WoodFinishing Enterprises, P.O. Box 10117, Milwaukee, WI 53210. They carry a full line of colors and their catalog is free. After the stencils have been cut, you're ready to varnish the pane of glass. Apply one coat of unthinned varnish to one side of the glass and make sure that all of the glass is covered. Finish off with the tip of the brush to pick up tiny bubbles on the surface, then set the glass aside in a dust-free place and wait for the varnish to become almost, but not quite dry. The proper stage has been reached when the surface is very slightly tacky but the fingertip leaves no mark. On a piece of paper, pour small amounts of each of the three colored powders. The first unit to be stencilled is the bowl so place your stencil (shiny side down if architect's linen is used) on the varnished surface so that the bowl is centered as shown in the photo. It's a help to work over a black background. Fold a piece of chamois (or velvet) around your index finger so that the tip is smoothly covered. Pick up a very small amount of gold powder with the fingertips and, with a light circular touch, apply the powder around the edges of the stencil. Take up more powder as needed and try to keep the brightest areas near the edges. After the brightest parts are done, go over them with more pressure to burnish the powder. Lift the stencil carefully, taking care to keep stray specks of powder off other areas of the glass. The other units of the drawing are added in much the same way in the colors shown. Note that the fruit and leaf units are not covered completely with powder but rather, the powder is applied around the edges of the stencil and allowed to fade. Separate stencils are used for the centers of flowers and the grapes and leaves are done by simply moving one or two single stencils around. When the design has been completed, set it aside to dry for a few days; then cover the entire stenciled surface with flat black enamel from a spray can. If your first attempt is not quite right, you can clean the glass off with turpentine and try it again. The cabinet sides (3A x 6V2 x 15%) can be cut to size from standard 1x8 stock. Try to select good flat stock that has a pleasing figure. Referring to the drawing, lay out the locations of the holes for the shelf support pins, then bore holes to a depth of 3A inch . Next, cut the top (3/* x 6V2 x 12Vi) to length and width, then set up the dado head to cut the Vi by 3A inch rabbet for the back panel as shown. Also, at this time cut the two rabbets in the side pieces. The base is cut to size (3/i x 7 x 14), then a router equipped with a 3/s inch rounding-over bit (piloted) is used to apply a bead to the front and sides. After cutting the rail (3/i x 2 x llVi) to size, give all parts a complete sanding. The case can be assembled as shown. Use glue on all joints and clamp securely. Six counterbored wood screws secure the base. The lA inch plywood back can now be cut to fit. The bed molding (see Detail) can be purchased at most lumberyards. Miter the two corners and joint to the case with glue and countersunk finishing nails. All door rails and stiles are 3A inch thick and 1V* inches wide. A tenon jig used in conjunction with the table saw will simplify cutting the four slip joints. Take care when cutting the joints so they result in a good snug fit. Assemble with glue and clamps. When dry, use a 3A inch rabbet bit (piloted) to cut the door rabbet. The router bit will leave rounded corners which can be cleaned up with a sharp chisel. Cut the adjustable shelf to size (3A x 5'/i x ll3/g) before giving the entire project a thorough sanding. Ours was stained with two coats of Minwax Golden Oak finish followed by an application of Watco Danish Oil. For strips of Vi inch quarter round molding, mitered at the corners, are tacked in place to secure the glass. (continued on next page) |


