Woodworker's Journal 1983-7-1, страница 44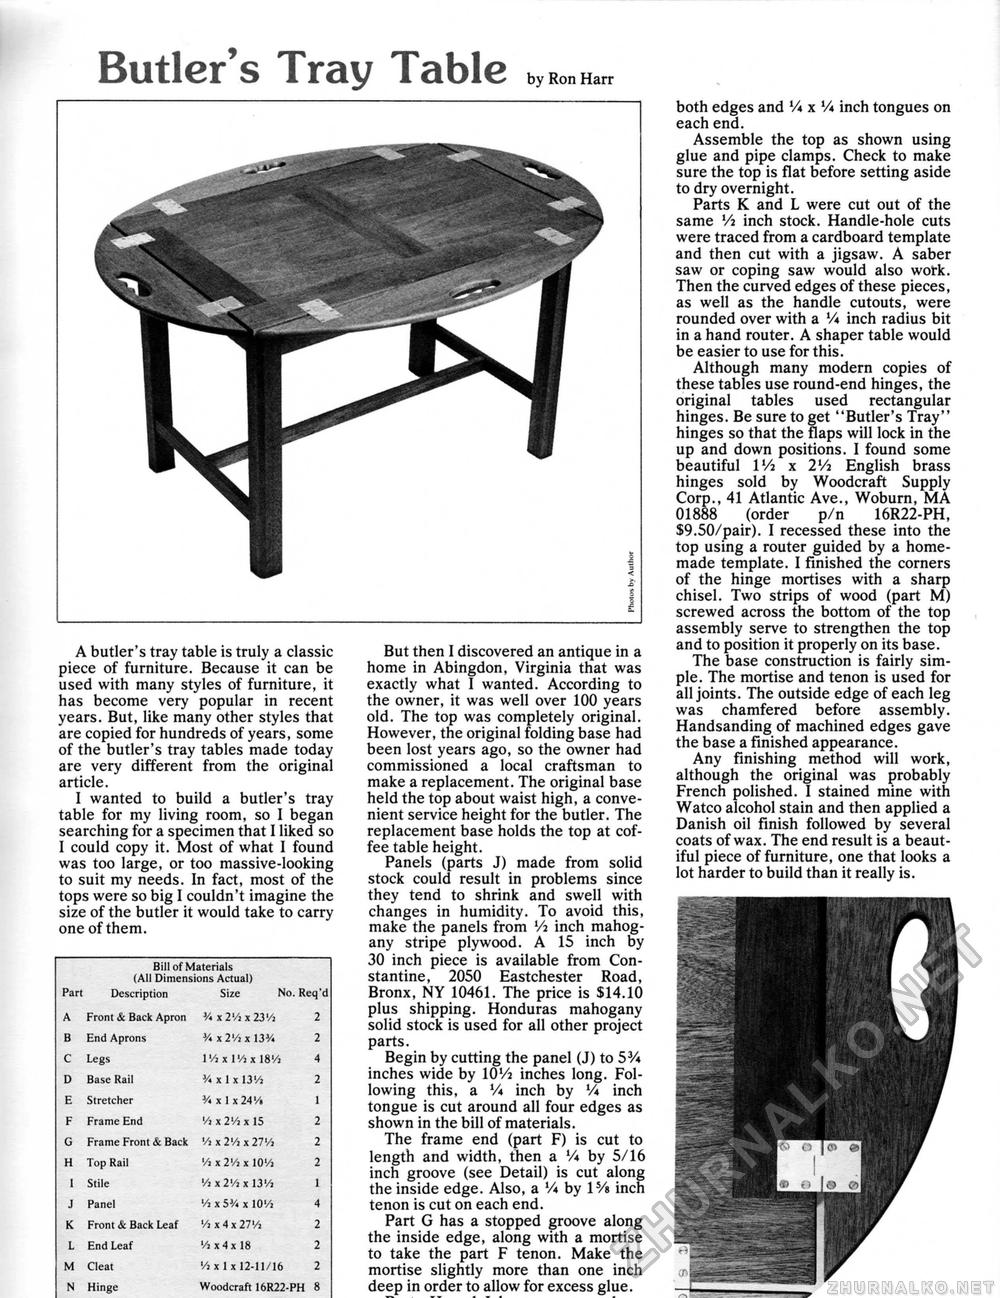
Butler's Tray Table by Ron Harr A butler's tray table is truly a classic piece of furniture. Because it can be used with many styles of furniture, it has become very popular in recent years. But, like many other styles that are copied for hundreds of years, some of the butler's tray tables made today are very different from the original article. I wanted to build a butler's tray table for my living room, so I began searching for a specimen that I liked so I could copy it. Most of what I found was too large, or too massive-looking to suit my needs. In fact, most of the tops were so big I couldn't imagine the size of the butler it would take to carry one of them. Bill of Materials (All Dimensions Actual) Part Description Size No. Req'd A Front & Back Apron H x 2'/j x 23'/i 2 B End Aprons Va x 2'/i x 13% 2 C Legs 1 'A x 1 'A x 18'/i 4 D Base Rail J/« x 1 x 13'A 2 E Stretcher 3/< x I x 24 '/• 1 F Frame End ,/ix2'/ixlS 2 G Frame Front & Back 'A x 2'A x 27'A 2 H Top Rail 'A x 2Vi x lO'/i 2 1 Stile ,Ax2,Axl3,A 1 J Panel 'A x SV, x 10'A 4 K Front & Back Leaf 'A x 4 x 27'/i 2 L End Leaf '/>x4xl8 2 M Cleat 'A x I x 12-11/16 2 N Hinge Woodcraft 16R22-PH 8 But then I discovered an antique in a home in Abingdon, Virginia that was exactly what I wanted. According to the owner, it was well over 100 years old. The top was completely original. However, the original folding base had been lost years ago, so the owner had commissioned a local craftsman to make a replacement. The original base held the top about waist high, a convenient service height for the butler. The replacement base holds the top at coffee table height. Panels (parts J) made from solid stock could result in problems since they tend to shrink and swell with changes in humidity. To avoid this, make the panels from Vi inch mahogany stripe plywood. A 15 inch by 30 inch piece is available from Con-stantine, 2050 Eastchester Road, Bronx, NY 10461. The price is $14.10 plus shipping. Honduras mahogany solid stock is used for all other project parts. Begin by cutting the panel (J) to 53/« inches wide by IOVj inches long. Following this, a V* inch by Vi inch tongue is cut around all four edges as shown in the bill of materials. The frame end (part F) is cut to length and width, then a Vi by 5/16 inch groove (see Detail) is cut along the inside edge. Also, a Va by l5/s inch tenon is cut on each end. Part G has a stopped groove along the inside edge, along with a mortise to take the part F tenon. Make the mortise slightly more than one inch deep in order to allow for excess glue. both edges and Vi x V« inch tongues on each end. Assemble the top as shown using glue and pipe clamps. Check to make sure the top is flat before setting aside to dry overnight. Parts K and L were cut out of the same Vi inch stock. Handle-hole cuts were traced from a cardboard template and then cut with a jigsaw. A saber saw or coping saw would also work. Then the curved edges of these pieces, as well as the handle cutouts, were rounded over with a Vi inch radius bit in a hand router. A shaper table would be easier to use for this. Although many modern copies of these tables use round-end hinges, the original tables used rectangular hinges. Be sure to get "Butler's Tray" hinges so that the flaps will lock in the up and down positions. I found some beautiful lVi x 2Vi English brass hinges sold by Woodcraft Supply Corp., 41 Atlantic Ave., Woburn, MA 01888 (order p/n 16R22-PH, $9.50/pair). I recessed these into the top using a router guided by a homemade template. I finished the corners of the hinge mortises with a sharp chisel. Two strips of wood (part M) screwed across the bottom of the top assembly serve to strengthen the top and to position it properly on its base. The base construction is fairly simple. The mortise and tenon is used for all joints. The outside edge of each leg was chamfered before assembly. Handsanding of machined edges gave the base a finished appearance. Any finishing method will work, although the original was probably French polished. I stained mine with Watco alcohol stain and then applied a Danish oil finish followed by several coats of wax. The end result is a beautiful piece of furniture, one that looks a lot harder to build than it really is. |


