Woodworker's Journal 1983-7-2, страница 32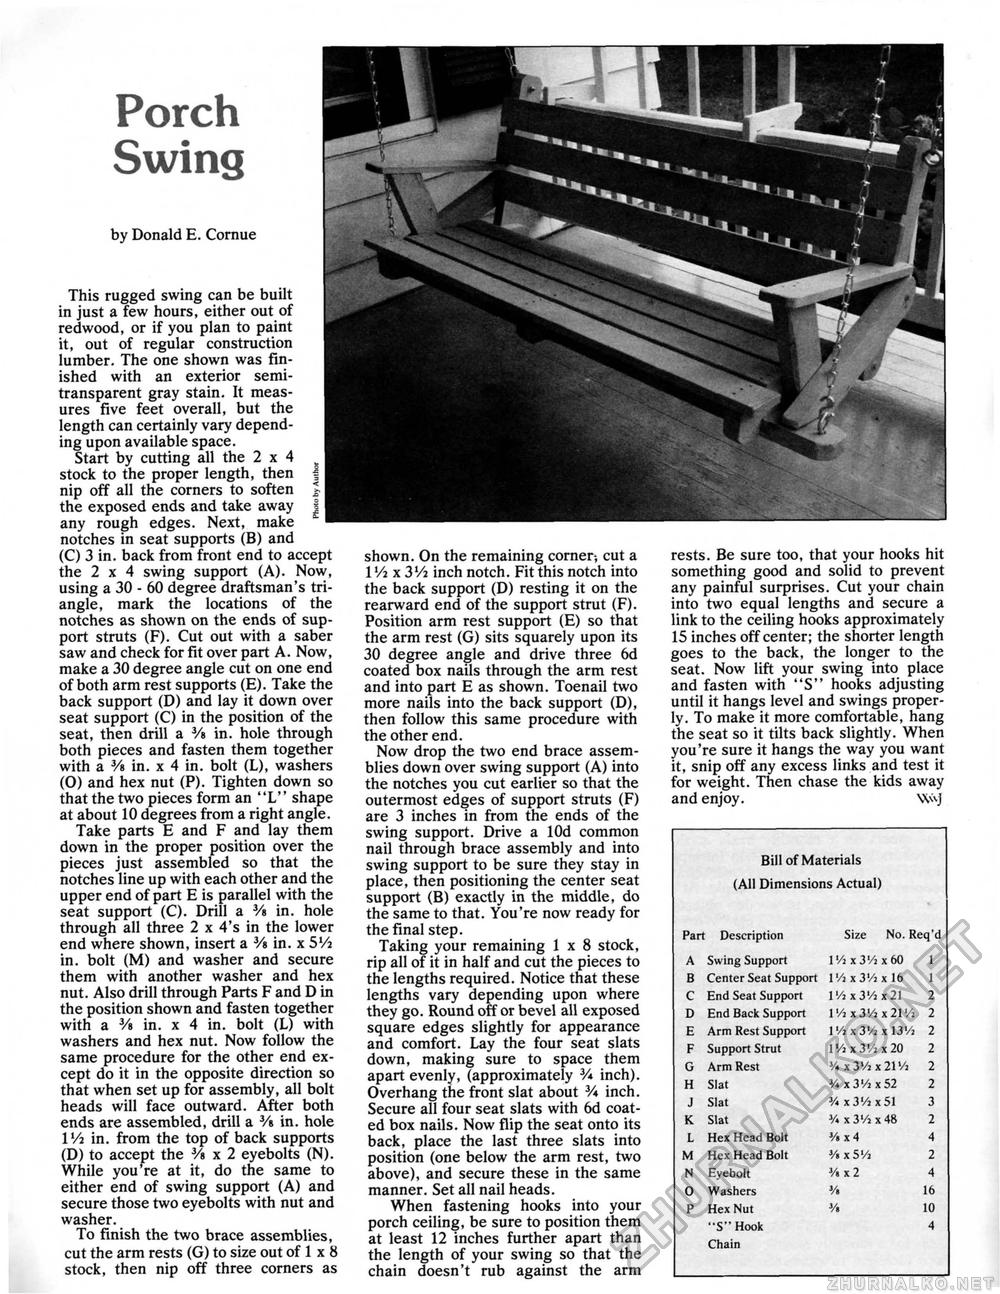
Porch Swing by Donald E. Cornue This rugged swing can be built in just a few hours, either out of redwood, or if you plan to paint it, out of regular construction lumber. The one shown was finished with an exterior semi-transparent gray stain. It measures five feet overall, but the length can certainly vary depending upon available space. Start by cutting all the 2 x 4 e stock to the proper length, then | nip off all the corners to soften J the exposed ends and take away J any rough edges. Next, make notches in seat supports (B) and (C) 3 in. back from front end to accept the 2x4 swing support (A). Now, using a 30 - 60 degree draftsman's triangle, mark the locations of the notches as shown on the ends of support struts (F). Cut out with a saber saw and check for fit over part A. Now, make a 30 degree angle cut on one end of both arm rest supports (E). Take the back support (D) and lay it down over seat support (C) in the position of the seat, then drill a Vs in. hole through both pieces and fasten them together with a Vs in. x 4 in. bolt (L), washers (O) and hex nut (P). Tighten down so that the two pieces form an "L" shape at about 10 degrees from a right angle. Take parts E and F and lay them down in the proper position over the pieces just assembled so that the notches line up with each other and the upper end of part E is parallel with the seat support (C). Drill a Vs in. hole through all three 2 x 4's in the lower end where shown, insert a Vs in. x 5'/j in. bolt (M) and washer and secure them with another washer and hex nut. Also drill through Parts F and D in the position shown and fasten together with a Vs in. x 4 in. bolt (L) with washers and hex nut. Now follow the same procedure for the other end except do it in the opposite direction so that when set up for assembly, all bolt heads will face outward. After both ends are assembled, drill a Vs in. hole IV2 in. from the top of back supports (D) to accept the Vs x 2 eyebolts (N). While you're at it, do the same to either end of swing support (A) and secure those two eyebolts with nut and washer. To finish the two brace assemblies, cut the arm rests (G) to size out of 1 x 8 stock, then nip off three corners as shown. On the remaining corner-, cut a 1 Vi x 3'/j inch notch. Fit this notch into the back support (D) resting it on the rearward end of the support strut (F). Position arm rest support (E) so that the arm rest (G) sits squarely upon its 30 degree angle and drive three 6d coated box nails through the arm rest and into part E as shown. Toenail two more nails into the back support (D), then follow this same procedure with the other end. Now drop the two end brace assemblies down over swing support (A) into the notches you cut earlier so that the outermost edges of support struts (F) are 3 inches in from the ends of the swing support. Drive a lOd common nail through brace assembly and into swing support to be sure they stay in place, then positioning the center seat support (B) exactly in the middle, do the same to that. You're now ready for the final step. Taking your remaining 1x8 stock, rip all of it in half and cut the pieces to the lengths required. Notice that these lengths vary depending upon where they go. Round off or bevel all exposed square edges slightly for appearance and comfort. Lay the four seat slats down, making sure to space them apart evenly, (approximately V* inch). Overhang the front slat about V* inch. Secure all four seat slats with 6d coated box nails. Now flip the seat onto its back, place the last three slats into position (one below the arm rest, two above), and secure these in the same manner. Set all nail heads. When fastening hooks into your porch ceiling, be sure to position them at least 12 inches further apart than the length of your swing so that the chain doesn't rub against the arm rests. Be sure too, that your hooks hit something good and solid to prevent any painful surprises. Cut your chain into two equal lengths and secure a link to the ceiling hooks approximately 15 inches off center; the shorter length goes to the back, the longer to the seat. Now lift your swing into place and fasten with "S" hooks adjusting until it hangs level and swings properly. To make it more comfortable, hang the seat so it tilts back slightly. When you're sure it hangs the way you want it, snip off any excess links and test it for weight. Then chase the kids away and enjoy. \\<vj Bill of Materials (All Dimensions Actual) Part Description Size No. Req'd Part Description Size No. Req'd
Chain Chain |


