Woodworker's Journal 1983-7-3, страница 34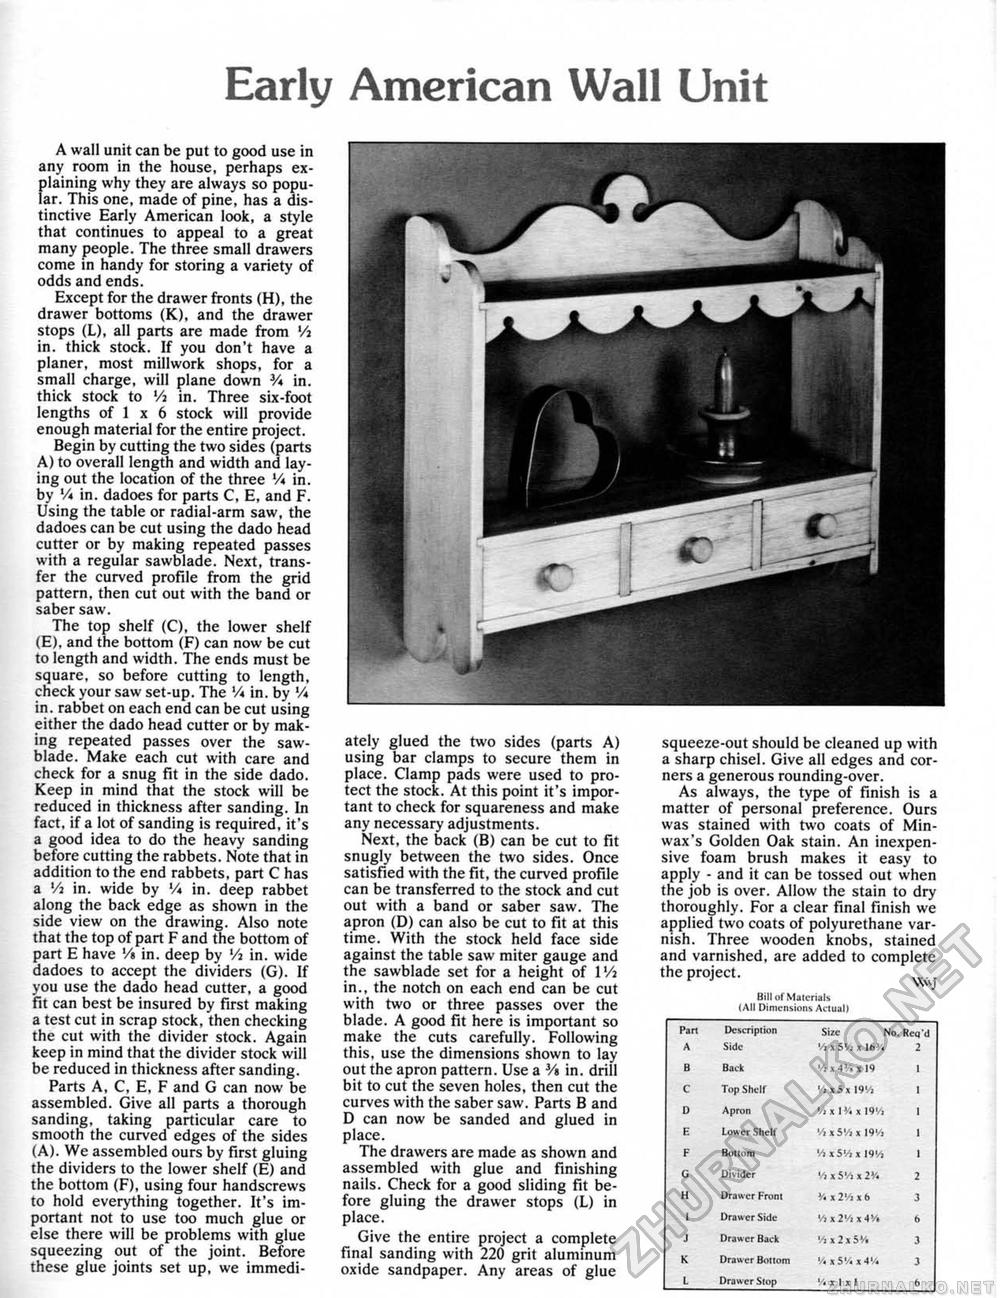
Early American Wall UnitA wall unit can be put to good use in any room in the house, perhaps explaining why they are always so popular, This one, made of pine, has a distinctive Early American look, a style that continues to appeal to a great many people. The three small drawers come in handy for storing a variety of odds and ends. Except for the drawer fronts (H), the drawer bottoms (K), and the drawer stops (L), all parts are made from '/a in. thick stock. If you don't have a planer, most millwork shops, for a small charge, will plane down 3A in. thick stock to '/a in. Three six-foot lengths of 1 x 6 stock will provide enough material for the entire project. Begin by cutting the two sides (parts A) to overall length and width and laying out the location of the three % in. by V* in. dadoes for parts C, E, and F. Using the table or radial-arm saw, the dadoes can be cut using the dado head cutter or by making repeated passes with a regular sawblade. Next, transfer the curved profile from the grid pattern, then cut out with the band or saber saw. The top shelf (C), the lower shelf (E), and the bottom (F) can now be cut to length and width. The ends must be square, so before cutting to length, check your saw set-up. The V* in. by '/« in. rabbet on each end can be cut using either the dado head cutter or by making repeated passes over the saw-blade. Make each cut with care and check for a snug fit in the side dado. Keep in mind that the stock will be reduced in thickness after sanding. In fact, if a lot of sanding is required, it's a good idea to do the heavy sanding before cutting the rabbets. Note that in addition to the end rabbets, part C has a '/i in. wide by V* in. deep rabbet along the back edge as shown in the side view on the drawing. Also note that the top of part F and the bottom of part E have '/s in. deep by l/a in. wide dadoes to accept the dividers (G). If you use the dado head cutter, a good fit can best be insured by first making a test cut in scrap stock, then checking the cut with the divider stock. Again keep in mind that the divider stock will be reduced in thickness after sanding. Parts A, C, E, F and G can now be assembled. Give all parts a thorough sanding, taking particular care to smooth the curved edges of the sides (A). We assembled ours by first gluing the dividers to the lower shelf (E) and the bottom (F), using four handscrews to hold everything together. It's important not to use too much glue or else there will be problems with glue squeezing out of the joint. Before these glue joints set up, we immedi ately glued the two sides (parts A) using bar clamps to secure them in place. Clamp pads were used to protect the stock. At this point it's important to check for squareness and make any necessary adjustments. Next, the back (B) can be cut to fit snugly between the two sides. Once satisfied with the fit, the curved profile can be transferred to the stock and cut out with a band or saber saw. The apron (D) can also be cut to fit at this time. With the stock held face side against the table saw miter gauge and the sawbiade set for a height of VA in., the notch on each end can be cut with two or three passes over the blade. A good fit here is important so make the cuts carefully. Following this, use the dimensions shown to lay out the apron pattern. Use a J/» in, drill bit to cut the seven holes, then cut the curves with the saber saw. Parts B and D can now be sanded and glued in place. The drawers are made as shown and assembled with glue and finishing nails. Check for a good sliding fit before gluing the drawer stops (L) in place. Give the entire project a complete final sanding with 220 grit aluminum oxide sandpaper. Any areas of glue squeeze-out should be cleaned up with a sharp chisel. Give all edges and corners a generous rounding-over. As always, the type of finish is a matter of personal preference. Ours was stained with two coats of Min-wax's Golden Oak stain. An inexpensive foam brush makes it easy to apply - and it can be tossed out when the job is over. Allow the stain to dry thoroughly. For a clear final finish we applied two coats of polyurethane varnish. Three wooden knobs, stained and varnished, are added to complete the project. W\v[ BID of Materials IA3I Dimensions Actual) BID of Materials IA3I Dimensions Actual)
|
||||||||||||||||||||||||||||||||||||||||||||||||


