Woodworker's Journal 1983-7-3, страница 36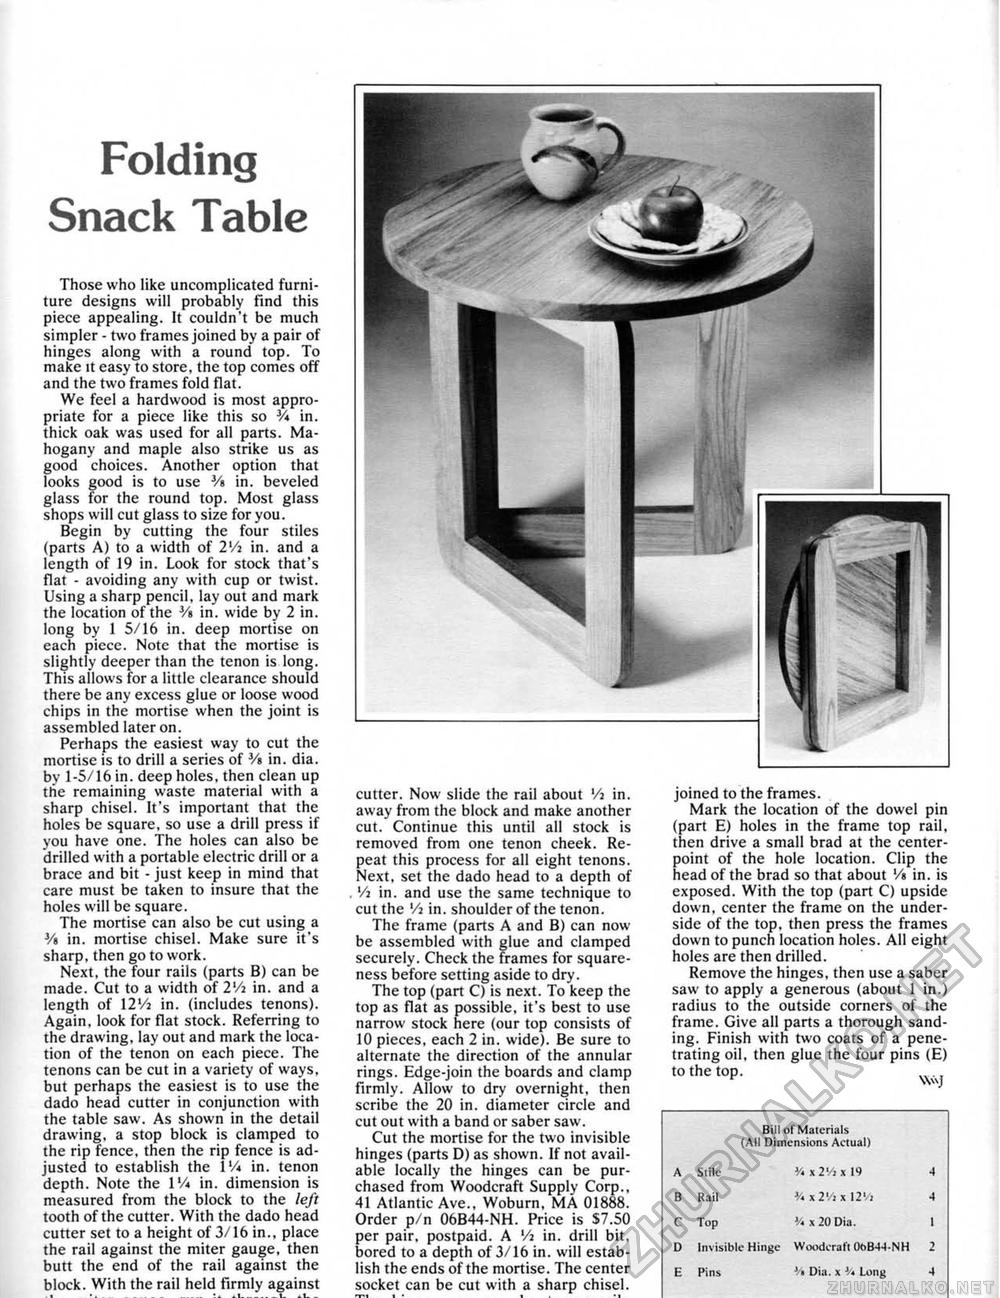
Folding Snack TableThose who like uncomplicated furniture designs will probably find this piece appealing. It couldn't be much simpler - two frames joined by a pair of hinges along with a round top. To make it easy to store, the top comes off and the two frames fold flat. We feel a hardwood is most appropriate for a piece like this so V* in. thick oak was used for all parts. Mahogany and maple also strike us as good choices. Another option that looks good is to use Vt in. beveled glass for the round top. Most glass shops will cut glass to size for you. Begin by cutting the four stiles (parts A) to a width of 2'/a in. and a length of 19 in. Look for stock that's flat - avoiding any with cup or twist. Using a sharp pencil, lay out and mark the location of the Vi in. wide by 2 in. long by 1 5/16 in. deep mortise on each piece. Note that the mortise is slightly deeper than the tenon is long. This allows for a little clearance should there be any excess glue or loose wood chips in the mortise when the joint is assembled later on. Perhaps the easiest way to cut the mortise is to drill a series of Vt in. dia. by 1-5/16 in. deep holes, then clean up the remaining waste material with a sharp chisel. It's important that the holes be square, so use a drill press if you have one. The holes can also be drilled with a portable electric drill or a brace and bit - just keep in mind that care must be taken to insure that the holes will be square. The mortise can also be cut using a % in. mortise chisel. Make sure it's sharp, then go to work. Next, the four rails (parts B) can be made. Cut to a width of 2'A in. and a length of 12Vi in. (includes tenons). Again, look for flat stock. Referring to the drawing, lay out and mark the location of the tenon on each piece. The tenons can be cut in a variety of ways, but perhaps the easiest is to use the dado head cutter in conjunction with the table saw. As shown in the detail drawing, a stop block is clamped to the rip fence, then the rip fence is adjusted to establish the IVi in, tenon depth. Note the 1% in. dimension is measured from the block to the left tooth of the cutter. With the dado head cutter set to a height of 3/16 in., place the rail against the miter gauge, then butt the end of the rail against the block. With the rail held firmly against cutter. Now slide the rail about Vi in. away from the block and make another cut. Continue this until all stock is removed from one tenon cheek. Repeat this process for all eight tenons. Next, set the dado head to a depth of '/j in. and use the same technique to cut the l/i in. shoulder of the tenon. The frame (parts A and B) can now be assembled with glue and clamped securely. Check the frames for squareness before setting aside to dry. The top (part C) is next. To keep the top as flat as possible, it's best to use narrow stock here (our top consists of 10 pieces, each 2 in. wide). Be sure to alternate the direction of the annular rings. Edge-join the boards and clamp firmly. Allow to dry overnight, then scribe the 20 in. diameter circle and cut out with a band or saber saw. Cut the mortise for the two invisible hinges (parts D) as shown. If not available locally the hinges can be purchased from Woodcraft Supply Corp., 41 Atlantic Ave,, Woburti, MA 01888. Order p/n 06B44-NH. Price is S7.50 per pair, postpaid. A Vj in, drill bit, bored to a depth of 3/16 in. will establish the ends of the mortise. The center socket can be cut with a sharp chisel. *T"»1 I » I * t joined to the frames. Mark the location of the dowel pin (part E) holes in the frame top rail, then drive a small brad at the center-point of the hole location. Clip the head of the brad so that about V» in. is exposed. With the top (part C} upside down, center the frame on the underside of the top, then press the frames down to punch location holes. All eight holes are then drilled. Remove the hinges, then use a saber saw to apply a generous (about 1 in.) radius to the outside corners of the frame. Give all parts a thorough sanding, Finish with two coats of a penetrating oil, then glue the four pins (E) to the top. Bill ol Materials (All Dimensions Actual) A Stile V* xlVi x 19 4 B Rail }A x2V, x \2Vi 4 C Top Vt, x 20 Dia. 1 D Invisible Hinge Woodcraft QbB-l-t-NH 2 E Pins W Dia. x J/« Long 4 |


