Woodworker's Journal 1983-7-3, страница 49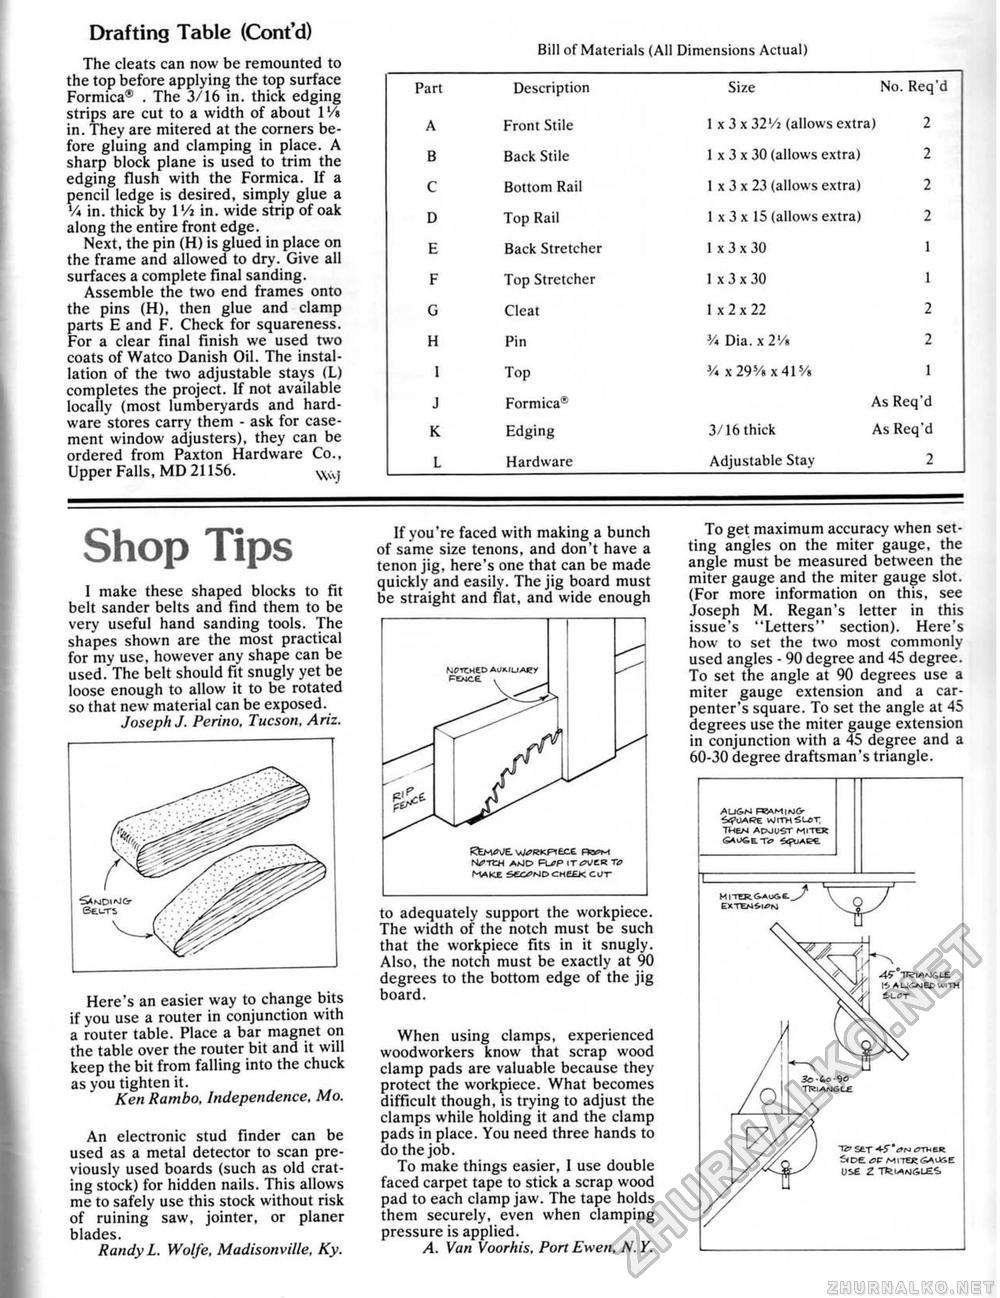
Bill of Materials (All Dimensions Actual) Bill of Materials (All Dimensions Actual)
Drafting Table (Cont'd) The cleats can now be remounted to the top before applying the top surface Formica® . The 3/16 in. thick edging strips are cut to a width of about 1Vt in. They are mitered at the corners before gluing and clamping in place. A sharp block plane is used to trim the edging flush with the Formica. If a pencil ledge is desired, simply glue a V* in. thick by l'/i in. wide strip of oak along the entire front edge. Next, the pin (H) is glued in place on the frame and allowed to dry. Give all surfaces a complete final sanding. Assemble the two end frames onto the pins (H), then glue and clamp parts E and F. Check for squareness. For a clear final finish we used two coats of Watco Danish Oil. The installation of the two adjustable stays (L) completes the project. If not available locally (most lumberyards and hardware "stores carry them • ask for casement window adjusters), they can be ordered from Paxton Hardware Co., Upper Falls. MD 21156. Shop TipsI make these shaped blocks to fit belt sander belts and find them to be very useful hand sanding tools. The shapes shown are the most practical for my use, however any shape can be used."The belt should fit snugly yet be loose enough to allow it to be rotated so that new material can be exposed, Joseph J. Perino. Tucson, Ariz. Here's an easier way to change bits if you use a router in conjunction with a router table. Place a bar magnet on the table over the router bit and it will keep the bit from falling into the chuck as vou tighten it. Ken Ram bo. Independence, Mo. An electronic stud finder can be used as a metal detector to scan previously used boards (such as old crating stock) for hidden nails. This allows me to safely use this stock without risk of ruining saw, jointer, or pianer blades. Randy L. Wolfe, Madisonville, Ky. If you're faced with making a bunch of same size tenons, and don't have a tenon jig, here's one that can be made quickly and easily. The jig board must be straight and flat, and wide enough that the workpiece fits in it snugly. Also, the notch must be exactly at 90 degrees to the bottom edge of the jig board. When using clamps, experienced woodworkers know that scrap wood clamp pads are valuable because they protect the workpiece. What becomes difficult though, is trying to adjust the clamps while holding it and the clamp pads in place. You need three hands to do the job, To make things easier, I use double faced carpet tape to stick a scrap wood pad to each clamp jaw. The tape holds them securely, even when clamping pressure is applied. A. Van Voorhis, PortEwen, N.Y. To get maximum accuracy when setting angles on the miter gauge, the angle must be measured between the miter gauge and the miter gauge slot. (For more information on this, see Joseph M. Regan's letter in this issue's "Letters" section). Here's how to set the two most commonly used angles - 90 degree and 45 degree. To set the angle at 90 degrees use a miter gauge extension and a carpenter's square. To set the angle at 45 degrees use the miter gauge extension in conjunction with a 45 degree and a 60-30 degree draftsman's triangle. 12*StT 4-5" trrhtR. Side, oc m,-tertiauf.e Ui£ Z TJt'^MdLEi |
||||||||||||||||||||||||||||||||||||||||||||||||||||


