Woodworker's Journal 1983-7-3, страница 48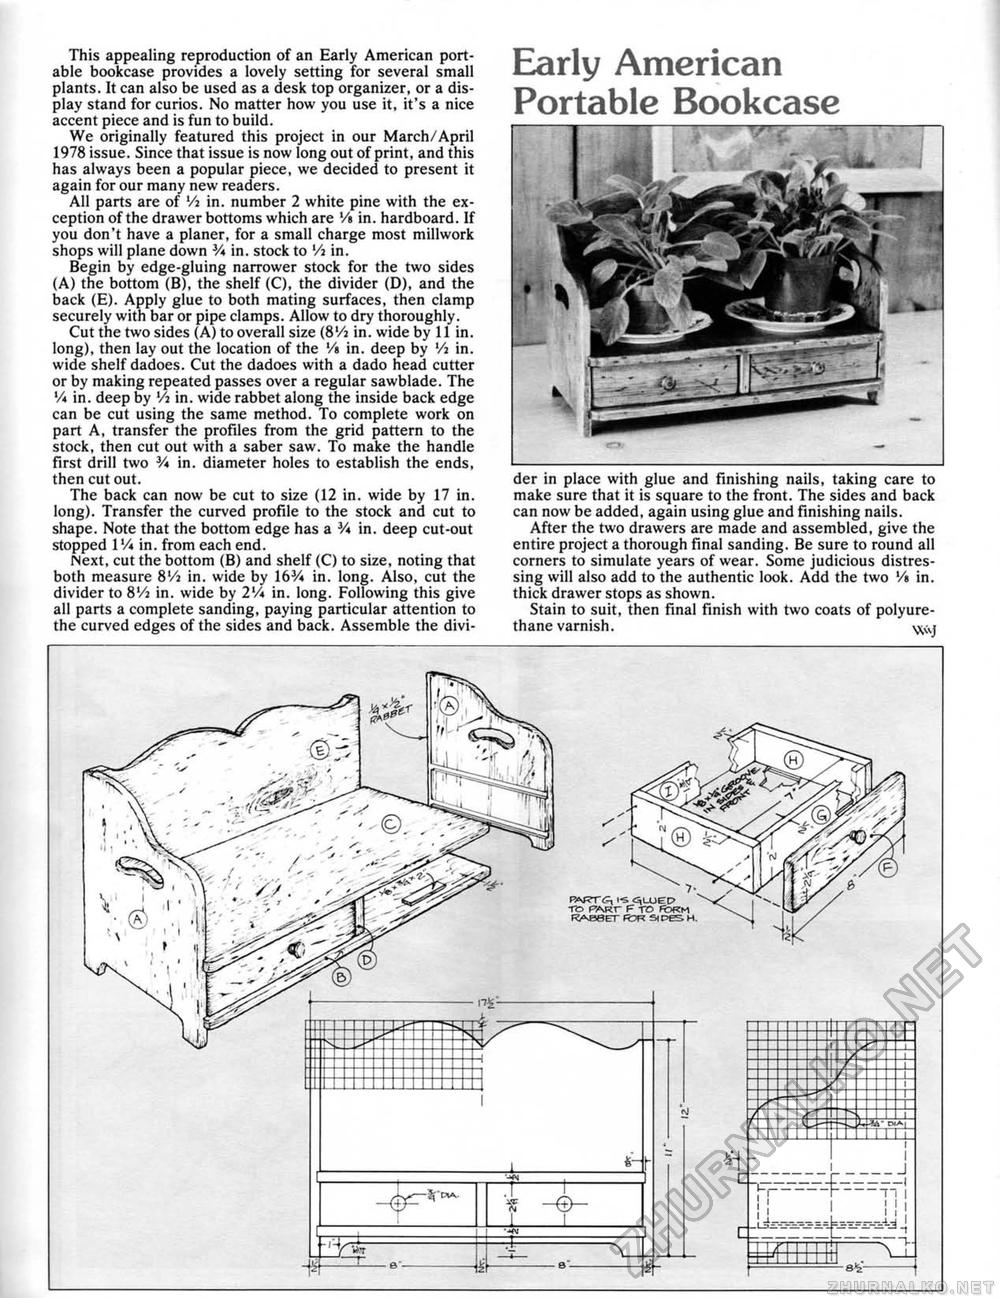
This appealing reproduction of an Early American portable bookcase provides a lovely setting for several smali plants. It can also be used as a desk top organizer, or a display stand for curios. No matter how you use it, it's a nice accent piece and is fun to build. We originally featured this project in our March/April 1978 issue. Since that issue is now long out of print, and this has always been a popular piece, we decided to present it again for our many new readers. All parts are of Vi in. number 2 white pine with the exception of the drawer bottoms which are 'A in. hardboard. If you don't have a planer, for a small charge most millwork shops will plane down V* in. stock to Vi in. Begin by edge-gluing narrower stock for the two sides (A) the bottom (B), the shelf (C), the divider (D), and the back (E). Apply glue to both mating surfaces, then clamp securely with bar or pipe clamps. Allow to dry thoroughly. Cut the two sides (A) to overall size (8'/a in. wide by 11 in. long), then lay out the location of the '/« in. deep by *A in. wide shelf dadoes. Cut the dadoes with a dado head cutter or by making repeated passes over a regular sawblade. The '/«in. deep by Vi in. wide rabbet along the inside back edge can be cut using the same method. To complete work on part A, transfer the profiles from the grid pattern to the stock, then cut out with a saber saw. To make the handle first drill two 3A in. diameter holes to establish the ends, then cut out. The back can now be cut to size (12 in. wide by 17 in. long). Transfer the curved profile to the stock and cut to shape. Note that the bottom edge has a V* in. deep cut-out stopped 1 lA in. from each end. Next, cut the bottom (B) and shelf (C) to size, noting that both measure 8V% in. wide by 163A in, long. Also, cut the divider to 8'/a in. wide by 2lA in. long. Following this give all parts a complete sanding, paying particular attention to the curved edges of the sides and back. Assemble the divt- Early American Portable Bookcase der in place with glue and finishing nails, taking care to make sure that it is square to the front. The sides and back can now be added, again using glue and finishing nails. After the two drawers are made and assembled, give the entire project a thorough final sanding. Be sure to round all corners to simulate years of wear. Some judicious distressing will also add to the authentic look. Add the two 'A in. thick drawer stops as shown. Stain to suit, then final finish with two coats of polyure-thane varnish, |


